
Well, it’s been a month and a half since I upgraded to Leopard and overall, I really like it. However, what I would really
Read MoreMonth: December 2007
OtterBox for iPhone
Review
 I’m happy to find an iPhone case I can recommend. The OtterBox from Otter Products is a stylish, rugged product that looks like it ought to be on the hip of an architect at a work site.
Macspiration 105
A Quick Tip: Changing Icons on Your Stacks in Leopard

I haven’t decided if I like the new Stacks feature in Leopard or not, but what I don’t like is how the icon of the stack is the icon of first alphabetical item in the folder you put in the Dock for a stack. This Macspiration will tell you how to fix that.
Serendipity Happens- The Swiss Gear “Maxxum” Computer Backpack
Review

I’ve decided to attend my first MacWorld Expo and there is no way I’m going with my old computer bag, lugging it all over Moscone Center, cutting off circulation in my shoulder for a week. What better time than now to test a computer bag?
Three FM iPod car adapters
Reviewed
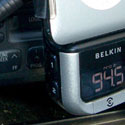
Our MyMac.com rankings blend objective quality with subjective personal experience. Your audio signal mileage may vary a lot from mine. If you can try before you buy, or return/exchange if not completely thrilled, you’ll eventually be satisfied by one of these units.
Klix
Review

Klix is a utility that recovers photos from digital cameras and memory cards. Klix can’t recover digital image files that have been partially or completely overwritten, but that caveat aside, Klix provides a quick and easy way to bring lost files back.
MyMac Podcast #159
Cool Mac Picks and Expo

Download the show here, via iTunes, or listen above
A full show this week with Tim, Chad, Guy, Rich, and Russ to kick it off. We look at some of the rumors and speculation on upcoming Apple products, Think Secret going off-line, and ringtones from GarageBand for your iPhone. John Nemo plays with the Edirol R-09 in a car, along with the Jalapeno Chorus. Finally, Sam Levin joins Tim and Chad for a Cool Mac Picks for the first time in months!
As always, we would love to have some feedback. Send us an email here, or simply call 1-801-938-5559 and leave a message.

Subscribe to us in iTunes.
Links from the show
Sam Levin
Vaja Cases
Go + Play
Evolve speaker system
iTalk Pro
Sanyo Xacti
Axiotron Modbook
Prosoft Engineering
Christmas Aussie-style Part II
A friend included this on a Christmas card. I thought you might like to know what REALLY happened. THE CHRISTMAS STORY ——————– There were
Read MoreExpert Mouse Optical USB Trackball
Review
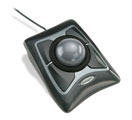
Over the years, I’ve used just about every type of mouse out there: Apple’s one-button mouse, trackballs, corded and wireless, small and large, two button up to multi-button. I even used the Kensington Turbo Mouse (version 3) during the mid-90’s and enjoyed its capabilities and ease of use. Fast forward to the present time and here I am using Kensington’s Expert Mouse, the descendent of the Turbo Mouse. How does it hold up?
Griffin iClear, Reflect, and Elan Form hard cases for iPod nano (3rd Generation) – Review
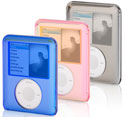
New iPods mean new cases, and just in time for stuffing those Christmas stockings. Here we take a look at Griffin’s new line of hard cases for the iPod nano. BONUS: Make your own nano lanyard.
U-Suit Folio for iPhone
Review

Another iPhone case arrived from Uniea review; the U-Suit Folio. Following hard on the heels of the U-Suit iPhone case, which I rated very highly, I expected another great iPhone case. Sadly, that was not the case.
Mac OS X Leopard Pocket Guide
Book Review

Like previous versions of Chuck Toporek’s Pocket OS X guides, Mac OS X Leopard Pocket Guide packs a lot of useful information into a compact format. If you travel a lot you might find yourself thinking of this little book as a handy security blanket.
Read MoreThe Artist’s Guide to GIMP Effects
Book Review

GIMP, or the GNU Image Manipulation Program to give it its proper name, is a graphics-editing program broadly similar to Adobe Photoshop in terms of functionality. The GIMP is an open source program that can be freely downloaded and installed on most computers, including maps. But on the downside it doesn’t come with a manual, so figuring out how to use GIMP can be tricky. Read the full review here.
Macspiration 104
Dead Dock Icons

Have you ever had an icon in your dock stop working? You click the icon for a program (maybe Mail), and the program never launches? The icon never bounces? The odds are that the link to the actual program has been broken. How do you fix it? Read on!
MyMac Podcast #158
Download here, via iTunes, or listen above.
With no big Apple or Mac news, Tim, Chad, and Guy look forward to Macworld Expo, and invite any and all listeners for a get together during the event. Also up this week, Nemo interviews educator Sharon Price using the Edirol R-09.
As always, we would love to have some feedback. Send us an email here, or simply call 1-801-938-5559 and leave a message.
Subscribe to us in iTunes.
Links from the show
Macworld Expo
Imaingo speakers
EA Games
Edirol R-09
Hewlett-Packard Photosmart 7280 All-In-One Printer
Review
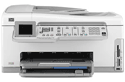
While there are some drawbacks to having all your printing/scanning/copying/faxing eggs in one mechanical basket, I love the convenience of having only one box to deal with. When I was offered the chance to review the Photosmart 7280, I jumped at the chance.
Four iPod Classic Cases
Review

iPod case selection is one of the most random, haphazard, subjective purchases made by iPod owners. The four cases being reviewed address most of the concerns an iPodder will have once the case is in active use. An iPod 80GB Classic was used for these evaluations. Both ezGear and OtterBox have comparable cases for all the latest (and many previous) iPods, plus the iPhone.
Using iWeb 08
Part 6
![]()
If you have stuck with me so far, I’ve talked a lot about how to use iWeb’s powerful built-in tools, how to make your own navigation bar, and how to set up Master Pages. What have I left out? Oh yeah, some other tools you may find useful and actually using the program.
Mac OS X 10.5 Leopard – Peachpit Learning Series
Book Review

Whether you are an experienced Mac user, new to the Mac or just switching over from a PC, you won’t go wrong by getting renowned Mac author Robin Williams’ new book, Mac OS X 10.5 Leopar
Macspiration 103
Quicktips for Quick Look
One of my favorite features of Leopard is Quick Look. Quick Look allows you to see the contents of a file without opening that file in its program. For example, a spreadsheet can be viewed through Quick Look without opening Charts or Excel. This article contain a few Quick Look tips that you might not know.