Five NewerTech iPhone Audio Accessories Reviewed

On April 30, 2008, in Uncategorized, by David Weeks


Five iPhone Audio Accessories
Company: NewerTech

http://www.newertech.com/
Prices: $8 – $20

Special thanks to John "Nemo" Nemerovski, who assisted on this review.


iPhone Headphone Jack Adapter
Price: $8

For a small amount of money you can buy this small adapter that opens your iPhone’s non-standard recessed jack to an enormous quantity of non-iPhone headphones, earphones, and earbuds. If you are happy with the earphones that ship with the iPhone, or if you already own special-plug compatible headphones, you won’t need this adapter. But if you own or want to buy a set of incompatible headphones, you’ll need an adapter such as this one. It’s flexible, almost weightless, with a good fit at each end. This product is excellent value for a simple solution. A slightly thicker cable would make it more robust.

MyMac rating: 4 out of 5

NOTE: The following four items do not require a jack adapter.


iPhone Mic Extender Cable with On/Off Switch
Price: $15

Third party headphones often fit better and sound better than Apple’s earbuds. With this microphone extender cable, any and all non-microphone equipped headphones can be used both for music and conversation with an iPhone. Built-in features are an on/off switch and a small stability clip. We tested it using original Apple white iPhone ‘buds. Listeners on the receiving end of iPhone calls said the microphone quality was crisp and clear, albeit with a little too much treble.

This gadget has a lot of potential; plenty of people who already own good-quality earbuds don’t want to give them up when they purchase an iPhone. The fly in the iPhone ointment is that the iPhone’s audio jack is not a standard mini-jack receptacle; Apple has engineered it to require a slightly longer plug.

Newer’s Mic Extender is an an adapter plug with an in-line microphone. You can use any earbuds, and Newer adapts the plug, and provides the microphone, as well.

For the iPhone user, the price is right, and the product does exactly what it’s supposed to do.

MyMac rating: 5 out of 5


iPhone Hands-Free Mic & Earbud
Price: $20

These earpiece drivers are nicely angled for a comfortable fit, with asymmetrical cables left/right. Noise cancellation is minimal, as is bass response. The audio is not something you’d write home about, and it isn’t much better than Apple’s original iPhone buds.

You can’t beat the price on this single solution for iPhone listening and talking. Voice quality is at the "just okay; good but not great" end of fidelity compared to others we’ve used, but none of them is especially noteworthy in the conversation category.

For music playback, these buds are rather a dud, but again are exceptional value for money. The company web site offers two raves, including one by our pal Bill Palmer. When you’re on a tight budget, this mic/earphone will suffice, but considering how much you’ve spent on iPhone and monthly service, MyMac.com recommends you instead choose a superior competitor.

MyMac rating: 3 out of 5

Improved Bass Response iPhone/iPod Music Earbuds
Price: $20

These buds may not be for you if you REALLY want improved bass response, friends, but they do a good job for the price. Our listening panel can’t determine if the audio is in any way better overall than NewerTech’s iPhone Hands-Free Mic & Earbud, reviewed just above. The recessed-jack compatibility is a plus, but if you only want to spend $20 to achieve enhanced bass, you’re out of luck. For best buds per buck under $50, we still recommend these, reviewed here. On a positive note, the NewerTech "improved bass" earbuds share the exceptional comfort and value of the other items we’re evaluating in this roundup.

MyMac rating: 3 out of 5

Portable iPhone & iPod Auto Charger
Price: $13

Thirteen dollars will not be your lucky number if your car’s cigarette lighter cavity is on a diet. This charger won’t fit into Nemo’s VW Beetle’s three 12V accessory outlet, and insertion in Weeks’ car was possible only by squeezing hard on the plug’s little springs and pushing harder than should be necessary. Once inserted, auto iPhone charging was effortless. If it fits, use it. If it doesn’t fit, give it to a friend whose car is more compatible.

MyMac rating: 3 out of 5.

Bonus rants: Why do so many companies make it difficult for users to locate "L" and "R"? And why can’t NewerTech provide a couple of different-size eartips, to accommodate all potential earbud listeners?


BusySync 2.0 – Review

On April 29, 2008, in Uncategorized, by Gil Poulsen


BusySync 2.0
Company: BusyMac

Price: $24.95 ($19.95 through end of April), discounts for multiple licenses applied at checkout
http://www.busymac.com/

As useful as Apple’s .Mac sync services can be for families and small workgroups, there are a number of issues with its iCal synchronization that have kept me on the lookout for viable alternatives. My specific concerns with .Mac revolve around the following:

• Users on the same .Mac account cannot share some calendars while keeping others private; with .Mac it’s all or nothing
• The .Mac service is prone to service outages that, depending on your perspective, range from the occasional to the all-too-frequent
• For many OS X 10.5 (Leopard) users, particularly those in a mixed environment of OS X 10.4 (Tiger) and Leopard machines, the problems with .Mac calendar synchronization are legion (see info and possible solutions here)

Having unsuccessfully applied various fixes to address the latter issue for a number of my clients, I was eager to provide an alternative that would be easy to configure, inexpensive, and at least as reliable as .Mac. That ruled out the new group calendaring options in Leopard Server (too expensive at $999), as well as setting up a Mac-based WebDAV server using the example info at Greg Westin’s site (configuration and troubleshooting far beyond the abilities of a “normal” user).

As if on cue, enter BusySync. This program easily fulfilled the above requirements, and after spending a few days trying it out, my clients have been able to disable their .Mac calendar synchronization without missing a beat. For one design group, we have it working over the Internet as well as locally, after doing some simple port mapping at their router (more on that later).

BusySync installs as a preference pane and is dead simple to configure. In the “Publish” tab, all your iCal calendars are displayed in the precise order each calendar appears in iCal (a nice touch if you’ve got a lot of calendars and you’re a neat-freak like me). To share any or all calendars, you simply check the box in the “Publish” column, whereby you are prompted to enter passwords to allow read-only or read-write access for each. If you don’t enter any passwords, those who subscribe to your calendar(s) can view and edit them without restriction. This ability to keep some calendars private, while allowing others to be viewed or edited—with or without password protection—represents a quantum leap beyond .Mac’s bare-bones calendar sharing.


In BusySync’s “Publish” tab, all your iCal calendars appear, in the precise order in which you’ve arranged them in the iCal program. Just click the Publish button, set passwords for read only or read/write access, and your calendar is instantly available to anyone else on your local network.

Thanks to Apple’s Bonjour networking technology, any calendars you’ve chosen to publish appear automatically for all other users on your local network. To subscribe to other users’ calendars, click the “Subscribe” tab and place a check in the box next to each calendar you wish to access. If said calendar is password-protected you’ll be prompted to enter the password at this point. The calendar(s) to which you’ve subscribed will then appear in your iCal application and, like your own calendars, can be assigned a unique color if you desire via the Info tab. In this way, multiple users can edit multiple calendars, with all changes synchronized immediately over the network.

That’s really all there is to it in terms of calendar sharing and syncing over a local network. The programmers were thoughtful enough to include not only a “Reset Busy Sync” option, which turns off all your published calendars while removing all calendars to which you’ve subscribed, but also a “Restore iCal from Backup” option (via any one of the ten daily backups BusySync creates of your entire iCal database). So even if a wonky iPhone or Treo—or fumble-fingered family member—fouls up your calendar data after a sync, the BusySync folks have your back. There’s also a handy “Reset Sync History” button that saves you a trip to the iSync preferences should you find you need a complete reset of your sync history, something that seems to be required all-too-often when multiple users try to keep calendar and contact data synced reliably via .Mac.

Ah, but how does BusySync stack up against .Mac when it comes to sharing calendars across the Internet? Quite well, as it turns out. If you’re the patient sort, who doesn’t demand instantaneous updates to shared calendars, you can still view and edit both your published and subscribed calendars to your heart’s content when offsite. Any changes you make to your own published calendars—as well as those to which you’ve subscribed—will be synchronized with all other users when you reconnect to your local network.

On the other hand, perhaps you require constantly-updated calendar info, regardless of your location. Never fear, BusySync has this scenario covered as well. By setting your calendars to publish using a static port number (BusyMac suggests 4990 but you can use any port you wish) and mapping this port in your router to the your machine’s IP address, you and other users can view and edit your calendars from across the vast reaches of the Internet using BusySync’s “Add Remote Server” option. If this sounds intimidating to configure, rest assured that the BusySync online user’s guide covers this setup in great detail.

As if that weren’t enough, the technophobes among you will be encouraged to know that once port mapping has been configured at your router and your calendars have been subscribed to locally, BusySync is smart enough to determine whether you’re sitting on your local network or sitting at your local Starbucks, and present all subscribed calendars to you accordingly. Note that updates to calendars when accessed over the Internet may take a few moments to register, but that seems a small price to pay for all this functionality and convenience.


BusySync allows you to use your Google calendar account as a “conduit” through which you can synchronize your iCal calendars. Clicking the “Publish to Google” box by any of your calendars not only makes them available to you from your Google account, but allows other BusySync-equipped Macs on remote networks to subscribe and synchronize.

Plus, thanks to the Google Calendar syncing options in version 2.0, you can employ a Google calendar as a “conduit” to enable you to sync multiple iCal calendars without needing to bother with the port mapping/Remote Server setup described above. Once you’ve configured BusySync with your Google account login, simply publish the calendar to Google from one computer via BusySync, then subscribe to it on another computer from the list of published Google calendars that appear in BusySync’s Google tab. If you have alarms set up for various iCal events, rest assured that they’ll also be synced to the Google version of your calendars. When you’re viewing your calendar on Google, you can choose to have those alarms appear as pop-ups, text messages or email alerts.

All in all, I find myself hard-pressed to conjure up any negatives about this product. The price is extremely reasonable at $24.95 ($19.95 through the end of April), and BusyMac offers 10% discounts on five copies or more, 20% when ten or more are purchased and a whopping 30% off for orders of 25+. It’s one of those apps that “just works,” and I now have two clients in the field using it without incident, both of whom are quite pleased to be freed from the vagaries and idiosyncrasies of iCal syncing via .Mac. It’s probably unfair to point out that BusySync can’t sync contact info as .Mac can, but it doesn’t claim to be a complete .Mac replacement, only a simple, reliable way to publish and subscribe to iCal calendars.

In the course of a phone conversation a few months back, one of the BusyMac principals indicated to me that they were exploring the development of a contact-syncing application that would allow Address Book to publish and subscribe, in much the same way BusySync manages this for iCal. Given that the founders of BusyMac, Dave Riggle and Tom Chaffee, brought us the venerable Now Up-To-Date, they certainly seem up to the task.

Here’s hoping it’s already on their calendar.

MyMac.com Rating: 5 out of 5


Exposure Photo Workshop
by Jeff Wignall

Wiley Photo Workshop Series
http://www.photoworkshop.com
ISBN 978-0-470-11435-3, 299 pages
$29.99 US, $35.99 CN, £19.99 UK

*SEE JEFF WIGNALL INTERVIEW BELOW*


Portrait and Candid Photography Photo Workshop
by Erin Manning

Wiley Photo Workshop Series
http://www.photoworkshop.com
ISBN 978-0-470-14785-6, 299 pages
$29.99 US, $35.99 CN, £19.99 UK


Macro Photography Photo Workshop
by Haje Jan Kamps

Wiley Photo Workshop Series
http://www.photoworkshop.com
ISBN 978-0-470-11876-4, 299 pages
$29.99 US, $35.99 CN, £19.99 UK


Photographing Children Photo Workshop
by Ginny Felch and Allison Tyler Jones

Wiley Photo Workshop Series
http://www.photoworkshop.com
ISBN 978-0-470-11432-2, 299 pages
$29.99 US, $35.99 CN, £19.99 UK

Wiley Publishing teams up with PhotoWorkshop.com in these four titles, plus three more we haven’t received yet: Composition, Lighting, and Photos that Inspire. Every page in each book is loaded with colorful examples and comprehensive instructional material. Images are large and expressive, and type is just the right size for easy reading, without too much text on a page.

Tutorials and illustrated examples are concise and straightforward. Authors write in a relaxed first person style that is comfortable to read once, or over and over. Technical and equipment details are delivered in a non-threatening way, with specific suggestions that will benefit most readers.

All demonstration photos are first rate, but are not so intimidating that plain folks can’t produce them with the help of these experienced authors. Both color and black and white examples are used, which we applaud.

When topics turn from physical photography to computers and the digital darkroom, Mac screenshots are used with Adobe’s affordable Photoshop Elements software. You won’t become an expert at Photoshop from this series, but you can easily achieve camera and subject mastery.

Do you understand the difference between using flash to illuminate a night scene, and fill flash during daylight hours? Do you know how to design a photo in your mind before you put camera up to your eyes? Can you comfortably get up close and personal with your human subjects to explore areas of the human body with a macro lens? Do you know the optimum shutter speeds for stopping motion of people doing active sports?

MyMac has reviewed dozens of photo technique titles, and this Photo Workshop series stands out. By addressing specific methods, one per volume, the expert authors are able to give multiple examples and techniques that you can learn sequentially or by skipping around pages and chapters.

Each chapter ends with an assignment you’ll want to complete after having read about its technique. Readers are encouraged to join the online community here. You can "view what other readers have created," then "post comments and read other encouraging suggestions and feedback."

Included are glossaries of technical terms, plus software and web site recommendations. Photo captions are excellent, as are the numerous tips and supplemental sidebar suggestions.

Most of my adult photo students don’t proceed past beginner status. They are uncomfortable with their cameras, and with books that claim to deliver successful methods. I’m going to circulate the books in this Photo Workshop series during future class sessions, and watch my students welcome the refreshing look and feel of the series’ hands-on material.

Book Bytes could devote many dozens of paragraphs to raving about Wiley Publishing and their collaborators at PhotoWorkshop.com. Instead, we’ll leave you with high praise for this series, and a strong recommendation that any and all of its titles will make you a better photographer. More than anything else, this series propels readers to pick up a camera and have a little fun while becoming a better photographer.

- – - – - – - – - – - – - – - -

Here’s a fascinating interview with JEFF WIGNALL, author of the Exposure title.

MYMAC: How can people know if their cameras are metering accurately when set for auto exposure?

JEFF: Digital cameras are so reliable and their metering systems so accurate, that I think if there was a real problem with the metering/exposure system, it would be pretty obvious because the exposures would be consistently bad. To be honest though, I’ve never seen that happen.

The real problems come, not from the hardware, but from metering the wrong areas of the subject and not knowing how the camera’s light meter will respond to certain subjects. For example, all light meters are all designed to record whatever you point them at as a medium tone (in black and white that would be a medium gray tone, for example). If you aim the meter at a white swan, you’ll get a gray swan. If you aim it at a black cat, you’ll get a gray cat. Once you know this and are aware of it you can use certain exposure tools, like the exposure compensation control, to adjust the exposure and place the subject values back where they belong. 

Also, it’s important to meter the actual subject — not the bright sky or dark pavement surrounding it. If you’re shooting a photo of some friends sitting on a picnic bench in a park, for example, it’s important to meter them: their faces, medium colored shirts, etc., and not the bright white sky behind them. Matrix meters (the main type of meter found in most digital cameras) are extremely good (almost spookily so!) at knowing what the important subject area is, but it’s still very important to meter the area that you think is important. If that area happens to be small (a person on a bright beach), you can use the center-weighted metering feature to meter just that subject and then use your exposure-lock feature (usually just holding down the shutter-release button halfway will do it) to lock in that meter reading. 

All of these adjustment tools sound a bit complicated, but they’re not and they are all described in the camera manual. (The what?) Take time to read the manual and you’ll find that all of those little buttons and dials have real and useful purposes. 

Also, it’s important to pay attention to the lighting. You’ll get much more accurate metering results if the light is landing on the front of your subjects — though this isn’t always the most creative or attractive light. The key thing is not to aim your lens directly into a bright light source behind your subject (the sun behind your dog, for instance) and expect the meter to know whether you’re trying to expose the light source (the sun) or the subject (the dog). Try to think like a camera!

MYMAC: Should photographers try to get their exposures correct in camera at time of shooting, or go for best subject/composition then, and improve exposures afterward in computer or at photo lab?

JEFF: Well, that’s a very good question because if you have some basic skills at editing you can correct a lot of exposure problems with a few creative mouse clicks. But there is a danger to relying on post-production skills to bail you out. You will always get the best results if you get it right from the start. I think that choosing a subject and designing a composition should take exposure and lighting in as inherent parts of the creative process. It’s easy to think of them as separate things ("I want a photograph of that barn, I’ll worry about exposure after I compose it"); the reality is that lighting should be a huge part of your composition process and so should exposure. 

Let’s say you’re photographing a farm scene early in the morning and the sun is low on the horizon and the contrast is very gentle, the long shadows are soft and open. Those things, the soft light, the open shadows, the gentle textures are all a part of the composition. You can separate them from the physical objects in the scene. So in order to capture them the way that your mind’s eye is seeing them, you must exposure things correctly at that moment. Yes, you can soften contrast or open shadows later in editing, but if you don’t start with a good exposure, you’ll always be rowing upstream trying to get back to a place where, if you had taken careful meter readings and studied the light, you would be at already.  

MYMAC: Are you personally involved with the assignments and reader participation at the PhotoWorkshop.com web site?

JEFF: I wrote each of the assignments that are a part of the Exposure book (the assignments that are online are also included in the book). And yes, I do prowl the uploaded photos and comment on them. I’ve just begun that this week, in fact.  I love critiquing photos and love seeing how people handle assignments, and I think encouraging people, regardless of their technical level, is important. It’s a part of who I am as a teacher. For years I taught online classes with both Better Photo and Bryan Peterson’s Picture Perfect school, and if you were to ask any of my students, they loved my critiques. My passion in photography really lies more in people’s visions of the world than in cameras, lenses, etc. The main reason I write about technical things is to help my students set themselves free to be creative. Once you can put the technical issues behind you and let them become second nature, you can just wander the world with your camera and your imagination.

MYMAC: Should pointnshoot photographers spend time learning to use manual exposure or the different exposure modes included on their digicams?

JEFF: I think that the first thing everyone (including experienced photographers, by the way) should do with any new camera is to sit down and read the manual with the camera in their lap: find out what modes the camera has and how to access them. It’s interesting that exposure modes (like the manual mode, as well as aperture- and shutter-priority modes) that were once found almost exclusively on higher-end cameras have now trickled down to the point-and-shoot level. And that is a good thing because creative exposure is the essence of great photos and so it’s important that you have complete control over that exposure, rather than relying on automatic to set it for you.

That said, I think the first thing everyone should do (after reading their manuals!) is to shoot a lot of photos in either the Automatic mode or the Program mode (they are essentially the same, incidentally, though the Program mode allows more flexibility, like being able to change the ISO setting while the Auto mode doesn’t) just to see what correct exposures look like. The time will come, however, when they will notice that action subjects (kids playing baseball, for example) are not as sharp as they want or that landscapes don’t have the depth of field (the near-to-far sharpness) that they want and that is when it’s time to start experimenting with other exposure modes.

In the aperture-priority, mode, for example, you can select the aperture setting and the camera selects the correct corresponding shutter speed. You use this mode to control depth of field (smaller apertures create more near-to-far sharpness, while larger apertures create less) so that they have control over what is and isn’t in focus. In the shutter-priority mode you select the shutter speed and the camera selects the correct corresponding aperture. This enables you to use a long shutter speed to blur things intentionally (like water coming over a waterfall) or fast speeds (to stop sports action). Knowing that you can make these choices really helps you to add a dramatic and creative twist to your exposures.

In the full manual mode, you select both the shutter speed and the aperture and the camera stays out of your way more or less (though you use the meter to guide your exposure). This mode is useful in unusual situations such as photographing fireworks where you might want to leave the shutter open for 20 or 30 seconds, for example. The manual mode is also useful when you know that you are facing a difficult situation that could fool the meter: I use it often if I’m photographing brightly colored water lilies floating on a dark reflecting pool at a formal garden, for instance.

It does take some knowledge of aperture and shutter speed to use any of these modes — you have to know why you would alter them. But anyone can learn to use these features and I think that they open the door to truly creative exposure. My book explains all of the basics and theory of exposure in a lot of detail but I think it’s broken down into basic pieces that are logical and simple enough for anyone to follow. I was fortunate in that my father was a photographer, so I grew up around f/stops and shutter speeds, but I’ve taught everyone from teenagers to doctors and professors in my classes and so far I haven’t left anyone behind!

MYMAC: What is exposure compensation, and why should we use it?

JEFF: Exposure compensation is a very simple and extremely useful control on almost all digital cameras that allows you to add or subtract light from the exposure that the camera determines is correct. This is really useful when you are shooting a subject that might fool the camera’s meter. Again, all meters are designed to turn what they see into a medium tone. Snow, swans, black cats, red cars, yellow flowers:  all become medium toned. But if you allow this to happen to snow, for example, you’ll get pretty dingy snow! By "adding" a stop or a stop-and-half of exposure using the exposure compensation dial you’ll return the snow to its nice fluffy white state.

How do you know how much compensation to use? It’s really a matter of experience, experimenting and reading about exposure. The camera won’t explode if you use the wrong setting and you may just learn something about light and exposure if you experiment. Exposure compensation is easy to use and it really can transform your photos. But don’t forget to set it back to zero when you return to other subjects or you’ll end up shifting all of your exposures. I’ve done that a thousand times.

MYMAC: Do readers need to memorize all the techie material at the front of your book, or can they plow right into your lessons and projects?

JEFF: I think the Wiley Exposure book serves several purposes: as an overview of exposure and as a reference book (as well as an inspiration, I hope). So I think the first time around it’s worth just reading the book and getting familiar with how all the pieces fit together. I think once readers do that they’ll see that none of the technical info is in any way complicated. It’s like anything new, once you get familiar with it, it becomes second nature. 

I do an FM radio show and it’s a self-engineering station, which means that if you’re on the air, you’re also working the board and controlling the transmitter, etc. When I first started 15 years ago, sitting down at that console was like trying to land a 747 in a tornado, but now it’s so second nature I don’t even have to look at it. I’m more worried that I’ll spill my tea on it than anything. Exposure is like that too: once you understand that there are only *three* camera controls that regulate exposure — aperture, shutter speed and ISO speed — then you see the mystery fall away. 

I can actually put the entire theory of exposure in one sentence: "Exposure is controlled by the lens aperture which lets in light, the shutter speed which determines how long the light enters the camera and the ISO speed that determines the light sensitivity of the camera’s sensor." That’s the whole shooting match. Yes, that’s a bit like saying that a car is controlled by brake, a gas pedal and a steering wheel, but essentially that is also true! Finesse and skill come with practice, practice, practice..

Also, as I say over and over again in the Exposure book (to the point of driving people nuts, I’m sure), exposure is more than "right or wrong" it’s about creating a bold first impression and capturing an emotional interpretation of your subject. This is not just any sunset, this is YOUR sunset. How do YOU want it to look? So you make some mistakes, who cares. Digital is free, after all. I had an art teacher in high school who used to see my intense frustration when I couldn’t get paints to do what I wanted them to do and she always said "The great thing about being a frustrated artist is that at least your an artist, and you’re better than you think you are." She also told me that there are no mistakes, only new roads to be taken. Despite all the prints I throw in the trash, she was right.

MYMAC: You sure like cactus pictures! When are you coming back to Tucson? I’ll give you a grand tour!

JEFF: I am basically a travel photographer and one question I always get is "What is the most exotic place you’ve ever been?" My answer is always the same: The American Southwest. There is no place on this planet as mystical or as challenging as the Southwest, and few places are as extraordinary as the deserts outside of Tucson. The saguaro are magical and some of them have been around 200 years — think of that! You can photograph cactus that were here before Lincoln was president. 

Plus, Tucson has the coolest photography museum around at the <http://creativephotography.org/> Center for Creative Photography (University of Arizona at Tucson). The greatest exposure master of all, Ansel Adams, helped created that facility and it’s worth a trip from anywhere.

MYMAC: Thanks to author and photographer, Jeff Wignall for this exceptional interview.


invisibleSHIELD for MacBook Pro full body version
Company: Zagg, Inc.

$54.95
http://www.invisibleshield.com

After my laudatory review of the BodyGuardz protective film for iPhone, the Weeks Division of MyMac Labs received an email requesting a review from a competing film manufacturer, Zagg, Inc. requesting a MyMac.com evaluation of their invisibleSHIELD film product. I was curious to see what other film products were like, so a MacBook Pro 15" full body kit was shipped posthaste to our Tucson laboratory.

At first glance, the invisibleSHIELD film appears similar to the BodyGuardz film, but at 2 millimeters thick, it’s thicker than the iPhone BodyGuardz film.

Zagg says that invisibleSHIELD is made of the same anti-erosion plastic that’s used to protect helicopter blades and the leading edges of propellors. Be that as it may, my first impression was that it looks and feels very strong. Zagg has videos of the material being tortured on their Web site.

I elected to try the full-body version; other kits covering fewer parts are available at lower cost.

As mentioned by fellow MyMac.com writer Scott Spaziani it can be a bit nerve-wracking applying any film product for the first time. I took advantage of my experience with the BodyGuardz film, and the invisibleSHIELD application went flawlessly. For newbies, invisibleSHIELD provides an installation video on the web site.

The printed instructions that came in the mailing tube were skimpy. It took me a while to make sure I knew where each piece of film went. DO NOT remove the film from the backing until you know you are ready to apply it! Having a piece of film off the backing and not applying it right away is asking for trouble. Zagg would be well-advised to add a diagram showing which piece of film goes where. It’s less obvious than you might think!

After having done several film applications of various products, I’ve concluded the key to a successful film application is to use lots of the spray-on liquid on the film itself. That’s lots, LOTS, L-O-T-S, of fluid. Make sure that your hands are wet with fluid, too. Also, make sure the gadget is clean before you commence. You don’t want fingerprints or other bits of dreck enshrined under the film. I used Windex to clean the MacBook Pro, and then set it aside for a few minutes to make sure it was dry.

Remember; don’t spray the gadget with the application fluid; spray the back of the film!

There are several reasons to be generous with the fluid:

1) Wet film is far easier to slide around to get it properly positioned.
2) You have more time to position the film
3) Bubbles are easier to remove with the squeegee tool when there is plenty of fluid to be removed.
4) Wet hands prevent the film from sticking to your hands.

To be sure, you don’t want fluid running into the various ports on your laptop or other gadget. When I applied the largest piece of invisibleSHIELD, the top cover, I had two dish towels rolled up and placed next to the sides of the lower case. This prevented fluid from running into the ports. I also had a dish towel covering the keyboard and trackpad, as well.

The smaller pieces of film were easier to apply, as you don’t need to worry about keeping a big piece of film from sticking to itself before you drape it on the computer.

From start to finish, getting all the pieces applied took about forty minutes. When the application was complete, I left the MacBook Pro alone for twenty four hours for the film to dry out.

The next day, the film had fully adhered, with no loose edges or corners. With invisibleSHIELD applied, the "feel" is different than an unprotected MacBook Pro; the invisibleSHIELD has a tackier feel to it that makes it easier to hold on to.

I have not yet had the invisibleSHIELD tested by the hards knocks of my business travels, but I suspect the film will repel most ordinary damage, short of crumpling the metal itself. It certainly feels tough.

Conclusion.
Zagg’s invisibleSHIELD, properly applied, will protect your Mac or other gadget against the ordinary scrapes and scratches that can disfigure your computer or cell phone.

MyMac rating 4 out of 5. The product is quite good. The film’s grippy feel is nice. Better printed instructions would make application easier.


Book Bytes 2008 Summer Reading List

On April 28, 2008, in Uncategorized, by John Nemerovski


Macs All-in-One Desk Reference for Dummies, 7 Books in 1
by Wallace Wang

Wiley / Dummies Press
http://www.dummies.com
ISBN 978-0-470-16957-5, 790 pages
$29.99 US, $32.99 CN, £19.99 UK

At pages per dollar, euro, pound, ruble, or yen, this book is a serious contender. Production values and graphics are of surprisingly good quality for a mass market text printed on budget paper stock. No expense was spared on providing tons of useful info on everything Macintosh. Do you know how to delete Safari bookmarks? Perhaps you do, but plenty of people don’t, and they’ll be glad to learn how on page 271 (or Book Three, Chapter One, if you’re keeping score). Two hundred pages later, you can immerse yourself in learning how to arrange Garage Band tracks by region. Two hundred pages after that, you can finally get the drift of working with iCal events. Wowzer. Every !! beginner-to-intermediate Macintosh user should pick up Macs All-in-One Desk Reference for Dummies, 7 Books in 1 and memorize each of its over seven hundred pages of exceptionally valuable material. Hold all calls: I’m going to plow through this book first, before attacking the others in our capsule coverage below.


The Apple TV Pocket Guide, 2nd Edition
by Jeff Carlson

Peachpit Press
http://www.peachpit.com
ISBN 978-0-321-56315-6, 188 pages
$9.99 US, $10.99 CN, £6.99 UK

I’m not an Apple TV person, but many of our MyMac staff, readers, and podcast listeners are. None of my computer tutorial clients or Tucson Mac User Group members have asked me to help with an Apple TV, but they will begin to do so soon enough. I’ll stick The Apple TV Pocket Guide, 2nd Edition into my gadget bag and read a few pages every so often to become familiar with Apple TV’s hardware, software, and interface. There is a lot of information between the covers, at a very affordable price. If anybody needs to “Rip television episodes from DVD,” page 158 in this book is a good place to start. And it’s important that this second edition covers the new features such as movie rentals and Flickr integration. Book Bytes is a long time fan of author Jeff Carlson. His writing, screen shots, and tips are tops year after year, book after book. At pennies per page, The Apple TV Pocket Guide, 2nd Edition looks like a winner.


Wikipedia The Missing Manual
by John Broughton

O’Reilly / Pogue Press
http://www.missingmanuals.com
ISBN 978-0-596-51516-4, 477 pages
$29.99 US, $29.99 CN

I use Wikipedia every day to acquire information, but I haven’t a clue what requires 477 pages to understand it in depth. Oh! Most of this book is dedicated to creating, posting, and editing Wikipedia entries, which I have not yet attempted. You may be an expert Wikipedia content creator, but I am not. I’m intimidated by all the potential pitfalls of getting my articles wrong, and suffering the consequences. Before I take the plunge, I’ll study Wikipedia The Missing Manual until I’m comfortable with Wikipedia’s procedures and protocols. I’m going to begin at the end of this exhaustive book, by immersing myself in its three appendices: “A Tour of the Wikipedia Page,” “Reader’s Guide to Wikipedia,” and “Learning More.” Wish me luck.


Final Cut Pro 6 For Digital Video Editors Only
by Lonzell Watson

Wiley Publishing
http://www.wiley.com/compbooks
ISBN 978-0-470-22450-2, 309 pages plus companion DVD
$39.99 US, $47.99 CN

If ever there was a topic that required my in-depth study, this is it. What I don’t know about Final Cut Pro will fill an entire Amazon.com warehouse. At the rear of Final Cut Pro 6 For Digital Video Editors Only is a DVD with video and sound clips, plus examples of completed projects. Use them! Study them! Get smarter and more productive with your video editing. The author is head honcho at GeniusDV.com, which looks like a very serious site. This title is beautifully produced, with page after page of large, colorful screen shots, tips, tutorials, and photos. I wish I knew enough to give the book a thorough evaluation and rating, because it appears to be a genuine gem. If you’re searching for a top tier video editing volume, I think your search is over.


Facebook The Missing Manual
by E. A. Vander Veer

O’Reilly / Pogue Press
http://www.missingmanuals.com
ISBN 978-0-596-51769-4, 268 pages
$19.99 US, $19.99 CN

Tim and Guy were joking about Facebook on a recent MyMac Podcast, which reminded me that I don’t know Facebook from the World Book. I am not normally an active member of Internet communities, but I hear about them over and over. With Facebook The Missing Manual facing me from the PENDING shelf for MyMac’s books to be reviewed, I’ll spend some time with this title to see what all the fuss is about. Is Facebook just for kids, or is there anything there for geezers? This book is nicely designed with an attractive layout, so I’m willing to give it a brisk read through. If you are an active Facebooker who has not yet seen this volume, check it out.


The Non-Designer’s Design and Type Books, Deluxe Edition
by Robin Williams

Peachpit Press
http://www.peachpit.com
ISBN 978-321-53405-7, 239 pages
$45 US, $52 CN, £32.99 UK

Robin Williams is one of MyMac’s favorite all-star writers. She brings common sense to confusing subjects, with design and typography at the top of her list, and ours. This single volume includes a combo update to two of her perennial top sellers: The Non-Designer’s Design Book and The Non-Designer’s Type Book. If what you don’t know about type and design is half as vast as what I don’t know, you’ll agree this duet between the covers is well worth the price. I’ve been studying and using Robin’s design-based books as long as I’ve been a Macintosher. She incorporates witty style and content that makes learning enjoyable from first page to last. Do you know the difference between monospaced and proportionally spaced figures? Or the best way to have a second page of stationary? These and hundreds of other wise tips are at your fingertips in The Non-Designer’s Design and Type Books, Deluxe Edition.


MyMac Podcast 181 – CodeWeavers and Case-Mate

On April 25, 2008, in Uncategorized, by MyMac PodCast


Download the show in MP3 here
, or subscribe via iTunes
Check us out on Twitter!
Jeremy White, CEO and founder of CodeWeavers, drops by to chat about CrossOver Mac and CrossOver Games. Case-Mate is sponsoring a Contest this week! But you have to listen to the show to learn how to win. Pick your own prize! Plus, John Nemo, Lee Givens, Guy Serle, and Tim Robertson chat more about software bundle promotions, NBC on iTunes, Mac Clones, and much more.

Contest Sponsor! Case-Mate.com

Links from the show:
CodeWeavers
Case-Mate
Mac Clones
MacHeist
MacUpdate Promo
O’Reilly Big Book of Apple Hacks
Oakley O ROKR Bluetooth Sunglasses
iMunchies, iVegas & iBeer for iPhone


The Digital Photography Companion – Review

On April 23, 2008, in Uncategorized, by Artie Alinikoff


The Digital Photography Companion
Derrick Story

O’REILLY
214 Pages
US $24.99 CAN $24.99
ISBN 978-0-596-51766-3

Who could have anticipated the almost rabid expansion of the imaging industry, and of cameras in particular, with the invention of digital photography? Digital cameras are everywhere, in cell phones and even in pens. They’re relatively cheap. And obviously can be made very small. Photography has become even more popular as the "every-man’s" art or hobby. Along with the proliferation of these imaging devices comes a glut of how-to books on the subject, second only in how-to information for the computer and it’s relevant software. Photography has become the back-pocket art-form of millions of snappers.

A lot of snappers are shooters who just want to take a snap-shot of something or someone who interests them at the moment, emailing shots, and either deleting them (the greatness of digital) or saving them for posterity. Nothing wrong with that. But some snappers become shooters interested in photography as an art-form. The Digital Photography Companion can be a very helpful guide for either type of shooter. Or any type, for that matter.

Derrick Story, author of this very handy guide, breaks down the walls of sophisticated camera-speak and tells the reader the what’s, how’s, when’s, and even the why’s with simplicity and common sense. The Digital Photography Companion, measuring a handy 8.5" X 5.5", is small enough to fit in a backpack or a large pocket. When a new camera buyer gets his first camera, buying this guide along with it would be a smart move. Derrick focuses in on the meat of subjects ranging from the cameras themselves to features to creative ideas. Even seasoned photographers can use the guide to check in once in a while to see if they’re on track for a certain kind of image in a given situation.

The first chapter of The Digital Photography Companion, What Is It, is basically a primer about what types of cameras there are available, and the features and benefits of the equipment. You’ll learn what all those buttons do, from diopter adjustments to shutter and aperture priority, and how to use them effectively. For the enthusiast this can be a handy check-list which can help save time and aggravation. Compact cameras, point and shoot, and DSLR cameras from popular manufactures, including Nikon, Canon, and Sony to mention a few, are discussed and compared.

Chapter Two, How Does it Work, will give you hands-on techniques in using all this equipment. Practical advice is priceless when it comes to taking photos because many times opportunities for certain images are few and far between: Lighting changes in seconds. Speeding cars go by in a flash. Fish can only soar out of water for a few seconds at a time, and elephants will stay still only so long before they decide to trample your sorry butt because you can’t decide on an f stop. As you can see, knowing what you’re doing before going out on a shoot can save not only time, but your life. Believe me when I tell you Derrick Story has covered most of the bases, simply. You’ll learn about flash and it’s many incarnations, focus lock, exposure, photo effects, and much much more. If you learn even most of what’s in Chapter Two you’ll be a better photographer than 90% of the shooters out there.

Then, in Chapter Three, How To Shoot Like a Pro, you’ll learn how to create. That is, use your knowledge to get the best shot in varied situations. Covered in this chapter are subjects like portraiture, kid shots, weddings, group shots, landscape, action, and even museum shots. He even goes into infra-red photography, fireworks capture, and underwater photography.

The next chapter, I’ve Taken Great Pictures, Now What, shows you how to send photos via the internet. prepare slide shows, convert still pictures into movies, recover photos from an erased memory card, and convert from color to black and white. This chapter also goes into photo management, which is very important if you want to keep track of all the images you’re going to have.

Chapter Five, Printing Made Easy, covers most of the basic printing techniques, and some more advanced work like calibrating your monitor. He talks about The Ten steps in Making a Beautiful Print. With today’s printers and software, making a really good print is a lot less problematic than it was just a few short years ago. Derrick will tell you about dedicated photo printers, and even how to shop for a desk-top photo printer. Check out his printer recommendations:

One of the great things about The Digital Photography Companion is the Appendix. Here, as Derrick Story tells us, is "A Quick-Reference Guide for a Variety of Camera Settings." That means we can look at the Lighting Situation on the left-hand side of the column and reference over to the right, under Recommended Exposure Compensation, to get practical guidance. Derrick includes tables for White Balance settings, Metering Modes, Camera Modes (shutter priority, manual, etc.), and Subject in relationship to ISO Speed, Aperture settings (f-stop) and shutter speeds. These Appendix present real-life photo-making situations, folks. Those of us who have been around cameras since the heyday of 35mm, taking pictures and fooling with all the o-rings and focusing rings and gobs of other things can bear witness to trying situations in lighting, and positioning, among the hundreds of other problems one may encounter in the field when conditions are less than ideal. It would have been wonderful for me if I could have had a Quick Reference Guide to help way back when. Now I do. And so can you.

If I was a new shooter, and I had a chance to leaf through this book I’d probably buy it. And even though I’ve been an enthusiast since 1969, that doesn’t that mean I can’t use this book. Nope. I’m going to use it. I can use all the help I can get. But new shooters will save themselves a lot of heartache and a long learning curve by simply following what Derrick has so systematically laid out for them.

The Digital Photography Companion is exactly what it’s supposed to be. A companion. Small enough to take along. And loaded with practical, on the spot guidance. There is a niche for this kind of publication. From cover to cover I recommend The Digital Photography Companion to those who are enthusiastic about photography and recognize the beauty of a fine photograph.

Rating: 5 out of 5


Targus 13.3″ radius Vertical Messenger
Company: Targus

Price: $60.00
http://www.targus.com

So you’ve gotten yourself a brand new Mac laptop. It’s a great investment, and a great purchase for those of you who have just switched to a Mac, are on the go or just looking to change from a desktop. Now what you have to consider is how are going to get around with your Mac laptop.

You can’t just schlep it around under your arm and it really wouldn’t be wise to just throw it into a briefcase. Consider a Targus Vertical Messenger case. Having recently purchased a MacBook, I wanted something that would protect my laptop and yet be presentable/fashionable to carry the MacBook around in. Targus’s radius Vertical Messenger is designed to fit the 13.3” MacBook and does so with protection and function in mind. Targus, a universally known producer of cases for laptops, has done a very nice job with the Radius Vertical Messenger case for the MacBook. Although the case will carry other laptops up to 13 inches by other manufacturers, it is especially touted for the MacBook.

As you can see below, the unit is sleek and functional. Unclasp the front cover and lift it up and you will see a see-through zippered storage area. Unzip the next zipper set and you will find another see-through storage area on the back of the flap and then the main storage are for your accessories on the facing section. Marked for your mouse, an iPod, MacBook power supply and other items, you’ll have enough storage for those must-take items in the Vertical Messenger. I used the storage slot for an iPod to carry USB thumb drives for removable storage on items I was working on at that particular time. There is even a key hook to secure your house/car keys inside under the flap.

Open up the zippered compartment (securable with a small luggage lock) on the top of the bag under the top flap and you will find a molded EVA padded area for your MacBook. The fit is snug and it won’t permit your MacBook to slide around and scrape up. Your MacBook would be protected bottom, sides and top. The zipper on the top of the enclosure looks as though it would scrape the MacBook, however I found no signs of scrapping or damage… it’s just a snug fit holding the laptop in place. Besides the shoulder strap for the bag, there is also a rubber-coated handle to carry the bag, just as you would any other bag. Oh, and on the back of the bag there is a slip in pouch for other items, small writing pads, airline boarding passes, etc.

I have given the bag a work out, putting it through the paces. It has traveled by car, with other items on top of it, on the rear seat floor, in the trunk and on the seat. It has flown and it has been carried by shoulder strap and by rubber-covered handle. It has been placed on desks, in drawers, slid under a bed in a hotel room (hey, you know that no one ever vacuums under those beds… how would they know that a laptop is there!?) The nice thing about the Vertical Messenger bag is that with a MacBook inside, unless someone looking at it knows that it’s a laptop bag, they wouldn’t take it for one. The comments that I’ve received on the bag were all extremely favorable and complementary. Score some big points here for fashion and function coming together in a reasonably priced product.

  • Specifications:
    • Fits up to a 13” MacBook
    • Water-resistant fabric
    • Removable should strap
    • Back slip-in pocket
    • Weight- 2.2 pounds empty
    • Custom storage pockets for necessary accessories

This case has handled everything that I’ve thrown at it, including handling and use factors. It has maintained its shape and form, protected my MacBook and done so with a design for care and function.

So to review:

Pro: Well-designed and functional laptop case that offers protection for your MacBook and does so with fashion and functionality in mind. Provides storage space for the necessary MacBook accessories and additional items, such as your iPod or other small items.

Cons: Not designed to carry the world around with you, if that’s what you’re looking for in a laptop case. The case carries that which is necessary to use your MacBook and just a tad bit more. Not really a con for most users, just a good to-know item.

Highly recommended!

My Mac rating: 4 out of 5.

Tagged with:  


Interview with: Christopher Lowe, CAE, VP of Sales and Marketing, Key Ovation-Goldtouch

Goldtouch for Mac Adjustable Keyboard (available in black or white)
Company: Key Ovation
Price: $140
http://www.keyovation.com

MYMAC: What is the evolution of your company, and the specific history of the development of this Goldtouch Keyovation keyboard?

KEYOVATION: The increasing incidence rates of Repetitive Strain Injuries led the founders of Goldtouch Technologies (acquired by Key Ovation in 2004) to develop products designed to work with individual users, instead of requiring users to adjust to technology. This led to the famed Goldtouch keyboard which has developed into a mainstay on the market with its innovative design and adjustability. 

Since 1998, the Goldtouch Adjustable Ergonomic Keyboard has been the preferred alternative keyboard for professional Ergonomists, Occupational Therapists, and Physical Therapists throughout the U.S. and abroad. And, it has remained so with very little change or redesign efforts since its release. The Goldtouch for Mac and the Goldtouch ErgoSecure 2.0 (with built-in smart card reader for FIPS-201 certification) are the most significant changes based upon the original Goldtouch design.

MYMAC: Who are your target customers for this unusual ergonomic product?

KEYOVATION: Most everyone is a candidate for use of the Goldtouch keyboard, but much of our demand has come from large corporations. Most of the Fortune 1000 and Fortune 10 companies utilize the Goldtouch as both a preventative device and as a rehabilitative tool to assist injured workers in reducing pain, remaining productive and reducing claims costs.

With the growing use of Apple products in the workplace, we are supporting more personal/home Mac users and seeing increased demand in the SOHO and SMB/EDU areas. Apple users tend to be more progressive and would see the benefits of preventative maintenance associated with ergonomically engineered products.

MYMAC: What is RSI and why should our readers be concerned with it?

KEYOVATION: RSI is a Repetitive Strain Injury. It can be caused by a number of activities that require repeated small movements, and most often affects computer or assembly line workers. It is a result of muscles remaining tense for an extended period of time and leaves the person with constant pain in the upper back, shoulders, wrists and hands. Treatment is really two-sided in that it cannot be healed solely by a physician—it requires the user to adjust his or her actions to prevent the return of such pain. Our products are designed to meet this need for adjustment.

MYMAC: How long should new users allow to become familiar with new key locations?

KEYOVATION: The answer is: it depends. We have found that very good typists tend to adjust within 1-2 days, but others who may not be as experienced, or are resistant to new things, can take a week or more. Everyone is different, and we have found that the biggest hurdle is people’s ability to adapt to change and make the psychological commitment to doing things a little differently than before.

Once a new Goldtouch user commits to taking the time, we find that they do not want to use any other keyboard. We just saw this in a recent study where 90% of the participants that received a Goldtouch keyboard did not want to try another alternative keyboard, nor did they want to go back to their old standard QWERTY after just 30 days of use. That was above and beyond what we had expected, and we were quite pleased, of course!

MYMAC: How many adjustment variations will it take until people find a comfortable and efficient way to use this GTKO keyboard’s split shape?

KEYOVATION: This is different for everyone. Some adjust right away; some take more time and variance to get to their “happy place.” Once comfortable with the position, however, it has been shown that the keyboard works more naturally with an individual’s body structure and will accommodate over 85% of the population (compared to about 15% with a standard keyboard) in a neutral typing position.

There is no real set number of adjustment variations it takes for people to get comfortable and we actually recommend adjustments on a regular basis, especially if using the keyboard for extended periods of time. Continual adjustments reduce stress and strain resulting from sitting in the same position for too long. The whole point of the Goldtouch keyboard is to make it your own.

MYMAC: Can people adjust their sitting and typing positions to achieve optimum benefit without needing to buy a special keyboard?

KEYOVATION: Adjusting sitting and typing positions are a good start; however, a standard keyboard still requires the unnatural placement of the hands and wrists and those actions, combined with extensive mousing activity, can really put a great amount of stress on muscles, tendons and nerves.

MYMAC: How did you decide which keys to include and where to place them, and which keys to omit?

KEYOVATION: We felt it was necessary to stay close to the standard QWERTY layout to minimize the learning curve. For individuals who would already be adjusting to a split design keyboard, we felt it would be a shorter adoption cycle if the layout were familiar and keys were laid out in locations where people would expect them. Also the Apple Control key, right and left Apple & option keys, the CD eject, and the mute/volume control keys common to Apple users are included.

Omitted is the side numeric keypad which we accommodate by creating an embedded keypad on the keyboard. Users also have the option of purchasing a separate full-size numeric keypad that can be placed on the left or right side of the keyboard, or simply put away when not needed. The actual key placement is designed to spread the work evenly between the left and right hands and the keypad is omitted to maintain a small keyboard footprint so that both the keyboard and mouse can fit within the ergonomic “comfort zone.”

MYMAC: Why are there no USB hub ports included?

KEYOVATION: Our original design did not incorporate this; however we are looking into this for future models. We do find that with most laptops only having two USB ports anyways, it is usually best to use a 4-port hub adapter to accommodate external keyboards, mice, printers, iPod, Blackberrys, etc.

MYMAC: Is all the configuration instructional material included in the packaging, or will new users need to visit your web site or call your toll free number?

KEYOVATION: We do have an insert in the keyboard box that directs the user to our website to download the User Guide. We also have a toll free number that is available for Customer Support or Technical questions.

MYMAC: Who are your competitors in this special marketplace?

KEYOVATION: I think the biggest competition we face is the overuse of the word “ergonomic” in too many products that do not validate HOW they are ergonomic. This has created a misconception among consumers that if there is some sort of odd curve or shape, or if it says, “ergonomic” on the box, they take it at face value. We believe that “If it’s not adjustable, it’s not ergonomic,” and if a product doesn’t fit you, then how is it providing an ergonomic benefit?

MYMAC: What improvements or innovations are you considering for future keyboards, or other usability products?

KEYOVATION: We are seeing a change in the marketplace from a desktop-centric workspace to a much more mobile remote-office or drop-in space. Many of the computer hardware manufacturers are seeing this trend escalate quickly on corporate tech refreshes, and with more people working in non-standard environments.

This trend creates a number of ergonomic issues for people who are now working in places where there is little or no flexibility in adjusting their workstation, chair, desk, etc. If they are spending most of their time working on a notebook, with lots of bending of the wrists and contact stress on the hard plastic pinching their Carpal Tunnel sheath, we expect to see a significant rise in upper extremity MSD’s (Musculoskeletal Stress Disorders). So, addressing the challenges of the mobile workforce is where we want to focus our solutions.

MYMAC: How do you handle foreign or nonstandard keyboards?

KEYOVATION: We produce the standard Goldtouch keyboard in 12 different languages, ship to 180 countries around the world and have a number of distribution partners around the globe to support us. We will consider foreign layouts for the Goldtouch for Mac if demand increases abroad.

MYMAC: Which of your many products should Mac users pay special attention to, whether in need of ergonomic devices or not?

KEYOVATION: The first thing Mac users should pay attention to is their bodies, and be more aware of discomfort, stiffness, tingling, or anything out of the normal when using a computer. All users should take some time to look for symptoms of potential problems or identify risk factors that might lead to problems in the future.

We find that many of the people looking for an alternative keyboard do so because they are already injured, and are looking to reduce the pain. We believe that everyone should take some time to educate themselves about basic ergonomic principles about workstation and mobile setups so they can work ahead of the curve. Then, it might be time to make sure that you are working with the right equipment: the proper chair can make a tremendous amount of difference, especially if you are petite, or Big and Tall.

No one piece of equipment fits all, so it is important to look at products that offer a high range of adjustability, comfort and quality design. And, they should fit your body type, and promote healthy typing postures for hands, wrists, arms, neck, shoulders and back. Remember that once the pain starts, it really never goes away, so prevention is the best way to protect yourself from risk.


In-Ear iPhone Headset Earphone Review

On April 22, 2008, in Uncategorized, by John Nemerovski


hf2 Headset + Earphones
Company: Etymotic Research

Price: $179
http://www.etymotic.com

super.fi 4 vi Personal Earphones
Company: Ultimate Ears

Price: $150
http://www.ultimateears.com

These are the best in-ear headphones under $250, and the best iPhone-compatible microphone+headphones for any price. There are reasons why some people will prefer the Etymotic Research model to its competitor from Ultimate Ears. Aside from the $29 price gap, there isn’t a huge listener experience difference between them.

COMPARISONS:

• super.fi 4 vi’s CARRYING CASE is very small and rigid, compared to the spacious, soft hf2 storage pouch

• hf2 ships with a very limited set of EAR TIPS, but the entire lineup of Etymotic Research tips are available to be ordered; tips from some other manufacturers also work fine (Etymotic Research tells MyMac “the ones we do include fit almost all ears — the two sizes of 3-flange eartips and the foam alternative are enough.”)

• super.fi 4 vi ships with round silicone blob “universal” EAR TIPS in a range of sizes

• hf2 has full spectrum transparent AUDIO DELIVERY, with a slight treble bias

• super.fi 4 vi has neutral “reference” AUDIO PRESENCE, without any built-in enhancements

• hf2′s microphone is slightly larger and better quality than super.fi 4 vi’s, but there isn’t a huge difference during actual iPhone conversations

- – - – - – - – - – - – - – - -

I’ve been alternating between Ultimate Ears’ super.fi 4 vi and Etymotic Research’s hf2 for nonstop listening during the past two weeks. These are both G-R-E-A-T headphones for in-ear audio, with a satisfying sound throughout the spectrum. In the premium ($101-$249) price range, both of these earbuds are exceptional value and quality.

If you choose super.fi 4 vi, carry them in a larger, padded case, or a ziploc bag. The included rigid snap case is such a snug fit that you can accidentally damage the cable when shutting it. If you don’t like silicone blob ear tips, these Ultimate Ears headphones won’t change your mind, but if you prefer silicone blob tips, the Ultimate Ears are your best choice.

Etymotic Research’s large range of foam and flange ear tips, and driver filters, are genuine assets. Some people adore Etymotic’s super-isolating tips, and other people never are comfortable using them.

- – - – - – - – - – - – - – - -

Good fit, comfort, and audio response are interdependent on premium in ear noises isolating iPhone headsets. Knowing that your listening experience is almost identical from hf2 to super.fi 4 vi, and the pricing is very close, your buying decision should strongly factor the feel and fit of ear tips you’ll be using for thousands of hours.

Good news: whichever headset you obtain, your music and iPhone calls will be the highest quality audio. Both of these top-tier earbuds guarantee you the best performance in the price range. Better news: when you listen to music on an iPod, computer, or other player, you’ll agree that for $150-179, these are the best in ear headphones you’ve ever experienced, even if you completely disregard their microphone.

MyMac rating is 4.5 for both Ultimate Ears’ super.fi 4 vi and Etymotic Research’s hf2. If the former had a larger, softer carrying case, and the latter shipped with more ear tips, they each would be very close to achieving a perfect score of 5 out of 5.


invisibleSHIELD for the Apple iPhone – Review

On April 22, 2008, in Uncategorized, by Scott Spaziani


invisibleSHIELD for the Apple iPhone
Company: Zagg

Price: Full Body Coverage $24.95, Front Coverage $14.95
http://www.invisibleshield.com

The iPhone is a unique device compared to Apple’s other portable media players. The iPod is rarely handled by the user. The most of the interaction the user has with the iPod is to press play and then put it back in your pocket. The iPhone wants to be used.

The design of the iPhone is important to the entire experience, and using a bulky case robs you of a large piece of that experience. The invisibleSHIELD protects your iPhone without limiting its functionality. It won’t protect your phone from blunt trauma but the invisibleSHIELD will help keep your phone looking like new.

The InvisibleSHEILD for the iPhone comes in two different versions; a whole body set or just the front piece. The material is tough enough to make the front only version the best screen cover available for the iPhone, but the real value is having the full body of the iPhone protected. The full body shield comes with a complete front and back pieces for the phone, a rubber applicator, and a tube of the application solution.

When opening the product and being faced with the task of applying the shield, I grew very nervous during this step. The idea of using liquid to position the shield scared me. I was going to spray my $600 phone with a liquid? The front piece is the easiest to apply and set in place. The back gets a little tricky because it includes pieces that have to fold around the corners of the . The shield itself is extremely adaptable and after each end is down it’ll conform to the shape of the phone within about an hour. Don’t worry about the sides of the phone not being down exactly flat or moving out of place. As the shield dries it sets itself in place and morphs to the shape of the phone.

The small pieces of the Shield are frustrating to apply. There are two thin strips for the top and bottom silver borders, and four tear drop shaped pieces for the corners. I made the mistake of placing the small pieces over the larger portion of the shield, so it overlaps and creates a small bump on the side of the phone. The place where I managed to line the shield up correctly, on touch feels like it’s a single large piece of plastic.

The whole iPhone feels like a single piece of plastic is covering it. I wouldn’t be surprised if you handed me an iPhone with the invisibleSHIELD applied and told me that you had the iPhone dipped in plastic. I’m trying to avoid using the word plastic. The invisibleSHIELD is not made of plastic. It’s made from a material developed by the Defense Department to protect helicopter blades in flight.

The material is ultra thin and impossibly strong. But at the same time it’s adaptive to whatever you put it on. It stretches easily (which is how I managed to overlap some pieces of the material) but wants to grip to the surface that it has been applied too. After applying it I left one unsightly air bubble on the back of the iPhone. I attempted to use the applicator to smooth it out but failed, so I just ignored it. After a few days I noticed it was starting to shrink. After a couple weeks the former bubble is a barely noticeable tiny bump in the surface of the shield.

I’ve tested and used some iPhone cases in the past and found all of them to be bulky and all of them to harm the usability of the phone. It was not as fun to even hold the iPhone with the extra bulk applied. The invisibleSHIELD does not suffer from this. In fact it might have the exact opposite effect on the phone. I think the shield enhances the usability of the iPhone.

The shield gives the phone a much more grippy fee, making it much more substantial when placed on surfaces. I’m able to leave it the center console in the car and not worry about it falling. Setting it on a normal table and pushing the phone around gives the feeling that it’s better anchored to the table.

I’ve seen videos from YouTube.com of people taking keys or knives in an attempt to slice the invisibleSHIELD. 
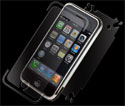
I tried to scratch the shield using my car keys, a steak knife and a pocket knife. Rubbing the point of the key against the shield did nothing. The small indents that were left vanished shortly afterwards. The steak knife lightly pushed into the side of the shield left no marks. The pocket knife was able to leave permanent marks in the shield, but none that were visible unless caught by the light at the right angle. When I tried the pocket knife on a standard screen protector it sliced clean though.

After a few weeks using the shield I feel that my iPhone is safely protected from everyday use. The shield is clean and barely noticeable. I put my friends to the test by handing them the phone to show them a website, and then after asking what they thought of the new case. Everyone I tested didn’t even notice that a case is on the phone. The most important part of the invisibleSHIELD is in the application.

One of the corner pieces has fallen off and lint is getting under a few of the edges because I didn’t line up the shield exactly as it should have been aligned. Other than the difficult application process the invisibleSHIELD is a must have case for every iPhone sold.

MyMac Rating: 4 out of 5


How to Improve Hulu

On April 21, 2008, in Opinion, by Scott Spaziani

NBC Universal and News Corp. invested heavily in the new online video service Hulu in an attempt to take control of their digital media. NBC pulled their media from iTunes late last year fearing Apple’s continuing dominance in the content distribution space. But NBC is missing the point of digital media and Hulu will always fall short as a solution for digital distribution.

Looking at Hulu, it is a very impressive service. Although still in closed beta I was able to sign up early and get an invite. The selection is very impressive with NBC offering over 70 shows; that’s right 70, and 37 networks signed on the amount of content will keep anyone busy for a very long time. Brand new shows become available on Hulu about an hour after the show has finished airing in Hawaii. Already it has a massive amount of content, new shows are available much sooner then they are on iTunes, and it’s all free. Where could Hulu possibly fall short?

Continue reading »


Photoshop Elements 6
Company: Adobe Systems Incorporated

Price: $89.99
Previous owners can upgrade for $69.99
(Check around on the web, as there are special deals with reduced pricing)
http://www.adobe.com

It has now been two years since Adobe last released a new version of Photoshop Elements for the Mac. The release PSE 6 at the end of March 2008, skipping an entire version number (5) marks the long awaited switch to an Intel-native version. So, did Adobe get it right?

I have been using Photoshop Elements since it first appeared in version 1.0. Photoshop Elements 6 still continues to provide users with amazing capabilities at a very reasonable price. For those users who can’t afford to run out and buy the full version of Photoshop, PSE 6 still provides a lot of the same assets at a price that one can reasonably live with without having to take out a loan.

CHANGES
The first thing that a PSE 6 user is going to notice is the change to the user interface. PSE 4 and previous versions provided a clear, see-through to the desktop below. Not so with PSE 6 which comes to the user with a charcoal grey interface that totally blocks out the view of the desktop below. There is also just a feel to the change that just doesn’t feel Mac-like when you first open it up and begin to use it. I know that it took me quite a while just to get used to it… and at times; it still gets to me as being non-Mac like.

Adobe has continued utilizing Adobe Bridge that first appeared in PSE 4, this time with almost a complete version taken from Photoshop CS 3. Adobe Bridge lets you rank and label your pictures, and also provides you with the capability to file, sort and arrange your items. You can inspect a hard drive for images or files using Bridge, find saved projects, stack files together under one thumbnail and even apply keywords. You can choose Adobe Bridge as your photo manager program or you can set it up that iPhoto is your main photo management program and that PSE 6 is your default photo-editing program. Adobe Bridge can also be used to browse through your own computer to find photos that you already have.

In Photoshop Elements, there are three ways to create and edit your images: Full Edit, Quick Fix, and Guided Edit.

The Full Edit workspace section contains tools that permit you to correct color problems in your photos, create special effects, and enhance photos. It basically permits the user to do anything with the image that they are working on. It is also adjustable to the user, allowing one to rearrange the section with palettes, moving to another area or providing multiple windows to work in.

The Quick Fix workspace section contains simple tools to correct color and lighting, and clickable commands to immediately fix common problems like levels, contrast, color and red-eye. I still like it that Adobe left the skin color correction tool within the product; it does work quite well to adjust skin tones. If you are a rookie or brand new to the world of digital imaging, Quick Fix is a good place to start learning the tricks of the trade. The Quick Fix capability is one of the premier aspects of PSE.

New to PSE 6 is the Guided Edit workspace section. This is like having a built-in tutor sitting with you at the computer. Select this section and as shown below, there are specific sections of work that PSE presents to the user. It will guide you through the process of what you wish to do with your image. For first time users, not familiar with PSE, this is a handy tool to have to work with until they get used to the process. As you work your way though the guided process, and you choose what you want to do, PSE will show the appropriate tool that you need to use, along with the necessary instructions, in the panel to the right side of the screen.

If you look at the picture above, you will see that the user interface is broken down into the three primary sections: EDIT – CREATE – SHARE. I’ve already gone over the EDIT section, so let’s take a look at the CREATE side.

Click on the CREATE tab, As you can see, this section is further broken down into PROJECTS and ARTWORK. PROJECTS permits you to develop a PhotoBook, a PhotoCollage, a Web Photo Gallery or a PDF slide show. Additionally, you can also create a greeting card, a CD jacket, a DVD jacket or a CD/DVD label. Artwork lets you to deal with Content, further breaking it down and even being able to choose Backgrounds, Frames and Themes for your projects

SHARE. PSE 6 permits you to take your pictures and share them among friends, family and others online. You choose the type of project you want to create, select it and PSE 6 provides the necessary instructions on how to do so.

New to PSE 6 is that the Convert image to Black and White has now been moved to the Enhance menu as part of the drop-down menu selection. In PSE 4, you choose Enhance, Adjust Color and then Remove Color. You now have six choices to choose among: Newspaper, Portrait, Scenic Landscape, Infrared Effect, Urban Snapshots and Urban Landscapes; each with a before/after view. PSE 6 also now sports a Quick Selection tool, appropriated from PhotoShop CS3 that allows you to “paint” a selection onto an object using the familiar brush cursor. Working with the Black to White is quick and easy.

PSE 6 also sports the Adjust Color Curves command that permits a limited capability to adjust the individual highlights, Midtone Brightness and Contrast and Shadow Adjustments while you are working on an image. It allows the user to compare and choose different presets by selecting from the list of styles in the Select A Style box.

Still in PSE, an updated PhotoMerge allows you to blend photos together to take the best from each to create one “perfect” picture. You know how it goes when you want to take a family photo –someone has their eyes closed, someone looks off to the side in the next picture and someone else doesn’t smile. You can take the best out of each picture taken to produce that one family photo with everyone looking just right. PhotoMerge Faces also permits the user to combine multiple facial features from different images to create one composite face, the “perfect face” if you wish.

While I don’t use it myself right now, Adobe has increased RAW support that allows the user to apply different adjustments and presets to multiple images all at once. Basically, you can perform non-destructive editing on the raw image files from your digital camera, as long as your camera is supported.

To fully evaluate PhotoShop Elements 6, I’ve had it installed on a MDD G4 867 Dual running with 1.5 Gigs of RAM, on a G5 Dual 2 GHz running with 2 Gigs of RAM and on a MacBook 2.2 GHz running with 4 Gigs of RAM. All systems are running Mac OS X version 10.5.2. My own personal take is that PSE 6 just seems so much snappier and responsive on the Intel MacBook. So for those of you, who have been waiting for PhotoShop Elements to run on your Intel-based Mac, have no fear, it works great! I’ve also been working with PSE 6 as a beta and the GM version and I’ve experienced no problems with the final install. It did take over 20 minutes to install, so please be patient and things will work out fine.

System Requirements:
• PowerPC G4 or G5 or multi-core Intel process
• Mac OS X – versions 10.4.8 through 10.5.2
• 512 MB of RAM (1GB recommended)
• 64MB of video RAM
• 1GB of available hard drive space
• 1,024 x 768 display resolution
• DVD-ROM drive
• QuickTime 7 software required for multimedia features
• Access to Internet for Internet based services

Pro: Now runs natively on PPC or Intel-based Macs. Permits users to work with their digital images at a fraction of the cost of the full version of PhotoShop CS. For the new or not-demanding user, provides the flexibility to work with digital images and perform improvements, tweaks and adjustments to their satisfaction. PSE 6 does seem to run faster than previous versions. The capability of Before/After views is an asset for those not really sure of how things will work out.

Con: Does not have the full capability of PhotoShop CS. Backup capability of digital photos and other data is not available to Mac users. The non-Mac like interface may turn off some Mac users.

Recommended Software!

MyMac rating: 4 out of 5.

Tagged with:  

MyMac Podcast 180 – Stan Flack and Mac Clones

On April 18, 2008, in Uncategorized, by MyMac PodCast

Download the show here, or subscribe via iTunes
The death of pioneer Macintosh publisher Stan Flack takes center stage this week. Also discussed, PsyStar, the company who purports to have a Mac clone for sale. Which of the two major software bundles is right for you, MacHeist or MacUpdate? Lee Givens joins Tim, Sam Levin, and Guy for a lively chat. Plus, Nemo chats with Karen Arabas on his All Over the Mac segment.

Follow us on Twitter!

Links from the show:
Stan Flack Interview and Discussion
MacUpdate Promotion
MacHeist Promotion
Wayback Machine
PsyStar Mac Clone


SRS Labs iWOW 2.0 for iTunes


Iomega eGo 250 GB Portable Hard Drive, FireWire 400
Company: Iomega

Price: US $189.00
http://www.iomega.com

Iomega’s new eGO line of portable hard drives comes in colors, and I mean colors. The review drive I’ve been using for a while is red, Red, RED!

My techno-wife especially approved, as the red color matches her favorite toenail polish. If red’s not your fav shade, the Firewire-only eGO drives come in black and white, as well. If you crave more color choices, the USB versions come in a high fashion palette of red, black, blue, pink, and silver.

The eGO’s case is nicely shaped; it reminds me of a hip flask, flat on the bottom and curved on top. Iomega could even use the marketing slogan, "eGO drives let you take a sip of your data."

Enough about colors and shapes; we need to see if the drive performs.

We tested the Firewire 400 model. Iomega also sells eGO drives with USB 2.0 only, and combo Firewire 400/USB 2.0.

Iomega gets extra points for making the drive bus-powered, so no external power supply is needed. This is great for traveling, as having to cart around a wall wart is annoying. Iomega does provide a good quality Firewire 400 cable, so you’re ready to go eGO right out of the box.

Iomega lost a point or two by using fluffy marketing slogans like "Patent Pending DropGuard™ foam protector feature." What’s DropGuard? I spent 5 minutes searching through the Iomega web site trying to find what DropGuard really is, or does, and came up with nothing. So for now, DropGuard is a triumph of marketing over technology.

Plugged in and running, the drive is virtually silent, at least to my 51 year-old aviator’s ears.

Before doing any testing, we erased and repartitioned the drive, as it comes set for use with Windows machines. Mac users would be well advised to use Disk Utility to partition the drive as needed for your Mac. Intel Mac owners need to partition the drive as Mac OS Extended (Journaled) and then click the Option button, and choose the Apple GUID option. if you don’t choose the GUID option, you won’t be able to boot off the drive. See this link for more information.

Once the partitioning exercise was complete, we used Drive Genius 2.02′s suite of disk tests.

Here are the results:

  • Sustained writes: 114 MB/sec.
    Sustained reads: 130 MB/sec.
    Random writes: 117 MB/sec.
    Random reads: 77 MB/sec.

This is nowhere near as fast the main drive as my 2.66 gHz Mac Pro. But don’t expect blazing desktop performance from any portable drive. The eGO Firewire 400 is a 2.5" notebook-sized 5400 RPM drive, with 8 megabytes of cache RAM.

Drive Genius’ benchmark list shows the 250GB eGO Firewire performing much like the drive in a 2.0 gHz G5 Power Mac. However, newer Intel Macintoshes do better.

All in all, for a portable drive, the eGO’s performance is nothing to scoff at.

Iomega also includes a licensed copy of EMC® Retrospect® Express (roughly $42 at most resellers), a complex and powerful backup application. I’ve used Retrospect, but prefer other backup solutions, so I did not try using Retrospect with the eGO drive.

Conclusion.
Iomega’s eGO line of drives look great (pick the red one), and perform well. They are priced competitively with other 250 GB portable drives. With no wall wart to clutter your laptop bag, and a good quality cable in the box make this an attractive portable drive. Iomega; just tell buyers what DropGuard is!

MyMac rating 4.5 out of 5


presentationZen: simple ideas on presentation design and delivery
Garr Reynolds

New Riders
229 pages
ISBN 13: 978-0-321-52565-9
ISBN 10: 0-321-52565-5
US $29.99, Canada $32.99, UK £21.99, Australia ?

Since reading Zen and the Art of Motorcycle Maintenance some 30 years ago, I’ve been attracted to books with Zen in the title. In fact, it was a book called Zen and the Art of the Macintosh (by Michael Green, published in 1987 but now out of print) that convinced me I simply must have a Mac. Get yourself a used copy from Amazon. The book is sheer delight and encapsulates the early magic the Macintosh.

It was little surprise, then, that I impulsively volunteered to review presentationZen, despite having no spare time whatsoever.

It took a long while for the book to reach me in Australia from the publishers (perhaps to allow me to clear a space for it in my cluttered life). I was surprised when a package was delivered to my front door one morning, and when I opened the envelope my first impression was that it must be an art photography book I’d ordered and forgotten. I knew immediately I was going to like this book.

I lingered over the front cover of presentationZen with its deceptively simple asymmetric balance. I lingered over the back cover and the photo of the interestingly handsome author, Garr Reynolds, but I swear that didn’t influence my rating one bit.

Tearing myself away from the photo, I looked inside and flipped through the pages. The layout, appropriately, reflected the Zen concept of space and simplicity. Illustrations and typography underlined the message, with white space and color used to excellent effect throughout. Just enough and no more.

The table of contents was easy to scan, unlike those highly detailed TOCs that take 15 minutes to plough through. The foreword is by Guy Kawasaki: "As far as I know, the first foreword in history presented in a book as a series of PowerPoint slides."

A word of warning: If you have to deliver a presentation in a couple of days’ time, and you want to pick up some quick tips, presentationZen is not the book for you. And if you want a easy step-by-step approach to presentation mastery, this is not the book for you. As Reynolds states, "There is no short and quick road to presentation excellence. Learning to become an exceptional presenter is a journey." If you aspire to becoming a superb presenter, and are prepared to put in the time, then you’ll find presentationZen invaluable.

There are three major sections in the book: Preparation, Design, and Delivery. Throughout, Reynolds focuses on the Zen principles of restraint, simplicity and naturalness. He advocates doing most of your preparation away from the computer, and warns against getting caught up with technique. He stresses the importance of story, and connecting with the audience. He uses Steve Jobs as an example of a presenter-par-excellence.

The Design section gives a truly excellent overview of design principles, with plentiful "before and after" examples to show the reader how to apply these principles. These can be applied in other areas (and life itself), not just to presentations.

Most of us have suffered through the "death by PowerPoint" style of presentation. You know the kind — slide after slide of bullet points overlaid on fussy, clichéd PowerPoint templates, while the presenter droned on, often simply stating what was already on the slide. If the lights were out, you probably, like me, grabbed the opportunity for a nap. At the end you get a printout with exactly what was on the slides, so why try to stay awake?

presentationZen delivers everything you need to become a presenter who stands out from the crowd. If you apply even a few of the principles you will undoubtedly reduce the death-rate by PowerPoint or Keynote.

Is there anything I didn’t like about this book? Just one minor issue: the table of contents does not reflect the rather unusual chapter numbering in the body of the book. I found this strangely disorienting when trying to get an overview.

One final caution: As intimated earlier, I have long been interested in Zen principles, so I found the book fascinating reading. If Zen is not your thing, you may not be quite so attracted. However, it does not depend on an acceptance of Zen and the presentation guidelines are completely practical. The section on design alone is well worth the purchase price.

There’s a nice bonus. With the purchase of the book, you get to choose ten free photographic images from istockphoto.com.

(Be sure to check out Garr Reynolds’ blog at http://www.presentationZen.com.)

MyMac.com rating: 4.5 out of 5


STM Small Rogue Laptop Backpack
Company: STM

Price: $100.00
http://www.stmbags.com
All STM products are available at retailers, on-line stores, and universities only.

Ok, you have your MacBook (or MacBook Air) and you want a laptop case to protect your investment. The problem is that you also want to be able to carry other items around with you besides your laptop. Looking for something comfortable, durable and yet still presents a good image, no matter whether you’re in jeans or a suit? Then take a run over to STM Bags and consider their Small Rogue backpack, designed for the MacBook or MacBook Air.

STM, an Australian-based company, has been producing its products for the past nine years and has made in-roads in the U.S. in the past five years, due to great products designed for laptop users. STM’s Small Rogue backpack, originally designed for the MacBook, but now also capable of carrying the MacBook Air, is designed with water-resistant external 600D polyester jacquard and pearl nylon, and utilizes 210d water resistant nylon internally, plus it also comes with a water-resistant rain cover for those extreme weather conditions that is skillfully tucked away on the bag. (Trust me, I went looking for it)

The backpack, with a heavily padded laptop section, provides outstanding protection for your MacBook. The ergonomic harness and shoulder straps provided a comfortable and secure carry for the MacBook. I really did not mind carrying the backpack around, no matter what I threw into the pack. I didn’t experience any stress points and the weight was evenly distributed. As you can see below, the backpack is well designed and provides a sporty yet professional look.

When you unzip the third outside compartment, you find more storage for mouse, power supply, AC power cord, etc. There’s a clip for keys, slots for pens, business cards, thumb drives, you name it and you can probably fit it in there.

Then you reach the large zippered area that contains the larger storage space area, good for gym clothes, running shoes, or notepads and files. Also located with the confines of this large storage area is the separate laptop EVA padded area. The nice aspect of the laptop storage area in the backpack is that it is not readily visible as being such. The MacBook fits securely into the area and is covered over from casual observation unless the top section is open.

As you look at the pictures, you’ll even see that there is a removable pouch for a cell phone, a headphone portal and even an iPod pocket. On the outside of the backpack there are two water bottle pockets, or soda bottle/vitamin water bottle pockets if so inclined. The backpack is high quality and it clearly shows, even in pictures.

I have run the backpack through the course of use. I’ve taken it to work, used it when on the move, watched it being “handled” by TSA inspectors, even used it to carry my running gear and other items in it. Everything inside the case has come through with no damage, and even the water bottles did fine on the outside pockets. The interior storage area for the MacBook does not rest up against the back of the pack; therefore it’s not subjected to additional stress. Even with additional items in the pack, there is no heavy stress on the shoulder straps, nor heavy weight on your shoulders or pressure on the lower back.

Everything about the backpack is designed with comfort and function in mind. Unless you really inspect the backpack, you won’t even see the hidden waistband that lets you secure the backpack even more to your body. There are straps across the front of the pack to hold the shoulder straps and straps on the side of the pack to allow for more security when you have gear in the backpack.

One of the best aspects of this backpack is that it just doesn’t come across to the casual observer as a laptop backpack. There are tons of backpacks in use daily; for school, for gym, you name it and backpacks are used for carrying things around. So placing your laptop inside the backpack, out of view, works for me as a deterrent to someone who may be looking to rip off someone’s laptop.

So to review:

Pro: Well-designed, durable and functional MacBook backpack that offers protection for your MacBook and does so with comfort and protection in the design. Provides storage space for the necessary MacBook accessories and much more.

Cons: If you’re not into backpacks, then you’re out of luck here. The cost of the backpack may scare some folks off.

Highly recommended!

My Mac rating: 4 out of 5.


Ever heard of PsyStar? Prior to Monday, April 14th, 2008 I never had. This Florida-based company (it just HAD to be Florida) announced a Mac-compatible computer for sale called the Open Computer (renamed from OpenMac in the last few hours) and caused a %&#$storm of EPIC proportions.

Of course making a Mac-compatible computer is in itself not that big a deal. Since Apple went to Intel processors, Macs ARE PCs, their commercials not withstanding. For those that feel like going through the hassle there are tips on installing OS X on vanilla PC hardware at various locations all over the web (hint) OSX86 and Google is your friend (/hint). There are hardware guides, using AMD processors instead of Intel guides, software guides, hacking OS X guides, and all other kinds of tricks to make it work on something that doesn’t have a big Apple corporate label on the side.

Naturally you’re pretty much on your own for upgrades to OS X or making it actually DO anything, and if you ever, EVER try calling Apple for help, the last sound you will hear will be gales of laughter from the Apple support person and the sound of a click as your call is disconnected. In this case however, installing OS X on plain PC hardware was not the issue. PsyStar did something that guaranteed that Apple would definitely not be laughing. They advertised that they (PsyStar) would install OS X on one of THEIR computers and ship it to you for $399. Well, sort of. The computer was $399, but if you wanted them to install OS X there was an additional $155 charge making the price now $554 (this does include a retail copy of OS X and a restore disk).

The information was pretty sparse other than a listing of what hardware the Open Computer came with. This is what the basic model had along with listed options:

  • 2.2GHz Intel Core 2 Duo (2.4GHz optional)
    2GB of DDR2 667 memory (nothing on additional memory or what the max RAM is)
    250GB 7200RPM SATA Drive (various larger capacity drives available)
    Four total internal SATA ports (one taken by the standard Hard Drive and one by the optical drive)
    20x DVD+/-R Drive with LightScribe capability
    Integrated Intel GMA 950 Graphics (GeForce 8600GT with either 256MB or 512MB optional)
    4 USB Ports (FireWire card optional)

Considering that one of the advantages of owning an Apple-branded Mac is built-in wireless networking in every model, I found it odd that no wireless cards were listed or even available as an option. I would assume that 10/100 gigabit Ethernet is standard as it is on most PC motherboards these days. No software was listed beyond OS X so that free copy of iLife that Apple includes with a new sale most likely wouldn’t be there either.

So why would anyone buy something like this? Apple’s very own Mac mini fits their low-end range and includes iLife 08. Seems like you would just buy the mini. Except PsyStar’s computer has a few option that make it stand out and make the mini look like the dead-end, what you see is all you get (WYSIWYG?) computer that it is. No offense intended toward the thousands of Mac mini owners out there as it’s a perfectly fine little computer, as long as you accept its limitations. As advertised, the PsyStar Open Computer is a superior machine in just about any way you want to look at it. The low-end model has a faster processor than anything offered in a Mac mini, it comes standard with 2GB of RAM (the mini still only has 1GB) with an option for up to 4GB not even possible with the mini. It has the same Intel integrated graphics as the mini, but has options for a card that equals or surpasses even the iMac. It uses a standard SATA 7200 RPM hard drive, while the mini uses a laptop drive and can’t even offer as much storage through options.

The only thing the Mac mini has going for it above and beyond the Open Computer is built-in FireWire (though it is available as an option) and built-in wireless networking which isn’t mentioned at all with the Open Computer, athough there certainly are a lot of wireless PCI based cards for sale elsewhere. You also don’t get the iLife suite which is for sale for $79 from Apple. If getting this for free (kinda) is important to you, you’re most likely not the target that PsyStar was looking at when they (if they have) built the Open Computer.

If you fully deck out an Open Computer, you’re looking at about $1000 (actually $945 plus tax and shipping) or so. However, the hardware would be closer to the equivalent of a high end iMac than a Mac mini. Here are the specs fully loaded:

  • Intel Processor: Core2Duo/2.66GHz (+ $90.00)
    Hard Drive: 400GB 7200RPM SATA (+ $95.00)
    Graphics Processor: GeForce 8600GT 512MB (+ $155.00)
    Firewire: 3 x IEEE 1394 (+ $50.00)
    OS X Leopard: Installed (+ $155.00)
    Memory: 2GB DDR2

The Open Computer has something going for it that no consumer model Apple builds currently does, expandability. Oh, not for swapping out video cards (though possible if NVIDIA or ATI ever decide to), but storage. My one biggest complaint about the iMac is lack of internal storage. Sure, FireWire and USB enclosures are cheap, but they take up a lot of room. A tower might take up even more, but it isn’t sitting on top of my desk with a bunch of USB and FireWire hubs to accommodate drives, printers, scanners, a keyboard, and a mouse.

Tell you what. Let’s move on from talking about hardware. This machine is almost exactly what I’ve been waiting for Apple to build for years. So I’m already sold with some caveats. Let’s talk about OS X.

Apple’s EULA (End User’s License Agreement ) is fodder for the sleep deprived and I wouldn’t dream of trying to copy and paste the whole thing here. For the sake of this discussion, what it does say is that it expressly forbids you from installing OS X on anything other than an Apple branded computer. What exactly does that mean? If I installed it into a toaster (work with me here), would Apple and its enforcement branch come swooping into my house, destroy the best damn toaster I’ve ever owned, and take me away to an iPrison (surrounded by iWalls, iGuards and bad iFood presumably)? No, because they can’t. The worst thing they could do is not offer me ANY support for my iToaster and probably hope I get iIndegestion. They could tell me I no longer have a valid license, but would that be enforceable?

Instead what Apple has done is sic their very impressive legal team on this company and threaten to sue them out of existence. This prevents anyone from challenging them legally since very few companies have lawyers capable of going mano e mano with Apple. So PsyStar will probably as quietly as they can remove any mention of the Open Computer from their website and deny that they ever offered such a machine in the first place with a classic bit of ThinkSpeak. They will most likely end up a minor footnote hardly worth mentioning in Apple history as written by Steve Job’s clone (blessed be His name) one hundred years from now. Except what has happened instead is that PsyStar has thrown down the gauntlet and is themselves threatening to sue Apple over its own EULA AND is now also offering a higher end machine they call the Open Computer Pro. The “Pro” machine offers performance that at face value is better than anything Apple offers in their consumer line and starts at $999. I again went to the site and fully loaded one with the following specs:

  • Memory: 8GB DDR2 RAM
    Processor: Core2Quad/2.6GHz
    Hard Drive: 1 TB 7200RPM SATA
    Video Card: GeForce 8800GT 512MB
    Case: Mirror Finish
    Installed OS: OS X 10.5 Leopard
  • Total: $2169

I won’t do cost or performance comparisons with Apple’s own iMacs since I don’t have one of these Open Computers (or Pros) to play with. Who knows what the build factor is like or how well it will hold up, or even if it will still work the next time Apple either updates 10.5 or releases 10.6. On paper it sounds like a pretty good deal.

So what happens next?
PsyStar is sounding tough but time will tell if they can hold out and support these machines. Even if the absolute worst happens and PsyStar disappears in an Apple generated category 5 hurricane that is targeted toward their Miami, Florida facilities. With this announcement something has changed. Someone with deeper pockets than PsyStar might see this as an opportunity. Someone with the guts to stand up and offer a machine for sale that will run OS X (pre-installed) and force Apple to a courtroom to explain why exactly it is that if someone buys a copy of OS X that they can’t legally install it once (and only once to stay legal) on hardware not designed and built by Apple. Why this company couldn’t offer their own support for software and hardware as long as it did not violate Apple’s software patents. Would you support and purchase a machine that ran OS X legally that wasn’t built by Apple?

Look at it this way, Microsoft sells OEM Windows licenses for a lot less than what PsyStar was charging for a pre-installation of OS X. I bet if they gave Apple that entire $155 that it would equal or be pretty darn close to what Apple makes on a typical iMac sale without them having to actually build anything.


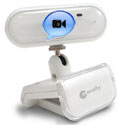
Most Macs Apple sells these days comes with a built-in iSight camera and microphone to allow for easy video chatting through iChat. However, if you get a Mac Mini or a tower, or you have an older Mac, you won’t have a built in iSight. Don’t give up, video chatting is still possible for you by following some (or all) of the tips below.

SETUP
Before any of this works you need an iChat login. You can use an AOL instant messenger name or a .mac name. Both of these are free. You can get an AOL name here. You can get a .mac name here. Sign up for a 60 day trial. Once the trial expires your .mac name will still work in iChat for free and for life.

If you want to be on the receiving end of a video chat and do not have to show the other party an image, you can receive audio and video without having those capabilities on your end. You only need iChat and an iChat login

CAMERAS
Apple no longer sells the stand alone iSight camera. If you want one of those be prepared to pay big bucks on eBay or some other auction site (even more then the pricey retail price when it was available).


There are other camera options out there for a lot less money. My parents use the IceCam by Macally. It works great and is very affordable. The picture is not the highest quality, but for basic video chat needs, it works great. A piece of software called iUSBCam from eCamm Network is required for the IceCam to work in iChat. It is only $10, but something to consider when pricing cameras.


The eCamm Network also makes a USB camera called the iMage Webcam for $59.95. I have not tried it, but it looks promising.

These are only two of the many options available. When shopping for a camera the one thing to look for in the specifications is that it is Mac and iChat compatible. Keep in mind the cheaper cameras will probably be lower quality (check the resolution).

MICROPHONES
Just because you need a camera, you may not need a microphone. My parents have an Emac, which has a built-in microphone, but no camera, My grandmother has a Mac Mini, which lacks both.

Like cameras, there are several options on the market at different prices. The higher the price, the higher the quality.


My favorite microphone is Logitech’s USB Desktop Microphone. You can find it for under $25 and the sound quality suits my needs for video chatting. It requires no drivers, which is great.

If you have an older Mac with a microphone jack (looks like a headphone jack with a picture of a microphone next to it) you can save even more money by buying a standard microphone with that connector.

OFF YOU GO!
You have your camera, you have your microphone, and you have your iChat name. All you need to do now is plug everything in, set up iChat, and find a few buddies. In the next Macspiration I’ll talk about how to set up iChat.

Leave your comments below.

Note: Once you have all of the equipment needed you can use it in Skype, or other chatting programs. They do not restrict you to iChat.


Spire Edge Laptop Sleeve
Company: Spire

Price: $20.00
http://www.spireusa.com

Ok, so you already have your laptop case/bag/backpack. Your MacBook is fully charged and you’re ready to go between offices but do you really need to take the laptop bag along? Not if you have yourself an Edge laptop sleeve that serves as a protective cover for your MacBook.

Spire’s Edge Sleeve for the MacBook as you can see in the pictures below is clearly designed to allow total coverage with a minimum amount of cost. The exterior of the Sleeve is made from 1680D Ballistic nylon while the interior of the sleeve is made from smooth, padded 210D nylon.

The sleeve is simple, stylish and straightforward. Put your MacBook in it as you travel between offices or just to protect it at home. Why allow your MacBook to get scratched up or have something drop onto it when you can have some protective cover on it? If your MacBook is not used constantly as your main computer and you want to protect it, consider an Edge Sleeve.

So to review:
Pro: Stylish and functional MacBook sleeve that offers protection for your MacBook and does so with a minimum amount of cost. Available in all-black or gray/black. The Edge Sleeve is also available for all other Apple laptops. Consider the Edge Sleeve as an additional source of protection for your laptop in that you can place your laptop in it and then place it inside a larger laptop case/bag or backpack.

Cons: None.

Highly recommended!
My Mac rating: 4 out of 5.

Tagged with:  

Looking for something?

Use the form below to search the site:

Still not finding what you're looking for? Drop a comment on a post or contact us so we can take care of it!