

Learn how to activate, change, and get the most from the built-in Screen Saver on your Macintosh.
Month: October 2005
Macspiration
10 Smart Playlists For Your iTunes Jukebox

Despite all the latest improvements in iTunes, the power of Smart Playlists remains the best way to navigate and get the most out of your ever-growing music collection. Bakari shows us how.
MyMac Podcast
#50
![]()
Contest Time! We announce the Prosoft Drive Genius contest winners, plus give instructions for the NEW Macromedia Studio 8 contest! Enter now, contest closes at midnight, Monday October 31st!
This is our longest show ever at almost an hour and a half. We talk the latest in the Mac world, how we record our podcasts, and so much more.
Get the show
(RSS) Subscribe to our RSS feed via iPodder or other RSS newsreaders
(iTunes) Subscribe to our podcast via the iTunes Music Store and have each episode downloaded every week automatically
(MP3) Download the MP3 file directly here, or listen in your web browser.
(Vote) For our Podcast on Podcast Alley
(YaHoo) Check out our listing at Yahoo and vote for us
Check out Chris Seibolds Sock Puppet MyMac.com Show!
Sponsor – SmallDog.com
Hosts – Tim Robertson and Chad Perry
Links
Prosoft Engineering, Inc.
Macromedia
MacMinute.com
MacCentral.com
Digigami.com (MovieToGo)
Send all feedback and MP3 files to MyMacPodcast@gmail.com
Interested in Podcasting yourself? Email Tim Robertson direct.
Photo Enthusiasts – Give Flickr a Try

Are you a shutterbug who wants more out of an online digital photo gallery than .Mac provides? New MyMac.com writer Bakari Chavanu takes us on a tour of Flickr, and why you should take a look at this terrific service.
Read MoreIntroduction to Wireless Networking

Want to learn more about the wireless technology Mac users take for granted? Or what all those confusing acronyms stand for, and what the difference between 801.11b and 802.11g are? David Cohen has the answer you seek. Read the article here.
Macspiration – Change That Desktop Picture
How do you change the desktop picture on your Mac? This article will walk you through the process step-by-step.
Read MoreMyMac Podcast
#49
![]()
The weeks top Mac news stories are discussed, including the new iMac, iPod, and iTunes. We finally get to interview Mac writer Bill Palmer, who joins us for a great interview. Audio feedback this week from Andrew Darlow, email reader feedback, and a new contest. We are giving away two copies of Drive Genius compliments of this weeks contest partner, Prosoft Engineering, Inc. Learn more about Drive Genius at this link. And we reveal the winner of the RadTech contest!
Tim thinks he knows what Apple, the Mac mini, and the Media Center are heading. Check out what he thinks in this weeks Focus Segment.
Get the show
(RSS) Subscribe to our RSS feed via iPodder or other RSS newsreaders
(iTunes) Subscribe to our podcast via the iTunes Music Store and have each episode downloaded every week automatically
(MP3) Download the MP3 file directly here, or listen in your web browser.
(Vote) For our Podcast on Podcast Alley
(YaHoo) Check out our listing at Yahoo and vote for us
Sponsor – SmallDog.com
Hosts – Tim Robertson and Chad Perry
Links
Bill Palmer (and here, here, here, and here)
Pirates of Silicon Valley DVD
Prosoft Engineering, Inc.
RadTech
Send all feedback and MP3 files to MyMacPodcast@gmail.com
Interested in Podcasting yourself? Email Tim Robertson direct.
Nemo’s Ten Point Tutorial #3

John Nemo shows how to record Audio Feedback for MyMac.com Podcast, Using Audio Hijack Pro
Griffin iVault
Review

Constantly dropping your iPod Shuffle? Do you slip it in your pocket and forget you have your keys and change in there too? Perhaps the iVault is for you.
Read MoreRoad Rules – Two FM Transmitter Reviews

Two FM transmitter reviews and a few tips for taking your iPod on the road. Chad Perry takes a look at the Griffin iTrip with LCD, and the XtremeMac AirPlay for the iPod Shuffle.
Macspiration – The Download Drawer
MyMac Podcast
#48
![]()
An early show this week. Tim and Chad talk to Mike Talmadge from ThoughtOut.biz about their cool new FlexPed. They are also offering a 10-20 percent discount for our podcast listeners, so be sure to download and listen. Go to www.thoughtout.biz/mymac for the special price, but listen to the podcast for the needed user name and password.
We go back in our Focus segment to 1995 and revisit the article 1-800-Buy-a-Mac written by Tim in which he telephones mac resellers to find out what was hot and not. Zip drive, anyone?
Sandro Cuccia sent in his Mac story. We would love to hear yours, so send in your MP3 file to us.
Get the show
(RSS) Subscribe to our RSS feed via iPodder or other RSS newsreaders.
(iTunes) Subscribe to our podcast via the iTunes Music Store and have each episode downloaded every week automatically
(MP3) Download the MP3 file directly here, or listen in your web browser.
(Vote) For our Podcast on Podcast Alley
(YaHoo) Check out our listing at Yahoo and vote for us
Sponsor – SmallDog.com
Hosts – Tim Robertson and Chad Perry
Links from the show
1-800-Buy-a-Mac
ThoughtOut and MyMac Discount Page
Binder Park Zoo
Wanted – Advertising Manager
Send all feedback and MP3 files to MyMacPodcast@gmail.com
Interested in Podcasting yourself? Email Tim Robertson direct.
Read MoreInvisibleShield for iPod nano
Review

Looking to protect your iPod nano? Writer David Cohen thinks he may just have a solution. Check out the review here.
FlexPed
Review
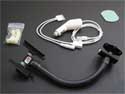 Looking for an ideal solution to mount your iPod in your car? Tim thinks he has found just that in ThoughtOuts new FlexPed.
Macspiration – Changing Icons
New to the Mac and want to learn how to change icons? This article is for you!
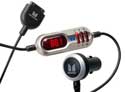
iCarPlay Wireless Plus
Review
MyMac Podcast
#47
![]()
Contest Time! This week, we are working with RadTech to give one lucky listener four cool items! To enter, listen to the podcast and send all entries to contest@mymac.com
Tim takes Chad by surprise with this weeks focus segment, Five Questions for Chad.
Get the show
(RSS) Subscribe to our RSS feed via iPodder or other RSS newsreaders.
(iTunes) Subscribe to our podcast via the iTunes Music Store and have each episode downloaded every week automatically
(MP3) Download the MP3 file directly here, or listen in your web browser.
(Vote) For our Podcast on Podcast Alley
Sponsor – SmallDog.com
Hosts – Tim Robertson and Chad Perry
Links from the show
Freecell Widget
VF1 Widget
Original Dwelling
Send all feedback and MP3 files to MyMacPodcast@gmail.com
Interested in Podcasting yourself? Email Tim Robertson direct.
My Odeo Channel (odeo/99be0c1cd029fbd4)
Nemo’s Ten Point Tutorial #2 – Shadows

Strong Seasonal Shadows With Help From Adobe Photoshop CS2. Learning the tricks of the imaging editing trade, by John Nemo.
ScanSnap
Review
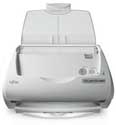
Looking to move all your documents into electronic format? Need a document scanner that is as easy to use as your Mac? Check out Tim Robertson’s review of the new ScanSnap.
Read MoreMacspiration – Emailing Photos using iPhoto
How easy is it to email pictures using iPhoto? Find out here!