
New From Adobe: Photoshop Lightroom 2.0
$299 New, $99 Upgrade, free trial available
Adobe Photoshop Lightroom 2.0 is a digital image cataloging application for serious amateur and professional photographers. Lightroom is a tool that allows users to import, manage, process, print, and share digital photos.
http://www.adobe.com/products/photoshoplightroom/
The thing I noticed when opening Lightroom for the first time is its beautiful interface. When running, Lightroom isolates the user from all other active applications in the background by filling the screen (or screens). Yes — Lightroom works with multiple monitors.
As you would expect, Lightroom 2.0 is a major jump up from iPhoto when it comes to managing your digital images. Lightroom’s color correction tools are far superior to iPhoto’s, and much more robust.
One of Lightroom’s most powerful features is in its importing process. Before images are imported into Lightroom, you are presented with a dialog box that allows you to determine how files are handled.
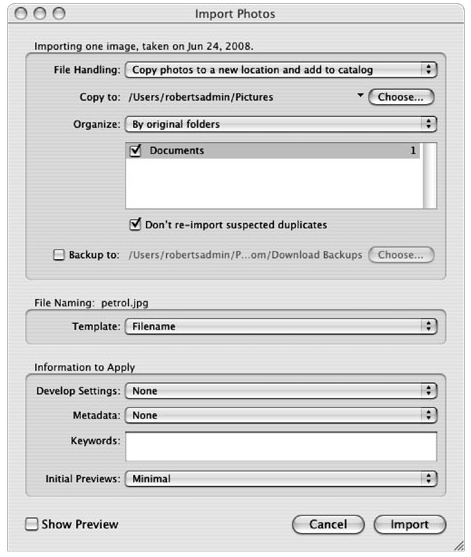
In this step of the import process you can apply keywords and metadata and even attribute Photoshop-like filters called Develop Settings. Lightroom 2.0 comes with a number of predetermined Develop Settings but you can create your own preset if you need to.
Once your images are in Lightroom’s library, you can rate or flag your images, as well as search your catalog. The mechanism allows you to search via Text, Attributes, and/or Metadata. This makes finding the images you are looking for a breeze. Lightroom 2.0 also allows you to create watermarked slideshows, and prints. Watermarking is a technique used by professional photographers to protect their images prior to being purchased.
Probably my favorite part of Lightroom is its Web interface. Lightroom by far has the simplest and easiest interface when it comes to creating an online portfolio of your work. I plan on using it when I recreate my portfolio. Although layout choices are somewhat limited, you can choose from HTML or Flash Galleries where you can adjust color, fonts, and image sizes.
The last part of Lightroom I choose to comment about in this introduction is the Develop section of the application. Although the tools are very robust for color adjusting and enhancement, I found myself a bit frustrated with the developing tools. Being a professional Photoshop user I expect more precise control over selecting areas of an image. When in the Develop mode users can straighten an image, spot remove (clone or heal) an image, reduce red eye, or add a graduated filter. You can also use the “adjustment brush” to paint you filters over certain areas. But the issue I ran into was there just isn’t anyway to make a precision selection like you can when working with masks in Photoshop.
Granted, Lightroom is not a Photoshop replacement. Lightroom is to be used in conjunction with Photoshop, but I did find myself wishing I had this type of control in Lightroom. So often my workflow demands that I select specific regions (down to the pixel) of an image, and Lightroom doesn’t offer this type of selection precision.
Still, the color control in Lightroom is much better then it is in Photoshop. I found doing my color corrections in Lightroom was much easier and faster. Especially when working in large batches of images at a time.
Overall I like Lightroom and will continue to use it to manage all of my photos.
Pros: Great for cataloging and searching images. Excellent color correcting tools, with easy to use web interface.
Cons: Slow performance on larger images with multiple filters. Lacks precise pixel selection
Initial Impressions – MyMac Rating: 4.5 out of 5.
email – MyMac Magazine – Twitter – Advertise – Reviews Archive – Podcast
![]()
Leave a Reply
You must be logged in to post a comment.