
Adobe Photoshop Lightroom 3.5
Company: Adobe
Price: $299 U.S.
Introduction
I am an amateur photographer, a passion I’ve had since 2000. In 2002 iPhoto became my photo management software, and I used Photoshop Elements for further editing my pictures. I switched to Aperture version 2.0 around 2009, keeping Photoshop Elements as my external editor. Last year, I upgraded to Photoshop CS5, and since then I always wanted to compare Adobe Photoshop Lightroom to Aperture, mainly because Aperture and Photoshop integration is poor.
This review/article about Lightroom 3.5 is the result of that investigation. To compare both applications in depth would take much more than a few pages, as you will read below. But at the end, my hope is that you will find some help when considering jumping to professional image management software.
Setting up the software
After installing the applications and entering the registration codes, a few basic settings are required before the photo work begins. Software such as Lightroom or Aperture needs to be customized before you start. Your first step should be to go to Lightroom/Preferences… or Aperture/Preferences… and adjust a few things for your specific workflow.
Both applications have pretty much the same set of preferences in general. For example, you can adjust some interface things such as fonts and window color.
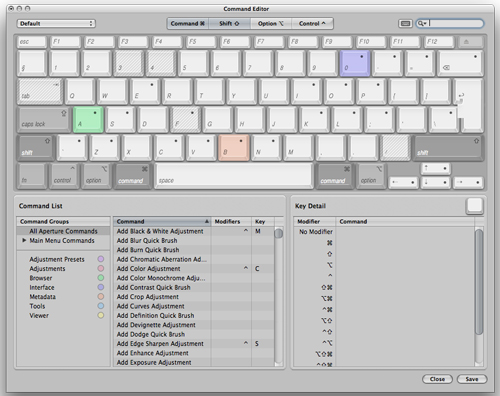
There are a few differences that may offer some advantages in both applications. For example, Aperture does have preferences to name the labels (color you can attached to photos). It also has a preference to enable the Faces and new iCloud Photo Stream features. The major preference that Aperture has over Lightroom is a fully customizable keyboard shortcut.
Lightroom also has preferences that Aperture is missing. The first one I really liked is the possibility to include the presets (Import Presets for example) into the catalog itself. If you move your library from one computer to the other, in Aperture you have to manually find the plist files in which those presets are and copy them to the new computer. This may also override things you have on the new computer.
Another simple but very useful preference Lightroom has over Aperture, is the possibility to write the side files (.xmp) that include the changes you did into Lightroom. In Aperture the only way to go to an external editor with the changes applied, is to launch the editor (say Photoshop CS5) from Aperture itself, letting it create a copy with the changes made. If you browse your RAW files with Bridge CS5 for example, the changes made in Aperture won’t be seen.
Library management and importing Lightroom into Aperture
Both applications use the notion of library. In Lightroom it is called the catalog, but you access it from the Library module. Aperture and iPhoto just call it Library. To simplify the reading of this article, I will use library as a general term for both applications.
Before importing any pictures to your library, you have to decide how to manage your files. Aperture offers two ways of managing your pictures. The first way is to have a managed library, in which your masters are stored into the library itself. The other mode is to work with referenced masters and, in this case, your files are stored on your hard drive in a directory you choose yourself. iPhoto also offer those two modes of operation in its preferences.
Lightroom uses the referenced files only, which means you have to organize the directory at import. Is it really a disadvantage? It may depend on how you work. If you use a single library for all of your projects, the referenced mode is preferable to the managed mode in Aperture. A manage Library will become too big, especially if you shoot RAW or RAW+JPG. The reference file also has the advantage of letting you open your master files from another application, say Photoshop CS5 or Bridge CS5, without launching your library management software.
Personally, and because I prefer to have only one library for all my pictures, I was using the referenced mode in Aperture. In this situation, migrating to Lightroom is as easy as pointing Lightroom to the directories containing your files and let it create its catalog from them. If using the managed mode (in either Aperture or iPhoto), you’ll have to extract your masters from your library file before proceeding. In Aperture this can be achieved easily with the File/Relocate master… command.
When importing the Aperture library into Lightroom, there are a few things you have to leave behind. Aperture makes due diligence of itself to keep your master files untouched no matter what you do. Everything you do in the software is kept within the Library, including any retouching and metadata you’ve attached to an image. So far, I have not found any way to import them into Lightroom. This may not be major, as you can keep Aperture nearby for your old stuff, but if you plan to rebuild everything, that may be time consuming.
Importing
Once you set up your environment and decide how to manage your files, your next task will be to import photos into your library. On this point, both Aperture and Lightroom have their pros and cons. I must say that both applications have a nice and easy-to-use Import panel which is very intuitive. Importing pictures into the library may look trivial, but it is not. This is the first step where you have a chance of making your library searchable and organized. It is important you do it right
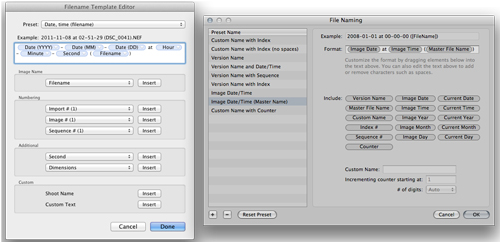
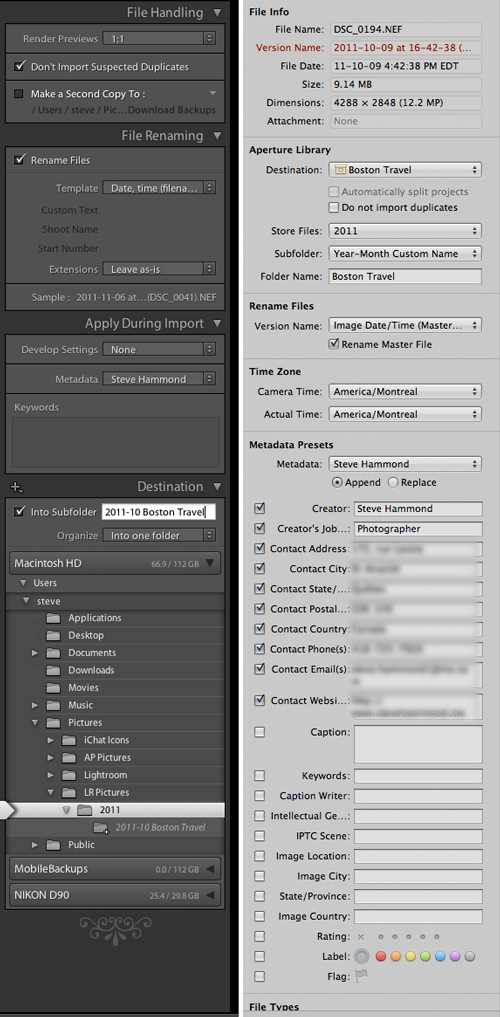
The way I import my pictures is simple, but needs a bit of preparation the first time. I personally use a directory structure that is based on the year, then a subfolder with the date and a short description of my import (basically something like /2011/2011-10 Boston Travel). Then I choose to rename my files on a format of the date, time and original filename in parenthesis (Ex: 2011-10-09 at 10-25-56 (DSC_1234.NEF)). Nothing too fancy, but I want this to be there when I’m looking at my files.
Both applications offer ways to manage the customized file names easily. This is done with building blocks of metadata you can choose from and add to the filename.
Once my file name was set up, using the Import panel on both applications felt about the same. It’s important to make sure you have a backup of your original files. Aperture and Lightroom offer the possibility to make a backup of the files you import in a second location at time of import. For example, it is good habit to have a copy on one drive (say, your internal drive), and a second copy on a second drive (a USB, Thunderbolt or Firewire device) in case the main drive fails. Once you erase your memory card, you then have two copies of your original files.
Some other common features include the possibility to apply fixes to your pictures while importing. In Aperture it is called Adjustment Presets and in Lightroom Develop Settings. That is not something I use very often, but it could prove useful if, say, you know the white balance on your camera was not set properly at time of shooting. It is also possible to tag almost every IPTC metadata available at time of import. Both offer a way to define metadata presets you want to have in every pictures (say, your name, company name, copyright information, web site, and much more).
Aperture has the advantage of letting you change every one of those fields at import time without tempering with the preset; Lightroom does not offer this. In Lightroom you still can update them after importing in the Library module. When entering keywords, Lightroom offers a drop down of previously entered keywords that you can select with Enter, while Aperture is not very smart about this. Aperture also offers to change the time zone in case you forgot to do it in the camera while traveling. This is mostly useful for frequent travelers. For folder naming, Aperture lets you define a preset like the filename, in Lightroom you have to enter it manually.
At import time, Aperture asks the user to select a Project to have your files placed-in into the Library. Aperture uses a concept of Project, which could represent anything from travel (ex: Boston travel Oct. 2011) or a model shooting (Ex: Lisa Oct. 2011). If you use the referenced master files concept in Aperture, you also have to choose the import directory. Lightroom offers the concept of Collections, but you do not have to choose one at import. It simply asks to choose the folder you want to place your pictures into. This may have some advantages on both sides, as you will see in the next section.
Managing your pictures
Once your pictures are imported, you need to classify them in some ways to find them later. One of the first steps should be to rate good pictures versus the bad ones. In digital photography, we are no longer tied with limited film rolls, so we tend to shoot more, and think later. Most likely, some of your pictures are totally out of focus, or even with the best digital retouching tool, won’t give any good result. You may want to concentrate your edits to good pictures only. In that regard, both Lightroom and Aperture offer a five star(s) rating, a reject rating, flag/unflag status and color labels.
To work this out, in Aperture you go to the Library inspector and in Lightroom you choose the Library module on top-right of the screen. Both applications have similar paradigms for classifying your pictures, they just name it differently. In Aperture, you can create a blue folder while in Lightroom you will create a Collection Set. In that division, you can store multiple projects related to the same subject, that are called Project in Aperture and Collection in Lightroom. Both applications also have Smart Album and Smart Collection to help you sort out things automatically with rules (Similar to iTunes or iPhoto). For example, you can have a set of rules to group every pictures taken in 2009 with a five stars rating labeled in red.
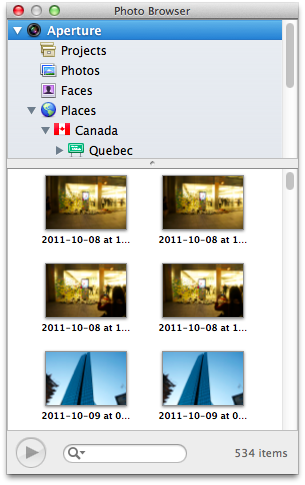
All in all, both applications offer similar management capabilities. Aperture offers two other methods of classifying your pictures: Faces and Places. The first one lets you name faces in your picture with a proprietary face recognition feature. This is great for, say, family and friends pictures, but for a professional photographer doing portrait shooting, it is less than useful especially since it takes lot of time to build the Faces database. I personally almost never use it. The Places feature is especially useful if your camera has a GPS built-in. It will shows pins of where your pictures were taken on a pretty world map. If your camera does not have GPS, your can tag them manually, but again it is a lot of work.
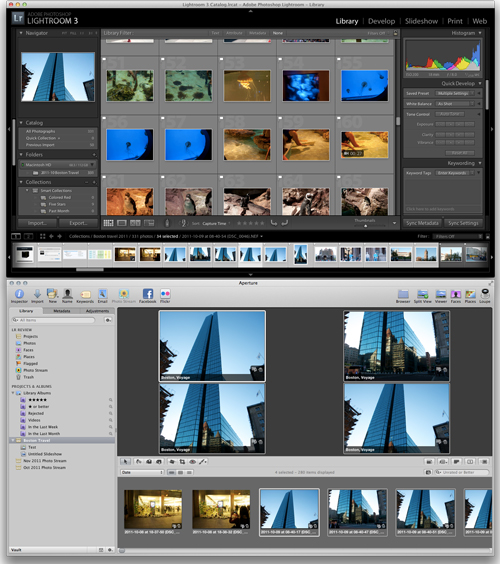
If there is something I can complain about the Lightroom Library module it is that on a very small screen like a 13†MacBook Air, its interface feels a bit cramped. The same view in Aperture feels more spacious and easy to work in. But on a 27†iMac, Lightroom, likewise for Aperture, feels comfortable and easy to use.
Making good pictures of your shoot
Aperture and Lightroom offer the benefits of management and adjustment of pictures in the same environment. Both use the paradigm of non-destructive workflow. It means that every change you make to your pictures leaves your original untouched. You can make many versions of a single picture starting from the master copy. Or, you can start from one version and, for example, create a black and white from this version. In any case, your master file is untouched and only the changes are saved into your library.
This implies that only the commands to make the changes are saved into your library, instead of multiple copies of the same master. If you want to revert a change, you simply reopen the image in the Adjustments inspector (Aperture) or in the Develop module (Lightroom), change it again, and the changes are applied from the master, not from the previous copy. You always have the original image and its information to work with.
For comparison, in iPhoto when you change something to your picture, the original is saved as-is, and the new picture is a modified copy of the original. If you want a different version, you need to have multiple copies of the same image, which takes more space on your hard drive. Each change you apply is permanent. If you want to revert one small change, you have to start from the beginning. This makes it clear why professionals and prosumer photographers are more likely to use Aperture or Lightroom, especially if you shoot RAW, a space in which iPhoto is pretty poor, but Lightroom and Aperture are very strong.
To make changes to your image, you choose the Adjustments inspector in Aperture, or the Develop module in Lightroom. The way Aperture works for adjustments is by stacking different modules called Bricks. Each Brick can handle a specific task and is named accordingly. For example, you have the White Balance Brick, the Black and White one, the Sepia, Red Eyes correction, in total 22 different Bricks. Lightroom does have a similar way of splitting adjustments with disclosure triangles such as Basic, Tone Curve, Detail for a total of eight of them.
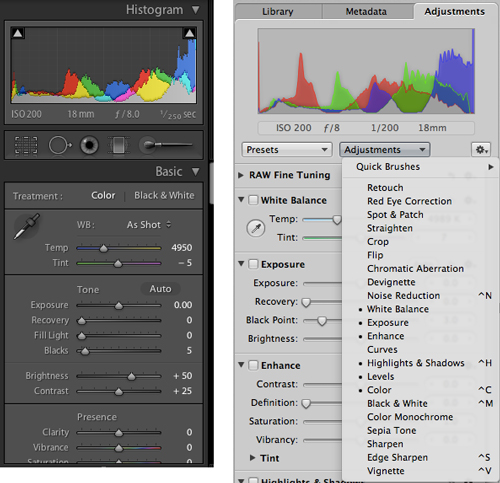
Looking at the number of adjustment panes, one may think that Aperture has more features than Lightroom. But they differ only by the way they are arranged. And Lightroom has some panes that combine multiple functions, such as the HSL (for Hue/Saturation/Luminance)/Color/B&W which is a three-in-one.
In fact, Lightroom has one adjustment pane that Aperture doesn’t have, which is Lens Corrections. This feature is basically the same thing you will find in Photoshop CS5, but is integrated into Lightroom. It will help you correct lens aberration (distortion for example) that certain lenses can produce at time of shooting. If you don’t have Photoshop CS5 for lens correction, and do not plan to buy it, Lightroom will offer you the feature for the same price.
Most, if not all, of the other adjustments are very similar and both applications can accomplish the same tasks using different sliders and checkboxes. For example, in Aperture the Highlight and Shadow Brick does basically the same as the Fill Light and Blacks sliders found in the Basic pane of Lightroom. Overall I cannot say that one is better than the other in terms of available adjustments: they are pretty much the same, just presented and used differently.
Sharing your pictures
Once your pictures are to your liking, you want to present them to friends and family or to your customer. Again, both Aperture and Lightroom offer some great features to help. You can export your picture to popular sharing sites such as Facebook or Flickr. Lightroom also has a built-in SmugMug Export Presets. You can also export your pictures to a hard drive in JPEG (or other) format for sharing on a USB thumb drive or CD/DVD. Aperture still offers sharing to MobileMe Gallery; that is sadly due to disappear at the end of June, 2012 with the transition to iCloud. You can also share them directly via email with one click from the Aperture toolbar, but in Lightroom you have to set up an Export Preset for email within the program before proceeding.
One other way to share your pictures is with a slideshow. Such a presentation offers an attractive way to show your pictures with music and animation. In that regard, I must say that I found Aperture to have more slideshow themes. Apple has built-in many attractive themes you can use. The Lightroom Slideshow module feels a bit difficult to use and does not offer easy built-in themes you can start with. For better slideshows you may want to export your Lightroom pictures to disk and use the free Mac bundled iPhoto (if you’re on a Mac) or another slideshow program to get better results.
Publishing to the web is another popular way to show your images. If you do not want to use sites such as Flickr, Aperture and Lightroom offer ways to build web pages from the application itself. On this side of the equation, Lightroom Web module has many built-in templates with or without animation, while the Aperture selection of themes is limited. Some animated templates from Lightroom may use Flash, which you may want to use or not depending on your audience. If you know that many people visit your web site with iPad and similar devices, that may not be a good option.
Finally, even in our digital world, printing is still an available option. Aperture uses the standard File/Print… command with an enhanced interface to help print your images. Lightroom has a dedicated Print module for this task. In either program you can arrange your printing in many ways, and you can save your customized print with presets. I personally found the interface for doing so in Aperture is more friendly. But you can accomplish the same things in both program, again, just with different sliders and checkboxes.
Aperture, like iPhoto, offers a Book feature in which you can build a photo book and have it printed by Apple services. I never tried it personally, but I’ve heard that the result is great. The thing that many users don’t know about the Aperture book feature, is that it can also serve as a layout program to help print your pictures in a particular arrangement. You can then print it yourself on your printer or you local photo lab (you’ll need to export it in a portable format for this to work).
Backup and other features
Once you have done all that work, you don’t want to lose it. That is where a backup is a very good idea. At the beginning of our session, we imported the master files and made a copy of them on another hard drive. But all the work we made in Aperture or Lightroom is stored in the library and need to be backed up as well. For this purpose Aperture offers a Vault management system. In Lightroom, a backup catalog can be set up in the Preferences to be executed when you quit the program.
Aperture‘s Vault system will backup your images too if you choose the managed file system. Otherwise, in referenced mode, Aperture and Lightroom act the same: they will save the changes made in the library, such as photo adjustments, blue folders/collections and other things specific to the application. Lightroom will query you for backup, based on what you schedule in the Preferences, when you quit the program. Aperture relies on you remembering to click on the Vault pane and the update button (or via its equivalent menu item). On Mac, your library will also be saved by a Time Machine backup, but the advantage of a specific backup for the Library is that you can rebuild the library with specific details. I never had to use the feature for restoring my library, but that is no reason for not doing it.
These applications offer many other features that I cannot explore in this review, but there are a few that are worth mentioning. One that may interest some of you is tethered shooting. You can attach your camera directly to you computer via a USB cable, shoot, and have your pictures directly imported into your library. There are more advanced programs to do so on the market, but if you need the feature for only a small portion of your shooting, it is a nice to have for the same price.
Aperture offers a few goodies that won’t be found in Lightroom. For example, your Aperture Library will be accessible from any program using the iLife Media Browser integrated into Mac OS X. Any version of your images are a few clicks away from any other program. If you have an iPod/iPhone/iPad that you want to sync images from a specific project or album, they will appear in iTunes for you to sync without much more work on your side. In Lightroom, you will have to export the image to a folder before being able to import them in other programs or to your iDevice.
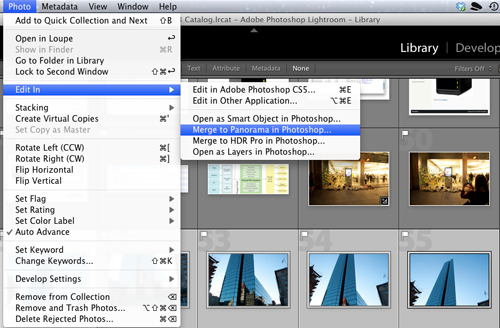
On the other side, Lightroom supports a better Photoshop integration than Aperture. While Aperture offers you a way to choose an external editor to open your pictures in, such as Photoshop CS5, it is poor at integrating advanced features available in Photoshop CS5. For instance, in Lightroom if I want to create an HDR picture or a Photomerge from many pictures, it is just a few clicks away. When saving the result, it will show up immediately into the Lightroom catalog. In Aperture you will need to export the master files to disk (or find them in their respective directory) and open them manually from Photoshop or Bridge to get to the same function. And then, you’ll need to import the resulting image back into Aperture manually.
Conclusion
After working with Lightroom for a few weeks now, I can tell you it is a solid piece of software. It is strong at managing a huge library of images, fast on search, and has powerful tools to correct the most obvious image problems you’re likely to encounter. Its integration with Photoshop CS5 advanced features makes it a good choice if you are using it often. For example, if you shoot portraits and go to Photoshop CS5 to make compositing from a few pictures of the same model, Lightroom feels easier to integrate in your workflow than Aperture.
If you do not use Photoshop at all, or very lightly, Aperture is a good choice and offers basically the same features as Lightroom. If you are coming from iPhoto, transferring your pictures to Aperture is a snap, but you will have to work a bit more to get them into Lightroom. Migrating a referenced library (Aperture or iPhoto) to Lightroom is easier, but you’ll lose your edits and metadata.
If you are using Aperture and plan to migrate to Lightroom, probably the fastest way would be to leave your Aperture library as is, use your referenced files and import them into Lightroom, and add metadata only if required. You can still search and find the pictures you want in Aperture, and retrace them in Lightroom directory structure easily. It is possible to use Aperture along with Lightroom, you can import from Aperture to a reference file model, and keep Lightroom pointing to this same location. Lightroom has a Synchronize Folder… command that will update the structure and files on your drive, by doing so, the files imported from Aperture will also appear in Lightroom. This way you get the best of both worlds!
Adobe Photoshop Lightroom is available in box copy that you can find in many software or photography stores. You can also buy it directly from Adobe’s web site, and you will receive a digital registration number from the site. Apple used to sell Aperture in box copy only for $199, but when the Mac App Store appeared in January, Apple decided to discontinue the box and sell it exclusively online for $79.99. You can download a 30 days evaluation version of both software from their respective vendor’s web site.
If you do not have any photo management software (or iPhoto only) and want to make a decision, I can say that either one will do the job. Aperture is available on the Mac App Store for a very affordable price that may be tempting if you’re on a budget. If you already use Photoshop CS5 and Bridge CS5, obviously the $299 price tag of Lightroom should not scare you, and you’ll get a better interaction between the two. You may also want to consider what your friends and colleagues are using, to exchange tips and tricks about using your photo management application. If you work with other people who are working on Windows PCs, Lightroom is the only software available on both platforms. You may then choose to go that path for better integrating your workflow with your peers.
In my rating of Lightroom, I considered that I am still not as used to the software as I am with Aperture. From an interface perspective, I find Aperture more Mac styled, better integrated with the OS, but for an Apple application it is no surprise. Lightroom has an interface that feels a bit darker, somber, and looks more like a Windows program than a Mac one. That does not remove anything from Lightroom‘s strong photo management and enhancement capabilities.
On the other hand, if I was to write a review of Aperture 3 alone, it would get the same score. I honestly think that Aperture and Lightroom can learn from each other. In fact, if I was asked what the best pictures management software should be, I’d say that it has to be the best of Lightroom and Aperture together.
MyMac Review Rating: 9 out of 10
Steve, I tried the Lightroom 3 and Aperture 3 demos at the same time when I was considering which to buy, and I really liked both, but I wound up going with Aperture. However, I’m always keeping my eyes on Lightroom. In some ways, I feel it’s a better piece of software.
I have a couple questions though.
1. Can you add multiple adjustment panes of the same adjustment as you can in Aperture? IE, can you add multiple dodge or burn or curves adjustments so that you can make independent changes which are easily removed?
2. I can’t remember which adjustments can be brushed in or out. Aperture is very flexible this way. How flexible is LR with granularity of control over applied adjustments?
Aperture has good tools for managing geolocation information, which I like to include in photos that I’ve taken away from home. How does LR handle this?
I do like the lens correction. You can do this in Adobe RAW in PS but it’s not optimal when your workflow is mainly in Aperture. I cannot believe Apple didn’t include this, it’s so basic that it’s not even funny.
Oh, one more question… performance. How did they compare that way? I find Aperture 3, even after multiple updates to address performance, is a bit of a pig, especially when zoomed in or in full screen mode and doing adjustments.
Hi Scott,
So many good questions and things I would have loved to explore as well. In the time I had for this review, there is many facts that I had to leave behind. I’m still exploring Lightroom.
As for geotagging your images, I found that Lightroom is not friendly as the Place feature in Aperture. If your camera supports GPS, which is likely not the case if you’re doing it in Aperture, it will appear in the EXIF metadata and Lightroom can access them. Otherwise, you may have to rely on third party software of plugin like explained in Lightroom online documentation:
http://help.adobe.com/en_US/Lightroom/3.0/Using/WSFB9BFF22-9A60-4dfc-8CC0-F2A09B515BE7.html
On Macs, HoudaGeo (http://www.houdah.com/houdahGeo/) has a good reputation.
Oh, and I forgot: about the lens correction feature in Lightroom, my guess is that it is a feature imported from Photoshop CSx from the Adobe labs. That may be a technology that Apple do not have access to from elsewhere, so it may explain the lack of this feature in Aperture.