
TechTool Pro 5.0.4
Company: Micromat
Price: $98 (upgrade from any prior version, $59)
Micromat.com
As a very young boy, I can recall many a time when I’d try my darnedest to convince my Dad, a glazier, to take me to work with him. “Tell you what,†he’d say. “The day you can lift my toolbox, that’s the day you’ll be ready to come with me.†Of course at that age I couldn’t even budge it, and wouldn’t be able to for many more years, given its size and weight and the hundreds of tools contained therein. But I always figured if I could just carry that toolbox around with me, I’d be able to fix anything.
Thanks to Micromat’s TechTool Pro 5, I’ve finally got that toolbox – and the best part is, it’s all on a DVD that weighs less than an ounce. The comprehensive suite of diagnostic tests covers virtually every part of your Mac, the tools are capable of addressing a wide variety of disk-related problems, and the protection features provide early warnings for problems yet to come. Sure, there are a few tests whose usefulness is debatable, and some of the tools already exist as freeware or as part of the operating system itself, but after putting TTP through its paces on a selection of Macs both old and new, I’m convinced that this is one toolbox that’s coming with me on every job.
TechTool Pro 5 (hereinafter referred to as TTP) takes a three-pronged approach to Mac troubleshooting – tests, tools and protection. The Tests area of the program consists of diagnostic routines that check the “health†of your hard drive, memory, volumes and files as well as select components like the processor and USB bus. The Tools area of TTP provides the ability to repair disk directories, optimize files and volumes, recover deleted files and even securely “wipe†data from a drive. One unique aspect of TTP’s Tools is the eDrive feature, which allows you to create a separate bootable partition on your hard drive containing a copy of TTP, which can be used to boot up your Mac and attempt repairs in the event that your primary partition becomes damaged or unusable.
The third and final aspect of the TTP program are the Protection features which, when enabled, monitor the amount of free space on your hard drive, back up your disk directory, track deleted files and check the SMART (Self-Monitoring Analysis and Reporting Technology status of your drive. TTP will alert you if your free space drops below a specified threshold, or if the SMART reporting for your hard drive indicates a potential failure. You also have the option for email alerts to be sent out in case you don’t happen to be in front of your Mac when a potential problem rears its ugly head. While TTP can be run by booting from the DVD (OS X 10.5.5 is pre-installed), the protection features aren’t available until you actually install it on your Mac, and are controlled via a System Preferences pane, as shown in the illustration below.
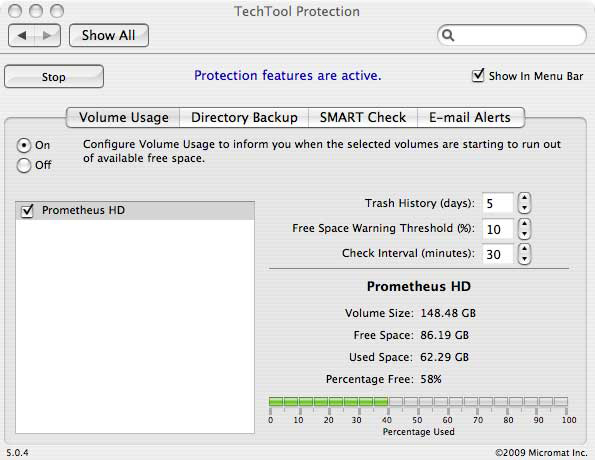
The TechTool Protection preference pane allows you to enable or disable TTP’s protection features, as well as fine-tune some of the settings. Here, I’ve adjusted the threshold for the free space warning on our boot partition to 10% and the Check Interval to 30 minutes. Note that you can toggle individual TechTool Protection features like the Directory Backup on or off, in addition to enabling or disabling the entire suite all at once.
Let’s take a closer look at each of the three TTP areas, starting with Tests. Each time you fire up TTP, whether you’ve running it from the bootable DVD or your own hard drive, a series of automatic tests are initiated which check the cache, USB and FireWire busses, processor, and network (if connected wirelessly or via Ethernet) and provide the relevant specs for each. The results appear not as numerical displays or bar graphs, but as a series of readouts on the gauges of a faux instrument panel; it’s no wonder the system requirements for TTP 5 specify Quartz Extreme capability, a requirement that might seem, er, extreme for a troubleshooting utility. I’ll admit, I’m a sucker for over-the-top eye candy as much as anyone, and Micromat has included plenty of it in this package.
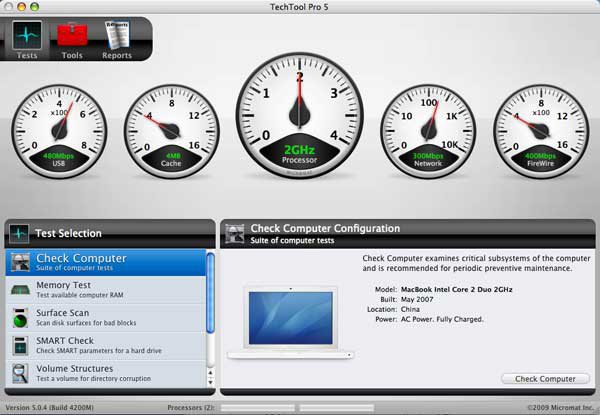
TTP’s Automatic tests display the critical specifications of my 2.0GHz MacBook using animated instrument panel gauges, an example of the over-the-top graphical displays that appear throughout the Tests and Tools areas. The program also identifies the specific model of Mac being tested, as well as when and where it was built. Strangely, while TTP identified my MacBook accurately, it labeled my PowerBook G4 12†1.33GHz as a “PLG†and an ancient G4/533 tower as an “L8G,†although it was able to determine the correct system specs, build date and location for both G4 models.
Once the automatic tests have run, you have the option to initiate the “Check Computer†sequence, which steps through all the tests available, or you can select to conduct individual tests from the Test Selection menu. Any test can be cancelled at any time after being initiated, without incident, so you’re never locked into the last 03 minutes of any test should you elect to bail prior to completion.
The complete suite of tests include:
• Memory Test – This runs a series of esoteric test routines like “Extended March C-†and “moving inversions†on all installed RAM, with the option to limit the duration of the testing to anywhere from one minute (the default) to 90 minutes. While having control over the duration of the testing is essential, I think the default should be at least five or ten minutes, as memory problems can be elusive and it’s very possible they would not be detected via a one-minute scan.
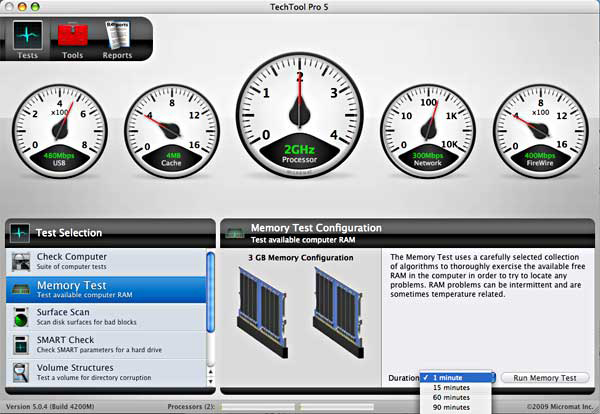
Testing RAM thoroughly can take a while, and in some cases problems appear only when your Mac’s internal temperature exceeds a certain point. If you want to give this test the best opportunity to find defective RAM chips, run the test for the maximum 90 minutes duration, and then run it again, just to be sure.
• Surface Scan – Scans the entire hard drive for bad blocks. This test took approximately 50 minutes to run on my MacBook, and could take much longer for larger drives. Although the test will identify any files that reside in bad blocks, there’s nothing you can do at that point but back everything up and format the entire drive, since if the file is located in a bad block it’s probably not recoverable anyway. I would recommend skipping this test unless you’re working on a very old drive or a drive that seems to corrupt files on a regular basis, and even then I’d run it only after I’d run the Volume Structures check (see below) and “Volume Rebuild†from the Tools area.
• SMART Check – As the name implies, checks the aforementioned SMART status of your drive. If any of the SMART parameters appear in red, you should consider backing everything up immediately and replacing your drive, as most problems revealed by the SMART system are indicative of a hard drive that is in imminent danger of failure. Hard drives are inexpensive enough these days that it’s not worth taking chances with your data.
• Volume Structures – Basically, this test does what “Verify Disk†in Apple’s Disk Utility does – it checks the integrity of the disk directory, which keeps track of where everything on a particular volume is stored. If problems are found, you should reboot from the DVD and use TTP’s Volume Rebuild tool to repair the directory.
• Video Memory – â€Exercises the VRAM†to check for problems with your video chipset. While it only takes about three seconds, it’s a throwaway in my opinion; if your video output was on the fritz you’d certainly know about it prior to running this test.
• File Structures – Checks individual files for corruption; unfortunately it works only on a limited set of file types (.plist and .xml files, some image formats like JPEGs and TIFFs, MP3 files, and .TXT files) and isn’t able to repair the corruption, but simply alert you to it. In my testing it accurately detected a pair of AirPort configuration files with badly-formed XML and a corrupt PDF, but also flagged a couple of Photoshop sample files whose only crime was being in 16-bit TIFF format. Micromat claims TTP will support more file types in the future, and I’d suggest that support for Microsoft Office, QuarkXPress, and Adobe Illustrator/InDesign files would be most useful here.
Moving on to the Tools, we first encounter TTP’s eDrive, a truly innovative feature that’s phenomenally easy to set up and could prove to be phenomenally useful if the directory of your main volume is damaged. The eDrive is actually a separate partition containing a stripped-down, bootable version of whatever operating system is on your Mac, along with a working copy of TTP. In the event your Mac refuses to start up, you simply boot with the Option key held down, choose the eDrive icon as the boot drive, and then you can run the various TTP Tools from the eDrive in order to resurrect your Mac.
To create the eDrive partition, all you need do is boot from the TTP DVD and proceed to the eDrive option under Tools. You select the volume you want to “split†to create the eDrive, and you even have the option to choose a different drive from which to copy the system files (although in most cases you’ll want to use your boot drive for this, as you know for sure the system on there will boot your Mac). There’s no need to reformat your drive, or copy all your files to another volume; TTP creates the partition “on the fly†while employing some more nifty eye candy, as folders corresponding to each directory being installed march across the screen. In about 20 minutes, you’ve got a separate bootable partition, ready for the next Mac emergency. The manual states that a 12GB partition will be created, although mine was a more-efficient 7GB, with about 1.3GB of free space remaining. The eDrive is read-only, and does not mount during “normal†computer usage, both of these steps taken by Micromat to ensure that the eDrive remains intact and ready to assist.
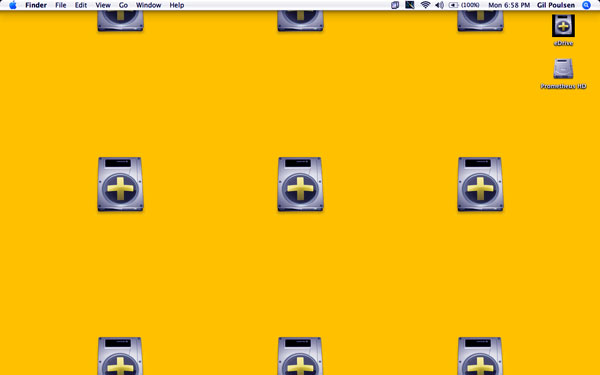
Starting up from the eDrive results in a desktop studded with massive eDrive icons and a background color looking for all the world like a heaping helping of pure Florida orange juice. Apparently Micromat’s programmers wanted to ensure there’s no mistaking which partition you’ve booted from.
I was able to create eDrives on my other two test Macs as well, boot from them, and run the various tools successfully, although my venerable G4/533 tower struggled with some of the Quartz Extreme-dependent eye candy. Interestingly, the tower booted with the TTP Pro DVD running OS X 10.5.5, somewhat surprising given that Leopard can’t be installed on any G4 with a processor speed of less than 867MHz. So apparently even those of you with pre-Leopard compatible G4 Macs can still boot from the DVD and make use of the eDrive; according to Micromat the official system requirements for TTP are a G4 processor, OS X 10.4.9 or better, 512MB of RAM and, of course, a DVD drive. And for those of you who might be wondering, “What if I start running out of room on my boot drive, and I need the space back,†fear not. I was able to remove the eDrive partition successfully from all three test Macs, without incident or data loss, simply by booting from the TTP DVD and clicking “Remove eDrive.†Twenty minutes and an icon parade or two later, all the free space previously used by the eDrive was restored to the original volume.
The other available tools are as follows:
• Volume Rebuild – Checks your disk directory structure for problems, creates a new directory, and presents you with comparison data so that you can decide whether or not to replace the original one. Changes to the original directory are indicated in green if they are “favorable†(in which case you should go ahead and replace the directory) and in red if they’re “unusual,†meaning that replacing your current directory might cause you to lose some data. The Volume Rebuild tool is basically a more sophisticated version of Disk Utility’s “Repair Disk,†though perhaps a less sophisticated version of Alsoft’s Disk Warrior in that unlike Disk Warrior, it does not allow you to mount a preview of the replacement directory as a disk and, if necessary, drag files from it in order to recover them from a severely damaged drive. I replaced the directories on all three test Macs successfully, though none indicated any “unusual†changes, so I can’t really say how well TTP’s Volume Recover would fare in a head-to-head-to-head competition with Disk Utility and Disk Warrior.
• File Optimization/Volume Optimization – Although there are some who maintain that optimizing/defragmenting your drive does boost performance, the general consensus among Mac techs seems to be that defragmentation under OS X offers minimal benefits, and an Apple tech note states that for the most part, optimization is not necessary. I previewed TTP’s File Optimization on my MacBook, and out of a total of 469,397 files, the only fragmented file was my Windows XP partition running under Parallels Desktop. Granted, your mileage may vary, and I’ve no reason to think these tools won’t work as advertised, but given the questionable advantages of defragmentation, I wouldn’t bother with them.
• Data Recovery – Assuming you have the TTP Protection features enabled (as noted earlier), you have three options for recovering lost or deleted files. When the Data Recovery tool is employed, the first option, under the Protection tab, contains a list of backups of your disk directory. You can search these backups individually to locate a particular file using a search string (like “Home Inventoryâ€) and TTP will check every directory that’s available for a record of that file. The second option, the “Drives†tab, searches the current directory in the same manner. Files matching your search are listed by name and date, in black if they can be recovered, in red if they cannot. “Trash,†the third option, simply shows you all the deleted files that have been “remembered†by TTP in red, while files in black text are currently in the Trash. For all three of these options, not all files TTP finds will be fully recoverable, but for those that are, Data Recovery is a potential lifesaver. I deliberately trashed and recovered a Web location file and a PDF, both intact, but keep in mind that the more time elapsed since the file was deleted, the less likely your odds of recovering it, since there is greater potential for the deleted file to be overwritten by new data.
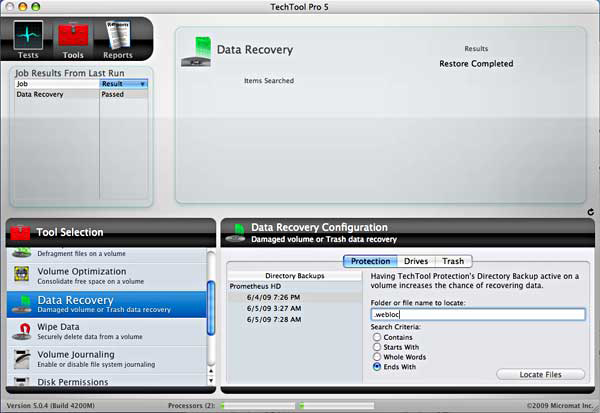
TTP’s “Data Recovery†tool can reach back into previous saved versions of your disk’s directory, giving you a much better chance of locating and recovering missing files. Here we’re narrowing the search to find only Web location files by entering .webloc as the search string and choosing “Ends with†as the search criteria.
• Wipe Data/Volume Journaling/Disk Permissions – These tools seem to be included merely for convenience, as you can easily do a Secure Erase from the Finder instead of using the Wipe Data tool, you can repair Disk Permissions in Apple’s Disk Utility, and you can enable and disable journaling there as well (the command to disable journaling isn’t readily apparent; you need to hold down the Option key with any journaled volume selected and go to “File – >Disable Journalingâ€). In any case, it’s extremely unlikely that you would want or need to do this on a journaled volume anyway. By way of explanation, think of journaling as the disk keeping an actual journal of what happens to all the files, so that if you crash at an inopportune time (as if there is an opportune time), the condition of the disk at the time of the crash will be automatically reconstructed from the journal upon rebooting.
• Video (Monitor calibration) – This is probably the most presumptuous of all the tools and tests in TTP. The “monitor calibration†merely displays a screen filled with one single primary color, with or without animation (sometimes helpful in detecting dead pixels), or it can present a test pattern, noise, repeating text, or animation featuring the word “Micromat†spinning, twisting and changing colors randomly. It doesn’t even come close to a tool that performs true monitor calibration, whether done via software in the “Displays†control panel, or with a dedicated hardware calibrator, so don’t be misled into thinking that TTP will actually calibrate your display.
• Video (iSight verification) – This displays the input from your iSight camera, to confirm that the iSight is functional. It’s designed to assist in ruling out a software problem as the cause of your iSight not working correctly.
• Audio – The Audio tool allows you to adjust the volume, frequency, balance and gain for the audio output by issuing a constant test tone. Typing text into the Speech Synthesis box and clicking the “Say Text†button will also confirm that text to speech is functioning as well, although this didn’t work when booted from the TTP DVD; only when the tool is run from the hard drive. Other that confirming that sound does comes out of the speaker(s), this one seems to be reserved for the audio geeks among us.
All in all, it’s quite the toolbox. Clearly some tests and tools are more useful or valuable than others, and some of TTP’s functions can be performed using software already supplied with the operating system. But having this multitude of testing and repair utilities all contained within a single program – on your startup drive, the eDrive partition, and on the bootable DVD – makes TTP the clear winner when it comes to a “total package†of troubleshooting utilities. I’m not convinced that the Volume Rebuild tool can replace the aforementioned DiskWarrior, a disk directory repair utility that has saved mine and my client’s bacon innumerable times, but since DW is pretty much a one-trick pony, TTP’s extensive tests and tools complement it perfectly.
Lest you get the impression that there’s no more room in the TTP toolbox for additional tools or improvements, rest assured that I have a few suggestions for Micromat along those lines. First off, I’d love to see a test for the PRAM battery; the remaining capacity would be very helpful info, but even just to know whether or not it’s functioning would be useful, as a dead PRAM battery can often prevent a machine from booting and is usually a cheap and simple repair. For laptops, why not a test for the battery itself? A lot of the info is available in System Profiler, so perhaps capturing that info and offering some commentary on whether it’s nearing the end of its life in terms of remaining charging capacity. There’s no modem test, either; while the vast majority of us most have graduated to wireless Internet access at this point, there are still plenty of Mac desktops and laptops with built-in modems out there and certainly some users who, even if they’re not stuck with dial-up Internet access, still employ their modems for FAX send/receive.
The Protection features, comprehensive as they are, don’t allow discrete settings for each volume on your Mac, meaning that the free space warning threshold, directory backup interval, days to keep Trash history and other settings apply to all connected drives at once, and can’t be customized for individual volumes. And while the windows displaying the results of directory searches and the Trash history allow you to sort by filename, created/modified date, etc., you can’t reverse the sort direction, something that would be very handy if you had thousands of files displayed as the result of a search and were using the “Created†or “Modified†date columns. Also absent from the Trash History window is a column with information as to whether the file will be recoverable or not, such as the percentage of the file that’s already been overwritten or a similar indicator.
None of these issues subtract in any significant way from the usefulness of this utility, and TTP is really in a class of its own, far eclipsing the old Norton Utilities of days gone by as an all-in-one troubleshooting package. As much as I wanted to accompany my Dad to his workplace and carry all those tools around as a young boy, I’m very appreciative that Micromat managed to fit all this functionality onto a DVD; nowadays I feel like I’m getting too old to be lugging around that huge toolbox.
MyMac.com Rating: 4.5 out of 5
email – MyMac Magazine – Twitter – Advertise – Reviews Archive – Podcast
![]()
Leave a Reply
You must be logged in to post a comment.