
![]()
Finally getting to it
In parts 1 through 4 of this article we discussed iWeb and its interface and finally we are ready to start talking about making web pages! What you want your web site to communicate to your audience is entirely up to you but remember that if they can’t figure out how to navigate your site and read your content, you’ve failed to make a good web site. You’re welcome of course to have obscure pictures that fade in and out for your navigation (and yes that is technically possible in iWeb), but unless having the audience hate you is the look and feel you’re going for, standard internal and external links will probably do nicely.
Because most of the functionality I’ll be talking about in this part of the article is done through the “Inspector†window, when I talk about which part of the Inspector to go to, you’ll see something like this: Inspector/Page/Layout. The first part (in this case the Inspector) is the window, the second (Page) is the icon to choose within the window, and the third (Layout) is whatever other button within the icon choice is required. I’ll be doing much the same once we start talking about other floating menus (like the “Color†and “Media†windows).
Before you even begin to put pixel on screen, think about what you’re doing. What do you want the page to look like? With iWeb 08 (or 06), changing your mind later on some design element can create some serious re-working and on occasion may be impossible for a few of the page templates. So give it some serious thought. One great place for design ideas is to visit pages that you enjoy and consider what it is about the site (beyond the content) that makes you revisit it. Ask friends for ideas and look for elements from unlikely places. Make your site look different and interesting without sacrificing those bits that will make it easy to move around in.
Master Pages
One feature that iWeb does not have in either the 06 or 08 version is “Master Pagesâ€. What exactly is a Master Page? A Master Page is a selection of common graphic and text elements that you want to appear on every page in your site. Done properly, it is a huge time saver in putting your site together. It is NOT done properly in iWeb. Oh sure you can have the common elements that Apple has created for each of their templates and they look good, but having your OWN Master Page is not supported. You can fake it though with iWeb though and while it takes a little more work that it should, you can get some pretty nice results. How is it done?
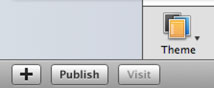
Start by hitting the “Plus†symbol on the bottom left of the main iWeb screen or by going to the “File†menu and selecting “New Pageâ€. For MacParrot.com (and almost every other site I make with iWeb), I used the “White†blank page, but you’re welcome to use whatever one you want. I found that the White blank made it easier to place my custom elements and not have to delete a bunch of stuff I didn’t want. If the page isn’t as wide as you want it to be, here’s how to change it (and do some other stuff too) before you add content.
Size Matters
iWeb’s default page size is 700 pixels wide. You can easily adjust this in the Inspector to any size you wish. Keep in mind that any pages you add will have to be changed (if you want them to be the same size) as well since all new pages default to this size. Also change the name of your pages in the Inspector if you wish and the iWeb created Navigation link (more on this later) will reflect this change. How do you do this?
![]()
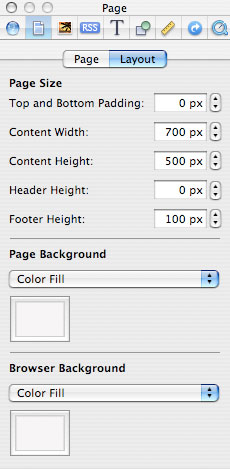
To make your page a different size than the default, go to your Inspector box and select the “Page†icon and then the “Layout†(Inspector/Page/Layout) button. This will have lots of information about the current page you are viewing, some of which we’ll talk about later, but for now let’s just change the width. You’ll see a “Page Width†box with the number “700px†in it. Select or highlight this number and put in whatever number you would like. Don’t fret about the “px†part, iWeb is smart enough to know you mean pixels and not inches or feet (that’s a good thing). There’s also a “Page Height†box, but don’t worry about it unless you absolutely have to. iWeb will grow your page length automatically beyond the default “480px†if the content requires it. If you don’t have enough to fill the provided 480 pixels, then feel free to shorten it if you wish.
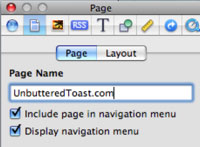
To change the Page’s name, go to Inspector/Page/Page. There will be a generic name there associated with whatever type of page you selected. Select or highlight the name and replace it with one of your choosing. If you’re using iWeb from iLife 06, iWeb will put in some really funky name for the actual page when selected by your web browser (I have no idea what was going through iWeb’s designer when they did this, but it probably wasn’t a legal substance), but the name will show up as whatever you chose in the navigation menu. Don’t worry about any spaces between words either, both versions of iWeb will put in the data required to allow the name to make sense to a internet browser when selected. In this case, this page won’t actually be viewed on your site. This is your Master Page and while it WILL be downloaded when you upload your site to either dotmac or to the domain of your choice with an FTP (File Transfer Protocol program), unless you actually link to it with your iWeb’s or your own custom navigation menu, most people will never see it.
We’ve changed the page width and given our page a name. Next, we’ll make a menu for navigating your site.
Site Navigation
Your first decision is what you want your navigation links to look like. Navigation links are what get you from page to page on your site and for the sake of people trying to view your content beyond your first page, please make it as identical as possible on every page. iWeb’s default navigation system is all pages (blogs, podcasts, photo pages, and the like) across the top of your site in most templates on every page. This works great and you can chose whether or not you want a page to be linked there in each page’s Inspection box. Actually calling it a default is a bit misleading. This is the ONLY way iWeb will display your links to other pages on your site automatically. Want a vertical navigation bar in the white template? You are SOL unless you make it yourself and again you’ll have to make it for each and every page.
We’ll begin by talking about iWeb’s oh so boring (to me anyway) standard navigation menus. Every single template within iWeb has a navigation menu. This menu in almost every case is situated at the top of each page and runs across the length of it. If you run out of room, iWeb grabs a little more real estate beneath the top layer and starts a new one.
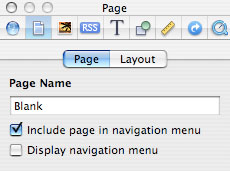
To include a page in iWeb’s standard menus, go to the page you wish to add and then go to Inspector/Page/Page. On the bottom of the window there are two selections, “Include page in navigation menu†and “Display navigation menuâ€. Hitting the check box for “Include page in navigation menuâ€, will put the page into iWeb’s navigation menu. No real surprise there, but you won’t SEE the menu until you also select the check box labeled, “Display navigation menuâ€. AH! There it is. Looks the same in almost every template and it’s about as exciting as unbuttered toast. So, uncheck both boxes and make them go away. Let’s make our own. I’m including the way to do it in iWeb 1 (from iLife 06) for those who haven’t upgraded.
In order to make your own Navigation menu in iWeb 1, create a text box by hitting the “Text Box†icon on the bottom of the main window. A small empty box will appear somewhere near the center of your page. Double-click inside the new text box and a blinking cursor will appear. Now add the names of the main pages for each section (Welcome, blogs, podcasts, photos, and what not) in whatever order and whatever font and size you choose. Don’t make them linkable yet! The reason why is that once they are hyperlinks to other pages, trying to copy and paste them to other additional pages can make iWeb 1 do strange things and most likely whatever editing you did to the text itself will disappear. This is where a little foresight comes in.

After making the Text Box and entering in the name of the other pages you want to link to along with whatever other text/font changes, select the entire box. Move the box to exactly where you want it to be once the page is completed. If the cursor is blinking inside your text box, click out of the box to deselect it and then single-click it again until you see the box itself highlighted. Go to the “Edit†Menu and select “Copy†(or . Go to each page you have created, go to the “Edit†menu and select “Pasteâ€. This will put a duplicate of your eventual Navigation box in the exact same place on each page. After that, use the Inspector box to create internal links (more details later) to each page. You’ll have to repeat this procedure on every page you placed a Navigation box. The links themselves do not allow for much customization. They are typically blue, turn red when the mouse pointer is over them, and then are a light gray after being selected. There are some tricks you can do to change this, but honestly it’s more trouble than it’s worth. If you want to make your own menus, please upgrade to iLife 08. You won’t be sorry.
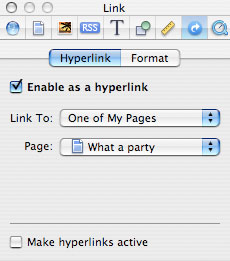
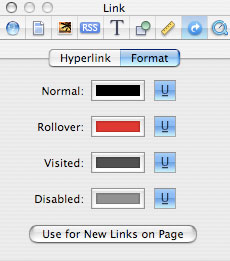
In iWeb 2 however, the process is much easier. Just make your text box as before and arrange your text however you want it. Go ahead and make your hyperlinks in the first box you’ve made. In iWeb 02, you can now cut and paste your links box into multiple pages and all your formatting will remain. Using the Inspector/Link/Format, you can also specify what color you want the link to be as is, when your mouse hovers over it, and what it will be after you click it. So get it just the way you want it, put it exactly where you want it to be and then cut and paste it to every page on your site. Viola! You now have a custom made navigation bar that will make your iWeb stand out from the others. If there are other elements that you want to have on each page, don’t do the copy and paste thing just yet. First you have to finish your Master Page and by a remarkable coincidence is part of the next section.
Creative Destruction
You’ve sized the page the way you want it and created a custom navigation section. Now it’s time to start arranging things to your liking. First, make sure there are no other elements of iWeb where you plan on putting these graphics and text boxes. Most likely, your bits and pieces will cover them up, and trying to get at them after can be a pain. So on your blank page either delete them or move them out of the way. As I said before, if you’re going to make your own navigation bar (see the previous section), go to Inspector/Page/Page and deselect both “Include page in navigation menu†and “Display navigation menuâ€.
Next, place whatever graphic and text elements you want on the page in the exact location you want them to be. Remember if you want to change it later, you’ll have to revisit every page created and redo it. So, once the graphic and text elements you’ve created are in place, your good friends “Copy and Paste†in the “Edit†menu will have to be visited. To select the elements you want repeated you have three options. You can go to the “Edit†menu and choose “Select allâ€. You can also drag your mouse across the screen until all the elements are captured, or you can hold down the “Shift†key on your keyboard and manually select each element.
Copy them, go to the next page (or create a new one) in your site, and paste. To see the Master Page I created for Macparrot.com, click this link. Almost every item you see was created with either Photoshop, iPhoto, or creatively acquired (OK ripped off) from the internet. I hate to be a nag but just remember that if you want to make changes later, the process will have to be repeated for each page you’ve made so far. It’s best to do your basic design for the site first, and add your content later.
The good news is once you have made a page in each section of your website, you most likely won’t have to repeat the procedure as most times you can simply “Duplicate†(also in the Edit menu) a page when you need a new one with similar content and all the graphic elements will be duplicated as well. Simply delete the repeated content (or select all the text in each text box) and put the new stuff in. If you accidentally cover one graphic with another, or you need one part of it to be front of another graphic and they’re backwards in order, don’t fret. The Forward and Backward buttons on the bottom of your iWeb window will make a graphic element or text box go forwards or backwards in order on your page. If you want it to be all the way up front or all the way to the back do the same thing, you’ll need to go to the “Arrange†selection in iWeb’s menubar and select either “Bring to Front†or “Send to Backâ€. If you make a mistake and the graphic is covered with no way to select it, you can still get to it, but you’ll have to move the other elements covering it out of the way. BEFORE you do this, go to the Inspector/Metrics window and in the “Position†section, you can note the exact position in pixels horizontally and vertically that the graphic was located in. Just write those numbers down, move the graphic to get what’s behind it, and when you’ve made the changes necessary, re-enter those numbers with the moved graphic selected, and iWeb will put it right back from where you moved it to.
The upside to this is that you can make similar themes on each page, maybe just slightly changed in color or size to make them stand out. The downside is that when your guests browse your site, they’ll have to re-download every element of that page even if it’s repeated on a previous one. This is one reason why iWeb sites have a tendency to balloon up in size as compared to other website makers and why it takes longer to download iWeb sites.
Congratulations! You now have the skills required to create as many Master Pages in iWeb that you’ll ever need! In the next section, we’ll make your “Welcome Page†and go over using some of iWeb’s built-in page creation templates (but tweaked to your own style).
Leave a Reply
You must be logged in to post a comment.