

Rogue Amoeba’s Audio Hijack 4
$64
Rogue Amoeba provided this product for the purpose of this review. Tested on a M1 Mac Mini.
I have owned and used Rogue Amoeba products practically to the very beginning of my career in podcasting. As a company, they have managed to demystify the the literal ins and outs of audio for the common user at an affordable price. The most recent version of Audio Hijack is a prime example.
At 64 dollars, Audio Hijack is a must have program for those dealing with pushing audio through an increasing more restrictive macOS while managing to keep the basic functionality of the program simple and easy to use. Version 3 of the program brought a new user interface that made pushing the blocks around much more intuitive and frankly, fun to use. With Version 4, they’re keeping that aesthetic but making subtle changes to the UI that are mostly welcome additions. They did this without the user having to relearn what makes Audio Hijack a terrific program for anyone working with audio on a Mac. So what are some of these changes?
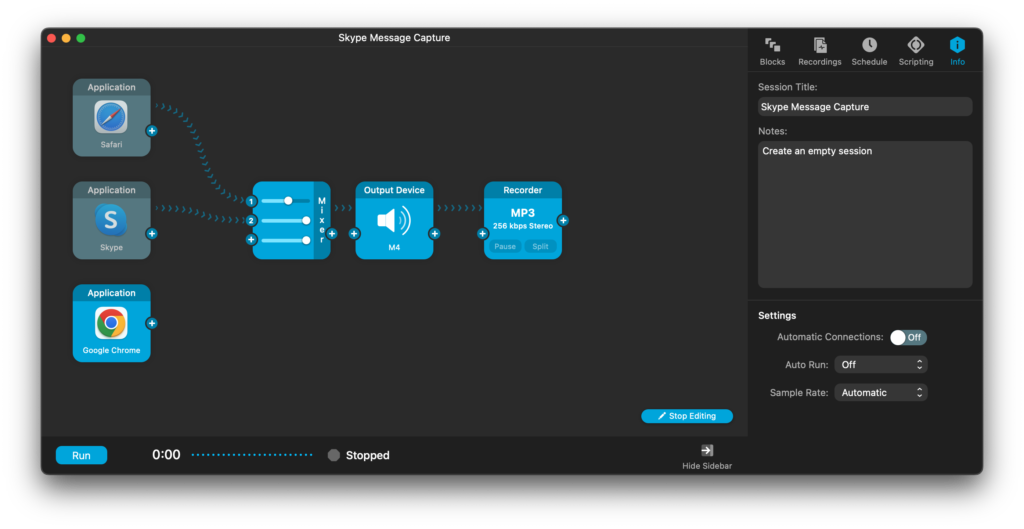
To begin with, the main Sessions window is vastly different from version 3 and adds a lot of functionality without even having to open an individual session. It now shows you the sources within each session, whether it’s set to auto-run when Audio Hijack is opened, the current status of each session, and the ability to start a session without having to open it in its own window.
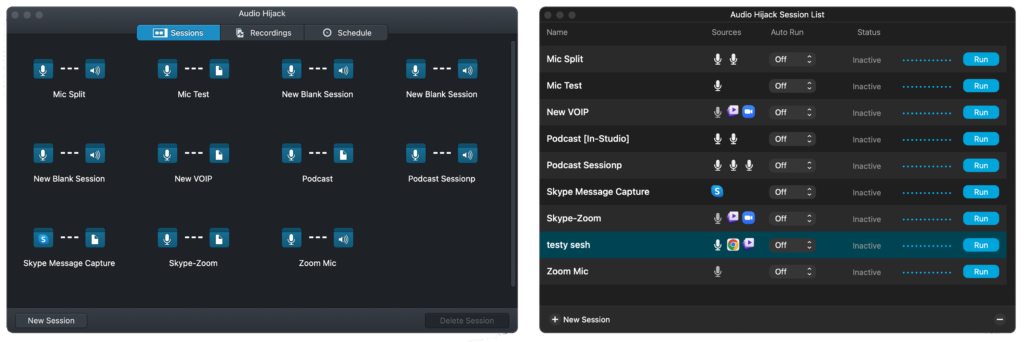
It’s well thought out and I didn’t find any issues with previously created sessions that were automatically imported with the new version. In fact, none of my previous sessions had a problem when being opened in Audio Hijack 4.
However missing from the Sessions window are the Recordings and Schedule Tabs. These have been moved from the Main Sessions window to each individual session. The Recording Inspector (selectable through the “Window” menu) only opens the last recorded session as compared to version 3 (called the Recordings Tab) which brought up a list of all recordings created for each session. However this functionality isn’t missing, just moved to within the individual sessions when opened. While this makes it easier to see recordings associated with a particular session, you can’t view other recordings from other sessions without having those open as well. They’re still grouped by session in the designated folder you as the user created or the default folder so you can still see them as a group in the Finder, but it is a big difference from before. Whether or not you prefer it will be up to individual taste. More on this coming up.
One huge difference is to the individual Sessions windows themselves. Much of the functionality dispersed throughout the rest of the program in version 3, is now concentrated in each Session window. This brings a focus to those pieces that wasn’t as easily accomplished before. There’s a LOT to unpack here so I’ll try to be concise.
The Sessions window may look similar to the previous version and all of the processes and performance from before is still there, but there’s a lot more to it now. Something to look at are the tabs on the top right. Previously, the right section of this window was a depository for all the various blocks you could assign in a session and that’s still here, but now the pieces that were spread out are all assembled in one place.
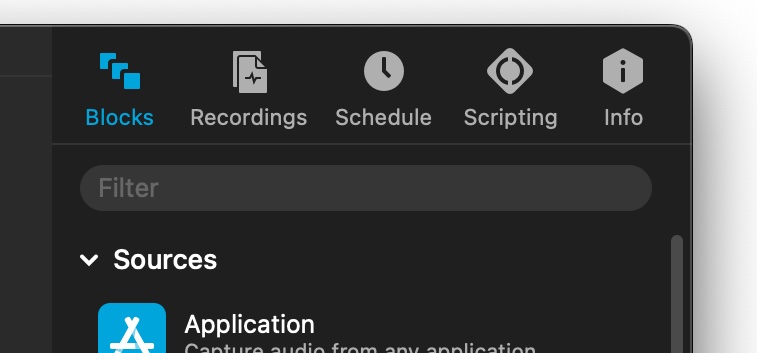
The first one called “Blocks” is for the familiar blocks to create and adjust audio channels for each input. There are some new ones for version 4, but we’ll go into that later. Rest assured that everything you did or could do with the previous iteration is still there, just quintupled! A new search bar also makes it easy to find just the right block you’re looking for.
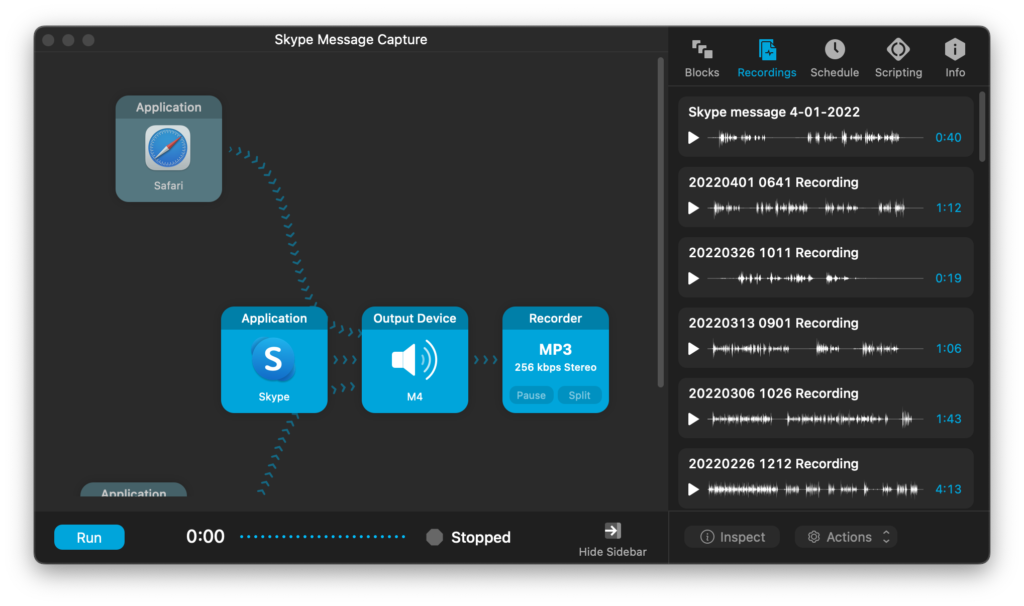
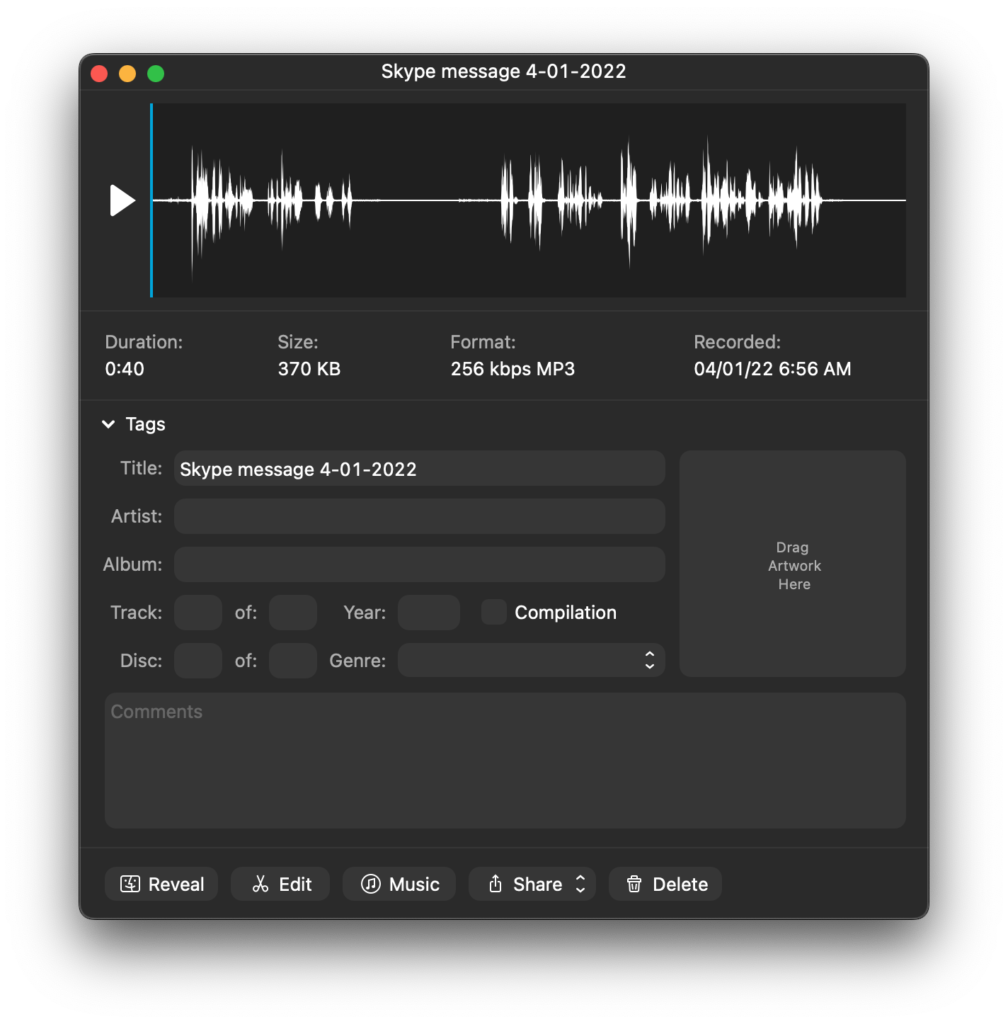
The next one is called “Recordings”. This is where you can play and edit previous recordings made with this Session. To edit the recordings, you can double-click on the one you desire or select the “Inspect” button at the bottom. This will bring up the information window for this recording with a number of options available. You can “Reveal” it in the Finder. Hitting the “Edit” button will open the audio editor you’ve selected in Audio Hijack Preferences to fine tune it. Hitting the “Music” button will create a copy in your Music folder and put in the Music app. You can “Share” it through Mail, Messages, Air Drop it, and send it to the Notes app. Lastly you can hit “Delete” which will remove it entirely.
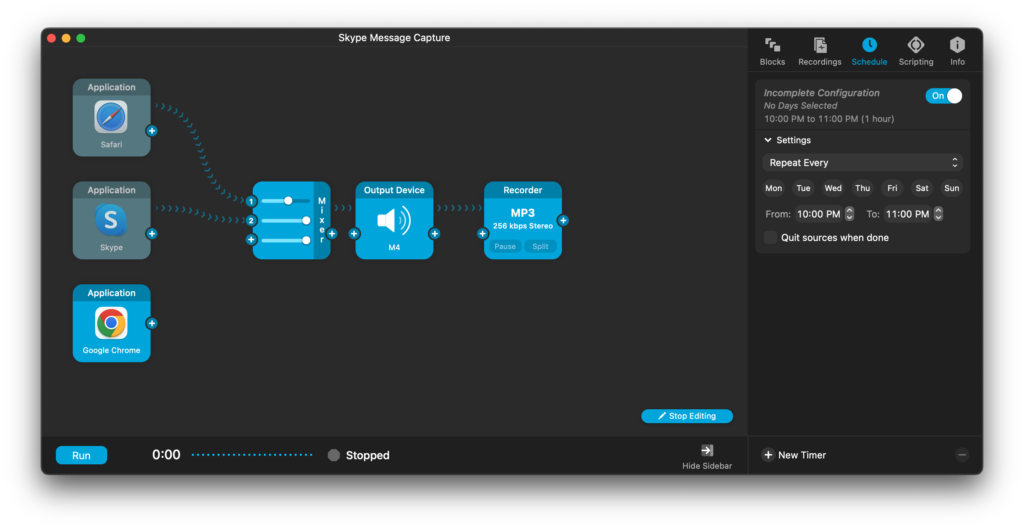
Next is “Schedule” which can automatically turn on a session via a schedule or a particular day and time to include opening the programs each session is going to hijack
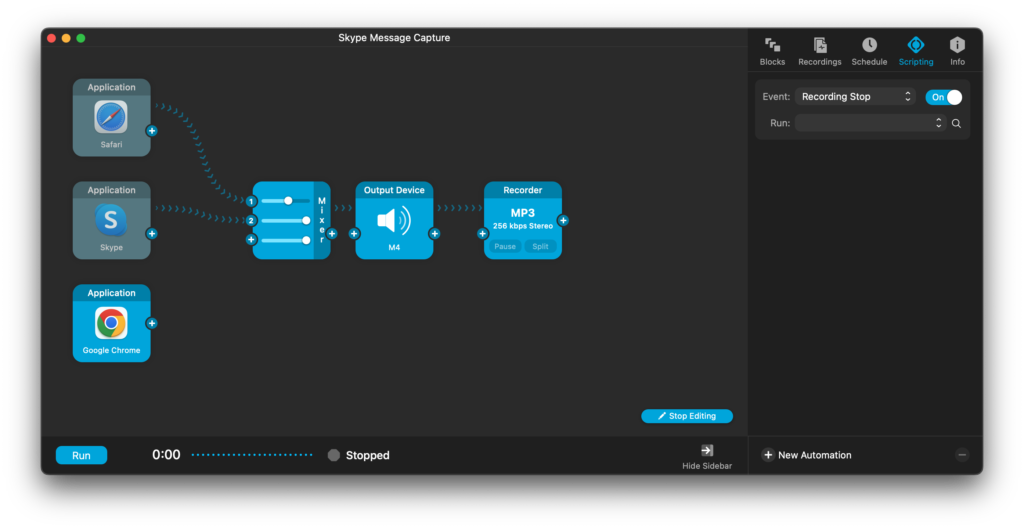
If you’re familiar with light coding, you can use the “Scripting” tab to create your own or use some of the existing pre-made ones to do your bidding
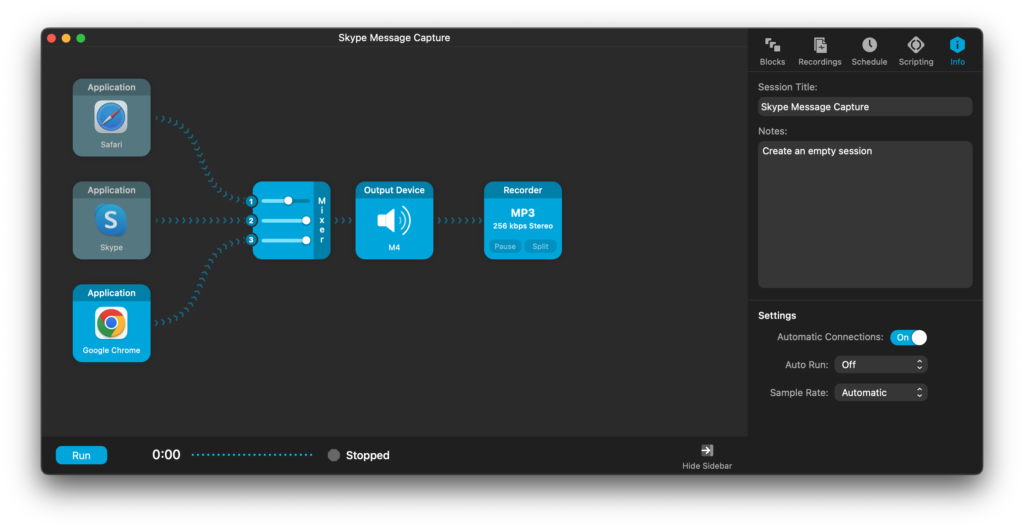
Lastly, there’s the “Info” tab which sets up one the most coolest new part of Audio Hijack 4, the ability to manually connect the various blocks in the way that YOU want to as compared to the program deciding it for you. Want to connect one block to another and NOT have to move about a gazillion OTHER blocks just so they didn’t automatically connect? How about dis-connecting a block from another without shuffling around on the screen to break the connection? Just turn off auto-connections in the Info tab to make your own paths and Control (Command on a Windows keyboard) – Delete to get rid of one. This is one of my favorites of the new features for Version 4.
There’s a lot more in this update, but to finish the review off I’m going to go over some of the big changes made in the Audio Blocks and the three new ones created. You can now rename each block dropped into a session. The block’s visuals won’t change, so you’ll always know what it is, but you can name each specifically for whatever reason you may like. Each block can now have named presets so if you’ve tweaked a particular block to your liking, you can reuse those settings in any other similar block. The metered blocks now have clipping indicators to help prevent overdoing a signal. The recording blocks now support 32-bit up from the 24-bit limitation they had before.
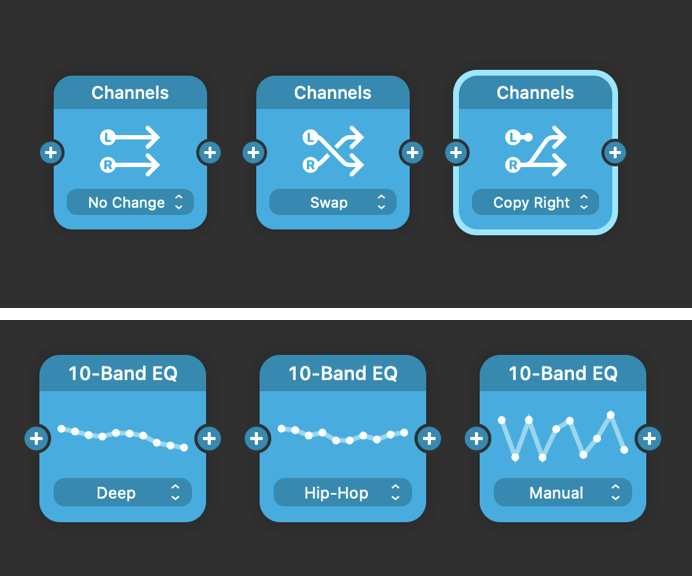
The visuals for some blocks now include indications to their functions, so no more guessing. Some of them also change to indicate what their current functions are. For example the “Channels” block which allows you to manipulate the path of both the right and left channels has a different look depending on what you’ve set it up for. Another good example is the 10-Band EQ Block. Each band’s level is represented on screen as well as the name of the selected pre-set. At a glance you know immediately what it’s set up to do
The Live Stream block can get you up and running to your audience…at least as far as audio goes. There’s some neat effects that sweep across the screen while audio is being broadcast, but you can’t include your video…at least I didn’t see how you could without the aid of another program.
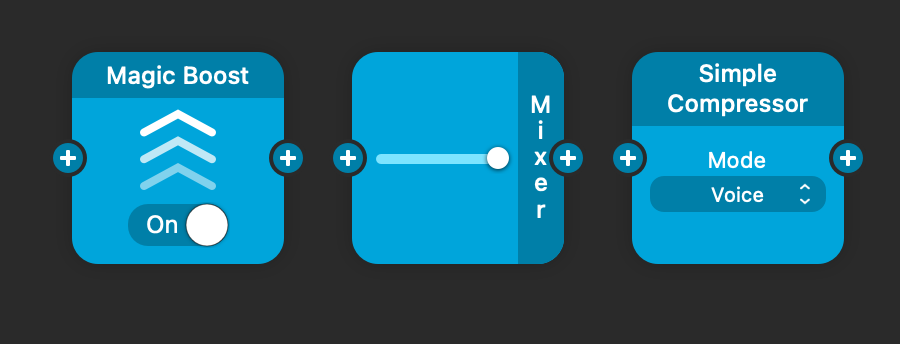
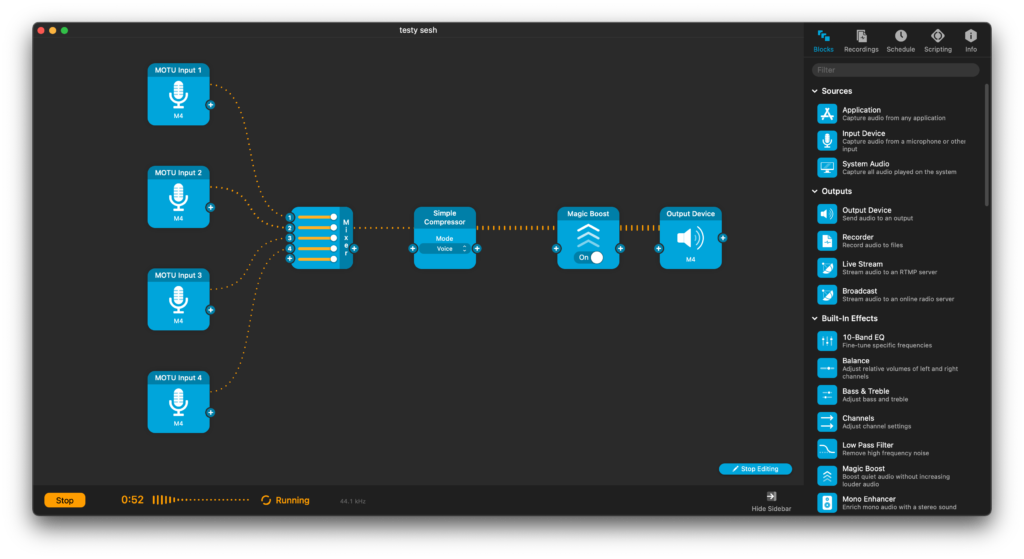
Last, but not least, there’s three new blocks included with Version 4 and they are, “Magic Boost”, “Mixer”, and “Simple Compressor”.
Magic Boost is sort of a compressor/ limiter which claims to increase the lower volumes of a channel without boosting the higher ones. This can come in quite handy when receiving audio from a pre-mixed source that you can’t separate onto different channels and works reasonably well as long as the sources aren’t too far apart in volume.
The Simple Compressor is exactly that. A compressor with four presets. What a compressor does would take this review in a completely different direction, but in essence it reduces the dynamic range of an audio signal by bringing up the lower parts and reducing the higher parts to give a smoother output overall. The trick can be to do it without adding a lot of coloration or change to the “sound” of the original signal. While this can be beneficial in some cases, for vocals (depending on the application) it can be disastrous. In my opinion the “Voice” preset is too strong and there’s no way to adjust it. Remember though it IS meant to be a simple compressor and if you want to do something else, the ASMultibandCompressor is in the “Audio Unit Effects” and you can add your own as well.
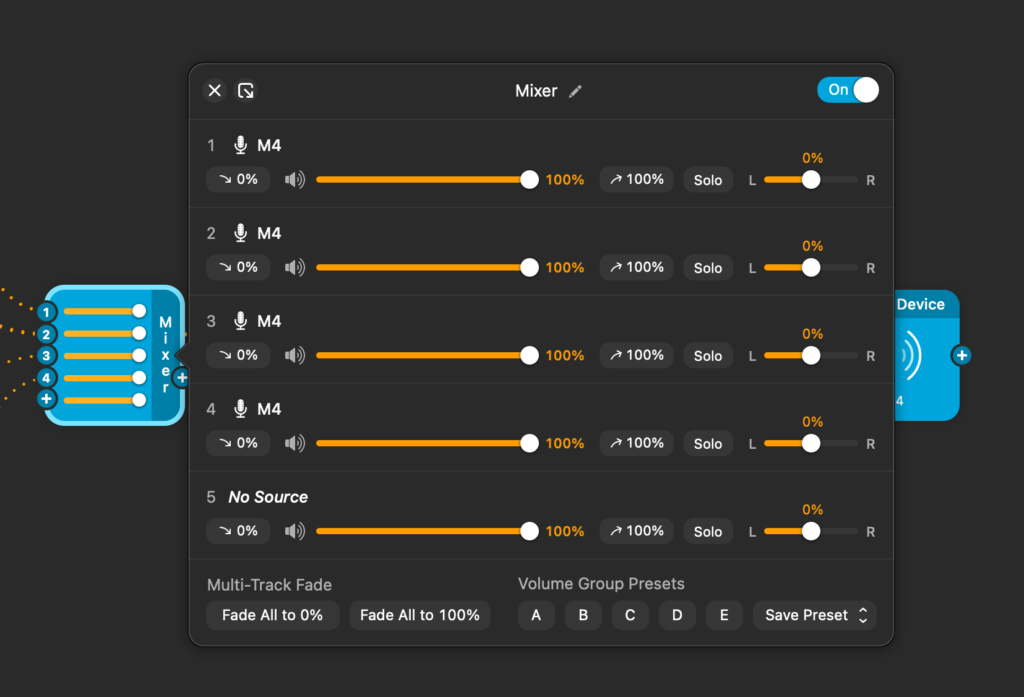
The best being saved for the end is the “Mixer” block. It’s something that has been sorely missed since version 3 came out but could not have been added until the ability to manually manipulate the connections to blocks came out. If you look at Audio Hijack as a digital mixer (which it is) and each audio source in as the beginning of an individual channel strip, then the Mixer block is at the far end of all those channel strips JUST before the outputs. Many times you might need to have multiple audio sources combined down into a single right/left or stereo pair and in the past you would have to do this by adding the same output block to different channel strips. While this works (you could do the same by using Rogue Amoeba’s companion program “Loopback” which is amazing in its own right), it isn’t very elegant. By using the Mixer block, not only can you combine up to five separate sources, you can adjust the volume of each individually. That by itself is very neat, but there’s more. With a single button within the block you can zero out or max the volume of all the sources at once. Not enough? Add being able to zero out or maximize each channel individually or solo each track muting any others. Not done yet. You can pan to the left or right each track. All of that is great, but the best trick is saved for last. There are five presets that you can assign to ANY combination of the effects I just listed for the Mixer block. Have Track 1 pan to the right while Track 5 goes to the left. Track 3 is reduced in volume to 25% and Tracks 2 and 4 are silenced by soloing Tracks 1, 3, and 5. All with push of a single preset.
Here’s the deal, if you already have Audio Hijack 3 and you’re happy with your setup, you don’t HAVE to update. Everything you currently do will continue to work just fine for the foreseeable future. Audio Hijack version 4 though brings some amazing new capabilities and to upgrade is only $29. That’s like five lattes. If you don’t own Audio Hijack and you’re a podcaster or Music/ Audio producer/engineer, it currently sells for $64 for what is the best available on any platform audio digital enhancer/mixer. Consider as well some of their companion programs like Loopback (the ultimate audio mixer/switcher) and Farrago (terrific soundboard application) as they have some hefty discounted bundles available. You can also download free version of each with a 10 minute limitation (white noise is added afterwards that can’t be removed later) to try before you buy.
Final word, Audio Hijack 4 is an evolutionary step up. It keeps what works and adds amazing features that has the potential (depending on how you use it naturally) to make your audio life much easier at an amazing low price.
MyMac.com Rating: 9 out of 10
Leave a Reply
You must be logged in to post a comment.