

1. Open your desired “squinting” or “eyes closed” image in Adobe Photoshop CS2 either by:
• dragging the file’s icon from iPhoto Library or Desktop over your Photoshop icon in your Dock
or
• navigating via File -> Open to the precise image file, then clicking Open, lower left.
2. Choose File -> Save As, and retitle your picture with a new name, such as “Tim’s Eyes Open.” I suggest you chose Format -> Photoshop, and save this photo file to your Desktop, for flexibility and convenience.
3. From your Menu Bar, top of screen, choose Filter -> Liquify. A strange new window appears.
4. In the lower left corner magnification selector, change the number to one where the eyes of your squinting subject will fill much of the display, after (if necessary) using the Hand Tool, at bottom of Liquify’s Toolbar on the left, to reposition the working area of your image.
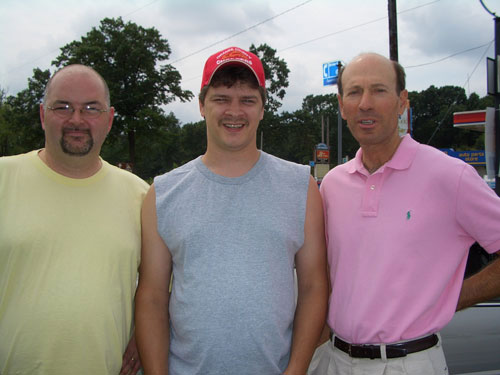
Here’s a really scary close up of Tim’s face, prior to the makeover.
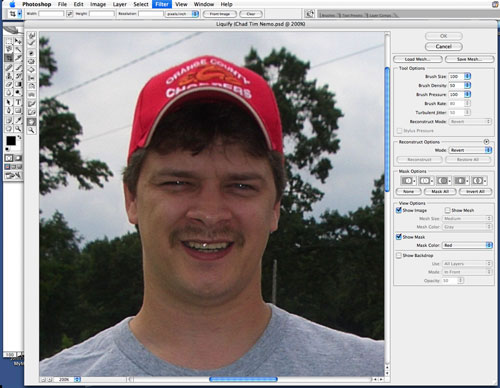
5. Click on the Warp Tool, top of Toolbar, upper left of Photoshop’s open Liquify window, and bring your cursor (which switches to a round “brush” shape) within range of your subject’s squinting eyes.
6. Don’t worry about any of the confusing stuff in that long vertical panel to the right of your subject, except Tool Options: Brush Size. I typed in 10 for the brush size in the project, after some trial and error.
Hint: Your goal is to choose a brush size roughly the same or a little bit larger than your squinter’s eye pupil would be if you could see it. This is easier to show than to tell, and you’ll figure it out in a couple of minutes once you get to this point.
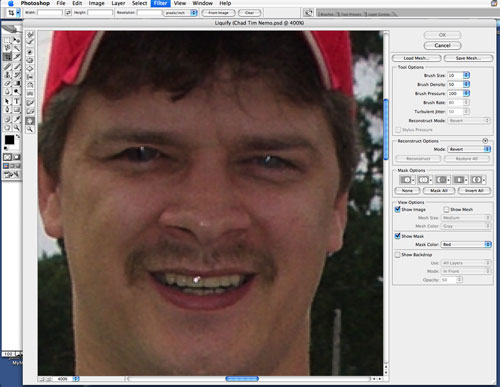
7. Slowly and gently stroke your brush-cursor up and down within the “normal” open eye area, until the squinter looks more or less normal.
Hint: Often this person will be a small part of a larger group of otherwise normal-eyed subjects, so you don’t need to be a perfectionist, because as long as the squinter’s eyes appear to be more open than closed, you’ll get away with whatever improvements you perform.
8. Once the squinter’s eyes are acceptably open, click OK (upper right), and Photoshop renders your changes and brings you back to a complete view of the photo, now improved. See below:
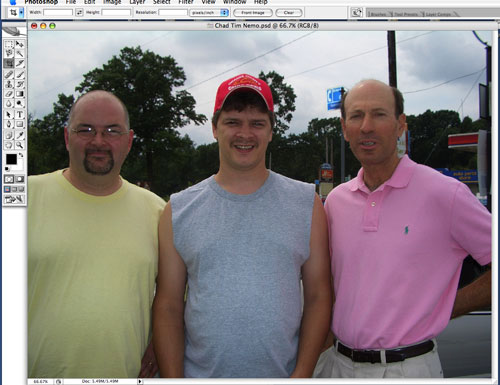
Hint: Since now both Chad and I seem more squinty than does Tim; I’ll have to decide whether to operate on either or both of our eyeballs. This happens frequently, and should be considered only when necessary, especially if one of your potential victims is wearing glasses, which often can take a face (sorry about that, Chad) from bad to worse.
9. If you’re unhappy with original squinter’s eyes, choose Edit -> Undo, and work through the process again from steps 3 through 8. Otherwise choose File -> Save, and then relocate your improved photo where you can find it.
10. Print and/or email the final photo using your normal methods. We’ll be addressing these topics in future Ten Point Tutorials.
Leave a Reply
You must be logged in to post a comment.