
![]()
All right, this is the last part of looking at the iWeb interface. We finish off looking at the Inspector.
Metrics Tab
What’s up next is the icon that Apple calls “Metricsâ€. At first glance it might not seem all that big a deal as it doesn’t have multiple buttons and as compared to the other selections in the Inspector very few options. But Metrics is where you can fine-tune almost every section of each page in iWeb. If something gets lost behind something else, this is where you can start moving things around to find those items and put everything back to where it started. Don’t worry; we’ll get more on that bit when we get into making pages.
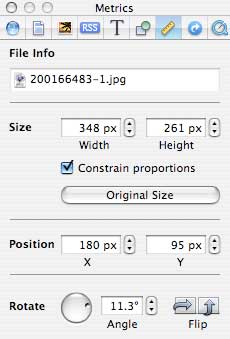
The first part of this section is a text box that tells you exactly what the file name is of the object you’re manipulating. Unfortunately you can’t actually change the name of the file (which makes little sense since iWeb saves every graphic in the Domain file kept in its Library), but you can view it.
Under the next part down (labeled appropriately “Sizeâ€), you can also adjust the physical size of the graphic or text box and in the case of pictures or graphics decide whether you want to keep both the width and height proportional. Making it smaller won’t reduce the file size however. Keep in mind as well that you can’t make a text box smaller than the size required to display the text within.
The third part of this box is the “Position†section. This is where you can also exactly position where the item will be located on your page. It’s not a bad idea if you start moving stuff around with the intent to move it back later to note the file name and position as labeled here. It’s a snap to move it back by simply re-entering in these numbers. Apple labeled these position markers as “X†and “Yâ€. Changing the X number moves them left and right and Y moves them up and down.
The last part of the Metrics box is called “Rotateâ€. As in sit and spin. Almost any object in iWeb with the exception of some of the template’s default graphics (this can change in almost every template so I won’t list them here) can be made to flip in 180 degree increments either up or across (embedded text in a graphic will flip as well so be careful) or angled using the spin-wheel or with exacting degree in the angle box.
Link Tab
OK, take a deep breath; we’re almost through with talking about the Inspector. Just two more icons to go, but they are very important to making an iWeb site. The first one is called “Linkâ€. As you might imagine, this is where you will create hyperlinks to not only other pages in your site, but to the whole World Wide Web itself. If there is some content that you use to make a point that isn’t on your site, this allows you to select a word or graphic to create a link to that other page. The original version of iWeb in iLife 06 allowed you to do this as well, but iWeb 2 takes it to a whole new level of customization. You’ll spend a lot of time here if you create your own navigation links instead of using iWeb template’s default navigation bar.
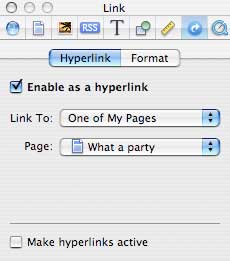
This icon has two buttons in it labeled “Hyperlink†and (new to iWeb 2) “Formatâ€. Creating a link couldn’t be simpler. Select a graphic, text box, or word/ line of text that you want to create a link with. Begin the process of making the link by clicking on the “Enable as a hyperlink†checkbox. Now select via the drop down menu labeled “Link to†that is enabled when you select the checkbox whether you want the link to go to one of your pages, a page somewhere on the internet, an email link, or a file and stuff happens. What kind of stuff happens next depends on what kind of or where you want the link to go to. Let’s go over them quickly one by one. More details will be in future sections as we get more into the meat and potatoes of making an iWeb site.
If you want the link to go to one of your other iWeb pages (when you choose the “One of my pages†from the “Link to†drop down menu), the second drop down menu labeled “Pageâ€, will have a listing of all the pages you’ve created so far for this site. Select the appropriate one and the hyperlink is automatically created.
If you want a link to go to another page somewhere on the internet (and have selected “An External Page†from the “Link to†drop down menu), a text box will appear for you to enter the internet address (you know, all that http://www.whatfreakingpagedoyouwant.com stuff). It is important that you have the exact address of the page or site that you want to go to. Some browsers handle links differently than others so neatness counts. The easiest way to do this is to open a browser window and go to the site or page you want to link to. Usually (unfortunately not always though) you can copy the address by selecting the entire thing via the URL window near the top of the browser. Go to the edit menu (or right-click/control-click) and copy the address. When you go back to iWeb and select “An External Page†from the drop down menu, iWeb will put the copied address right into the window for you. How freaking cool is that?
Next one is an email link. This is usually your own email address, though you can choose whatever or whoever email address you wish. Just select from the “Link to†drop down menu “email†and a text window opens. Type just the email address (example: youraddress@mac.com) and your done. iWeb does everything else including whatever call-ups are required to open the viewer’s primary email application.
Lastly you can link to a file. This can be just about anything, a picture, a movie, a PDF or other office document, a presentation, whatever you need it to be. When this option is selected via the “Link to†drop down menu, a Finder window will open and you can scroll to the actual file you want to link to. When the user selects this via your link, the browser window will display the contents of the file.
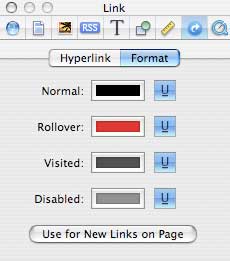
The second button under the Link tab s called “Formatâ€. This is new to iWeb 2 and was sorely missed in the first version. Under the original version of iWeb, the normal, rollover, visited, and disabled font link colors were defined for you and unless you knew how to get into the guts of the page could not be changed. Even if you KNEW how to get to the guts of the page (though quite frankly if you knew this much about web technology and its languages you were never going to use a program like iWeb anyway), iWeb would change it back the next time you updated the site. Once again there were some third-party software gurus that had figured out how to change this, but it was software you had to run every time you updated your site.
So what can you do when you’re in this area? Obviously change the colors of the normal, rollover, visited, and disabled font link colors. Just select the condition you want to define, choose a color and you’re done. Unless you are extremely picky about color, just use the crayon color picker. All of them are web safe. Couldn’t be easier. You can also select whether you want the text underlined in any of these four conditions.
The button on the bottom of the page (Use for New Links on Page) is for making all links on the current page work identical. Unless you have a need for links to appear differently (and hey, it’s your site), this can save you a lot of time by taking the decision out of your hands and just selecting whatever default settings you’ve made.
QuickTime Tab
The “QuickTime†tab is for adjusting all those iMovie 08 files you will undoubtedly be dropping into iWeb. Nothing says love like 10-50mb downloads of some family function for all your relatives. I’m kidding of course. By reducing the size and using default compression schemes in either iWeb or iMovie, your file sizes can be much less than this and we will certainly discuss some of these options when we start making pages in iWeb
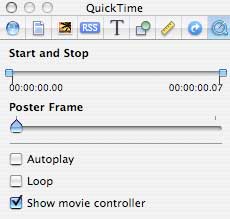
Some of the options here include setting start and stop points within the movie. In other words, moving the first flag (on the left) changes the point in which your movie will begin to play for viewers of your web site. Why would you do this? Several reasons come to mind. Perhaps you don’t want people to have to bother viewing the opening credits, or you just hate the beginning of your movie. Same thing with the other flag, it allows to you pick what point the movie will end. If web space is an issue, this is where you can make some cuts to reduce the file size being uploaded or downloaded.
The flag just below that is called “Poster Frameâ€. As you move the slider, you’ll notice that the movie is also moving along. What this setting does is allow you to select the still frame seen by visitors to your site of the movie you’re presenting. If your actual first frame is an all black screen just before the opening credits roll, or is a “Fade from Black†sequence, this is where you can pick a different frame to give your audience a view of what the movie may be about.
Last bit before we end this part. The first check box on the bottom is “Autoplayâ€. Much as it sounds, it begins to play the movie content (audio or video) as soon as enough has loaded in your Mac’s opinion to allow it to play without interruption. How well this works depends on your Internet connection, so it’s by no means an exact science.
The “Loop†checkbox is for when you want your content to play over…and over again until your target audience hates you. Don’t use Loop unless this is the effect you were looking for. Kidding, it has other uses as well. Maybe there’s an audio snippet you want to have play while the page is open. Use sparingly.
The last checkbox is “Show movie controllerâ€. This puts the start, stop, and movie slider controls onto the movie giving control of it to the viewer. Naturally this all requires QuickTime to operate and if your viewer is not on a Mac, this isn’t always a given. Most modern browsers will show some kind of pop-up saying what software is required to view the content, so you may be forcing otherwise kind and patient people to download software they may or may not want. Good luck with that.
OK, I could force you to read yet another article on iWeb talking about various menu choice and their relationship to you, the onscreen icons, and God, but I’ve tried your patience long enough. In part 5 we start talking about actually using iWeb! Really!
Leave a Reply
You must be logged in to post a comment.