

I just bought an iPod Classic. Well, not quite. My Wife bought me an 80 GB iPod Classic for my birthday. I could have gotten any of them, but the new iPod nano that is video capable was swallowed up in my huge hands and the click-wheel felt very fragile as compared to the previous versions. She also asked if I wanted to wait until the iPod Touch was out, but after playing a bit with its more expensive brother the iPhone, I decided against it. I use my iPod mostly in my car and the comfortable and easy to use click-wheel is better for what I wanted an iPod for.
So good for me, I now have a full-sized iPod. So what? Well, this is the first iPod I’ve owned that was video ready and this necessitated some changes in how I manage the media for it. I do have two iTunes purchased movies (Star Trek: Generations and The Sixth Sense) and a boatload of TV episodes (Heroes, 3 seasons of Battlestar Galactica, a few South Parks), but I keep them and most of my other QuickTime/iTunes compatible video files off my main drive. Why? Because they take up a LOT of room.
I have a 250 GB drive in my 24-inch Intel iMac and I need some extra space for occasionally trying out stuff and making movies. So imagine my dismay when once I consolidated my iTunes library to now include videos to put on my new sparkly iPod and discovered that I lost about 15% (a little more than 36 GB) of the available space. Yikes!

I needed to do something. That something was to remove my entire iTunes movie folder to another drive. Before continuing, remember that in order to use iTunes when this is done, the volume or drive you moved your iTunes library to MUST be mounted in order for iTunes to work properly.
Fortunately I have a lot of external drives. I use one more often than not as my main backup drive because it’s the quietest of them. I also have a two-bay FireWire 400/800 behemoth that would be perfect for this if it didn’t sound like an Airbus 380 with all engines on reverse thrust. I prefer as little noise as possible while working and the one I chose besides being quiet also had a 250 GB hard drive in it. All the steps I had to take to first use this drive (since I was already using it for backup) are unnecessary, so I won’t bore you those details and instead I’ll bore you with the steps you can use for an external or separate from your main drive for your iTunes library.
Before you start this procedure, it is imperative that you remember ONE VERY IMPORTANT THING! Before you delete any data, make damn sure you have successfully re-created your iTunes library. Nothing will make you want to kill yourself (or possibly me, which in my opinion is worse) than losing your entire audio and video iTunes collection. Also, if you’re a Windows user this will probably work as well, but I don’t have access to iTunes on a WinPC to try it. So, please be aware that I’m talking about Macs only. When we get to the part about moving stuff around, I’ll remind you of this again and give you a way to protect yourself in case something goes disastrously wrong. Lastly, if you don’t need to make a backup of your main drive, just follow the steps required to move the iTunes folder.
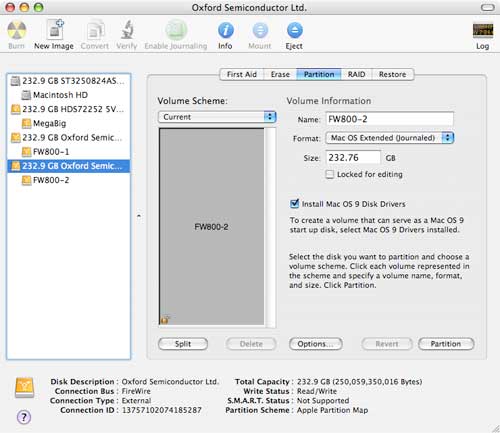
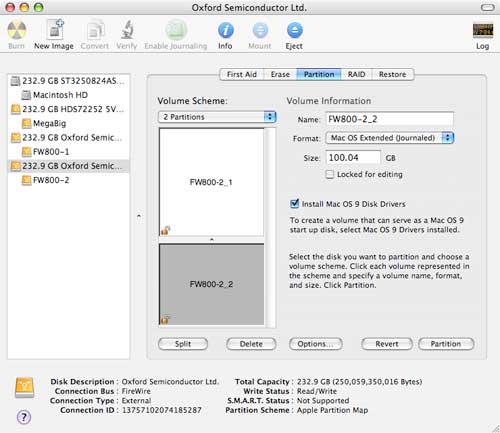
Let’s talk about the drive or volume for a moment. However big it is not too important other than that it is at least as big as your current iTunes library with some extra space (if you use a video iPod, a LOT of extra space). I have a 250 GB internal drive in my iMac. Why not use this for backup as well? Hard drives are cheap and getting cheaper all the time. So in my case I could use say a 320-500 GB drive to pull double duty. So, connect your external drive (that has nothing on it that you care about as we are about to wipe it clean) and fire up Disk Utility (Hard Drive -> Applications -> Utilities -> Disk Utility). Select your new drive and click on the “Partition†button right there in the middle. Find the “Split†button and hit it once. The drive will show as being of two parts. Use the upper part for your bootable backup (there are excellent reasons why to do this so just trust me on this) and the lower part for your iTunes moved library. Remember it needs to be at least as big as your current library and it’s probably not a bad idea to make it as big as your iPod’s storage capacity. Note that I have mine set-up for 100 GBs even though I have an 80 GB iPod. Why? Maybe there will be stuff I want to have around but not on my iPod all the time.
You’re all set now. Hit the partition button on the bottom (Last chance to back out) and the drive will wipe itself clean. Name each partition whatever you want, but make them distinctive enough to remember. Use SuperDuper, CarbonCopyCloner, or the backup utility of your choice to backup the rest of your drive, but let’s get back to iTunes and moving your library.
Step one is to find your iTunes folder. If you have an unblemished version, it is in your “Music†folder. Starting from scratch? Here’s the path: Hard Drive -> Users -> Your User name -> Music. There’s some other stuff in there too (like GarageBand files if you have iLife), but the only thing we’re concerned with is the actual ‘iTunes†folder.
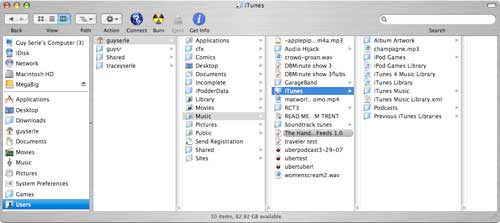
Inside the iTunes folder are various other folders and important information. In for a penny, in for a pound, let’s move the whole thing. Select the volume or drive that you made earlier and now want to use for your iTunes music library. Once it’s available on your desktop, you can move the iTunes library to it. Drag and drop the entire folder. Depending on the size of your iTunes library it could take awhile. Once it’s finished, open the iTunes folder in its new location and play a few things in the finder window to make sure things are kosher. If everything is fine, we’ll move on to the next step.
Trash your iTunes library on your main drive….I’m kidding, DON’T do this. At least not yet. We need to make everything work first. Go ahead and fire up iTunes. Once it’s up, go to your iTunes menu bar and under iTunes is “Preferencesâ€.
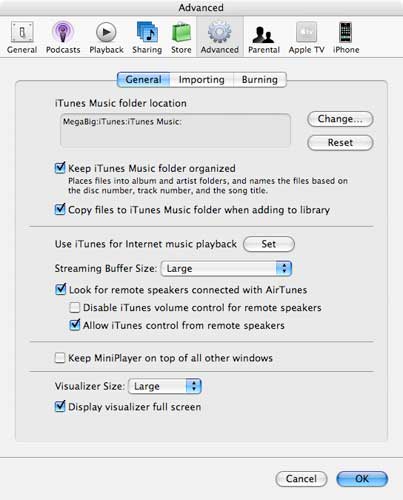
Bring that up and select the “Advanced†icon. You’ll see near the top a slightly grayed out section and “iTunes Music folder locationâ€. Hit the change button and a new window will open. Click your way to the partition where you copied the iTunes folder, select that and then the “iTunes Music†folder inside. Now quit iTunes.
In your Music folder on the main drive (the one that currently holds the now former iTunes library) make a new folder and call it oldtunes. Drop the iTunes folder inside that to prevent iTunes from finding it. Start up iTunes again. It will take a little bit for iTunes to re-index all your stuff, but once it’s done, everything should work just like it did before.
Try stuff out. Make sure a wide variety of music, videos, and podcasts all work like they should. For a little extra fun, create an alias of the new iTunes folder on your new volume (select the folder and either use right-click or control-left-click and select “Make Alias). Move it to your music folder. Now you can look at what’s in your iTunes folder and play selections within it without having to choose the other drive or volume. If everything is good, go ahead and trash the oldtunes folder and reclaim a big chunk of your main drive. What if that external volume or drive fails???? Go back to the section where I talk about making backups. Use another drive to back up either both partitions or how ever many volumes you currently use. What if those fail too??? Now you’re just being paranoid.
Leave a Reply
You must be logged in to post a comment.