

Do you ever receive a bunch of photos in an email that you want in iPhoto? If you are using Tiger, it is easy as 1,2,3. If you are in an older operating system, there are a few more steps involved. I’ll cover both in this installment of Macspiration.
Let’s start with Tiger, I said it is as easy as 1,2,3; and it is. Here’s all you have to do:
1. Open the email with the photos.
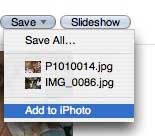
2. Under the address information you will see a line that says you have a certain number of attachments. There will also be a save button. Click and hold the save button.

3. At the very bottom of that window will be an option to “Save to iPhoto.†Move your mouse over that option and release the button. All of the photos attached to that email will be sent into iPhoto (which will open for you during this process).
The process for saving photos and attachments is similar in an older Mac OS, except for the “Save to iPhoto.†That was new in Tiger. Instead you can save all of the photos, or individual photos to a location on your computer.
To save all of the photos, you click “Save All†in the menu that I mentioned above. A save window will appear and you can designate where you want the photos to be saved.
To save an individual photo, move your mouse down the list and highlight the photo you want. Release when on the photo, and as before a save window will appear. I suggest creating a folder called “Photos†that you can always download your photos to.
Now that the photos are saved on your computer, you need to get them into iPhoto. Depending on the version of iPhoto you are using, this next step could be located under a different menu and/or be worded differently. I am using iPhoto 6.
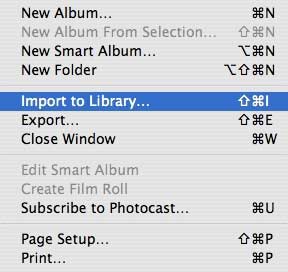
In iPhoto, go to the “File†menu and choose “Import to Library.†A window similar to the window for opening files will appear. Locate your folder with the photos in it, click the folder, and click “Import.â€
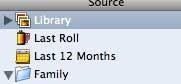
The graphic will appear as if you were importing from a digital camera, and the photos will be added to your library. For quick access to them go to the “Last Import†folder in the “Source†column of the main iPhoto window.
There is one other way to add photos to iPhoto from an email. If the images or file icons are visible in the open email, you can click on one or select multiple files with your mouse. Then click and drag the files to the iPhoto icon (hopefully in your dock). Once dropped on the iPhoto icon, the photos will be added to your library.
These “older†methods work in Tiger as well, but the “Save to iPhoto†is a great feature.
Look for more iPhoto tips in future Macspirations.
Leave a Reply
You must be logged in to post a comment.