
INTUOS4 – WIRELESS PEN TABLET Model PTK540WL
Company: Wacom
Price: $399
http://www.wacom.com/intuos/wireless.php
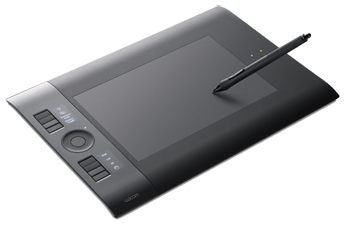
Wacom, the company well known for its pen tablets, introduced recently the Intuos 4 Wireless. This is basically the same as the Intuos 4 Medium size tablet with Bluetooth connectivity. We had the pleasure of testing it for you.
Get it out of the box
When I received the parcel with the Wacom tablet in it, the first think that struck me was the packaging. I’m sure you saw some of those new Apple product un-boxing pictures or video on the Internet. Un-boxing the Intuos 4 is the same experience as an Apple product. We can clearly see that Wacom took the time to package this professional pen tablet with proper care.
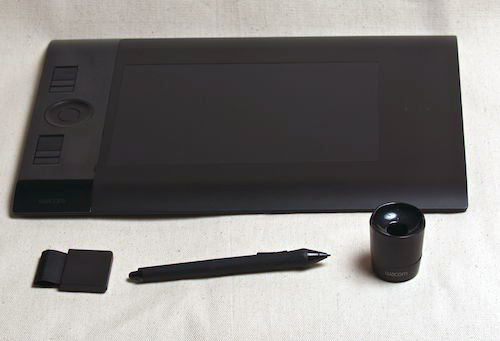
What you find in the box is the tablet, wrapped in a black high quality material. You lift the tablet from its position, remove it from its wrap, and you see the pretty nice tablet made of black plastic. The plastic is of very high quality, not that kind of cheap plastic found in disposable devices. The tablet construction is really solid and is conformable when you slide your hands on it. It does not feel rough to the touch. Under the tablet, the box contains some compartments that store a USB cable, driver CD and instruction booklet, the pen, and the pen holder.
In physical size, the tablet has almost the same dimensions as the medium wired tablet of the same name. In numbers, that is: the medium wired tablet is 14.6″ x 10.0″ x 0.5″ while the wireless one is 14.3″ x 10.0″ x 0.6″. The working area of the wireless version is a bit smaller at 8.0″ x 5.0″ compared to 8.8″ x 5.5″ for the wired one. That makes the wired tablet’s working area larger by around 21%. I do not believe it is a major factor to consider. In my test, the working area felt really nice and adequate even for my 27″ iMac screen. The tablet itself is almost the same size as a MacBook Pro 15″.
If you want to cary the tablet with you in your backpack along with your MacBook Pro, the tablet should fit nicely in your bag. I highly recommend that you put the pen tablet in some kind of sleeve to protect it from scratches while traveling. A scratch on that nice black surface is going to make you regret not having done so. Add to this that scratches may affect the working area and eventually the sensibility. There is no sleeve included with the tablet when you buy it. Wacom is selling one on its online store for $29.95. It could be a great add-on from Wacom to provide the sleeve with the tablet.
The wireless tablet does not come with an included mouse, as do the wired versions. But considering that most people use their standard mouse, it is nice not having this other rodent in the way. If you want it, you can buy it separately. Just remember that the Wacom mouse only works on the tablet surface, hence the fact that I prefer to use my normal mouse adjacent to the tablet. The wireless tablet comes with all the standard nibs included with the wired version.
Other than that, all characteristics of the wireless tablet are the same as any other Intuos 4 pen tablet: 2048 levels of pressure, 5080 lpi (lines per inch), and so on. The experience of working with the wireless tablet is no different than the ones with wire. If you choose to go with the wireless version, you do not make lot of sacrifices. And if you count the advantage of having no wire attached, that could easily compensate for the fact that the working area is slightly smaller.
Configuring it to work with your Mac
As for most wireless devices, you have to charge it before you use it. First remove the plastic sheet that isolates the battery contacts from the tablet hardware. Then you plug the USB cable into a USB port of your Mac and to the tablet. A light on the tablet indicates that it is charging: yellow means it is charging, green that it is fully charged.
While the tablet was charging, I took the time to install the drivers on my iMac. The installation process was very quick and a new icon appears in System Preferences as well as a Menu bar item on the right. The System Preferences pane is where you can customize the functions of the tablet. The Menu bar icon gives you the connected status of the tablet itself, battery status, and a shortcut to the System Preferences pane of the Wacom tablet.
The tablet connects wirelessly to your Mac via Bluetooth, and no dongle of any kind is required. For connecting it to your computer, you need to pair the computer and the tablet as with any Bluetooth device. You do this by using the Bluetooth System Preferences pane, and click on the plus sign to add a new device. Turn the tablet on with its switch, then press the Bluetooth paring button on the tablet; the Mac should see it as a mouse device. At first, I was wandering why my Mac could not see the tablet in the Bluetooth list of devices. I realize that if the tablet is connected via USB to the computer, the Bluetooth functionality is disabled. So be sure the tablet is not connected via USB when you want to pair it.
There are a few advantages of having the Bluetooth disabled when it is connected via USB. Suppose your Intuos battery is dead because you forgot to charge it. You can still use it as a standard Intuos 4 wired tablet by connecting the USB cable. Another advantage is that if you have, say, a MacBook and an iMac, you can choose to pair the device with one computer via Bluetooth, and use it with the second one as a wired tablet.
Discover the new functions at the tip of your hands
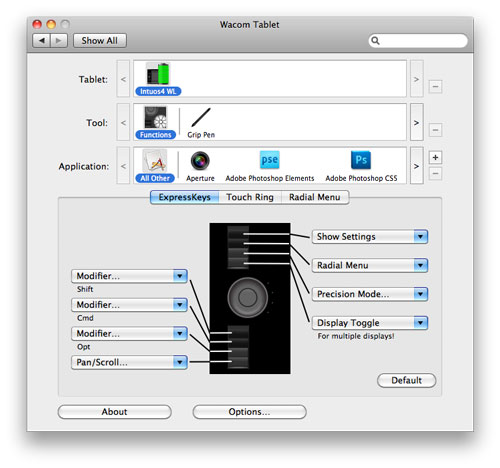
The Intuos 4 series of tablets include eight fully programmable ExpressKeys and a Touch Ring with a central button. By default, each ExpressKeys comes with a set of predefined functions programmed to them. On the side of the eight keys is a small LED display that describes the programmed function for that key. For example, the first button at the bottom is the hand tool (used in Photoshop to move the viewing area) and the display for this key shows a hand, the same hand you have in the Photoshop toolbox. The three buttons above the hand are for Shift, Option, and Command modifier keys, and they display the same icons you have on your Apple keyboard. If you customize a key, you can name it and that description will appear on the LED display. A very nice touch. The tablet can be used for left or right handed people too, and the keys will reconfigure accordingly.
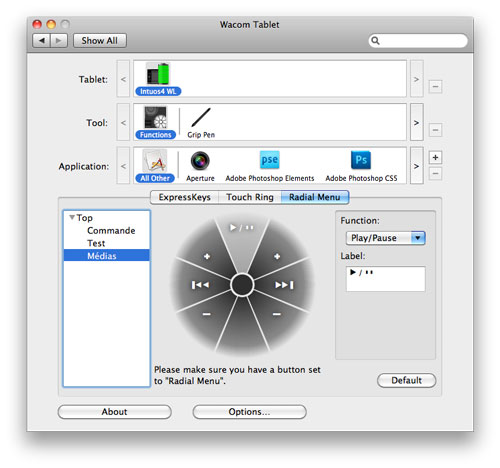
The four other buttons per default display the Parameters (the programmed functions of each keys, or help if you prefer), the Radial Menu, the Precision Mode, and a Switch Screen function that is useful if you have multiple displays. The Radial Menu is another great thing on this tablet. It is basically a rounded menu that appears at the cursor position on your screen when you hit the key it is programmed for. The default is a set of four sub-functions positioned at the cardinal points: Commands, WWW, Email, and Media. There are four other positions available that can be programmed as desired; they are not programmed by default. Commands is a set of the common commands you’ll find in any software (Quit, Cut, Paste, etc.). The Media is another default submenu that can be used to control media software such as iTunes for Play, Pause, Next song, etc. And you can create your own submenus if you wish. This means that the number of combination you can have is almost endless.
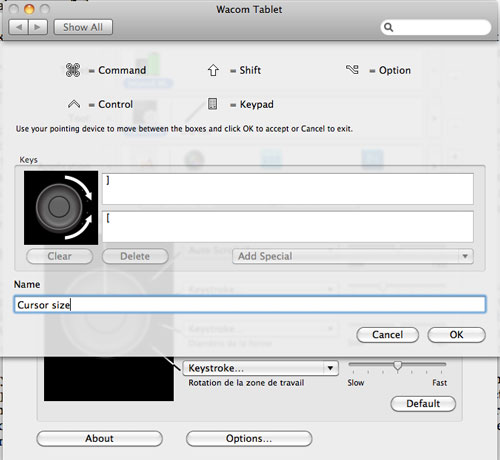
Each key or radial submenu is programmable to a level that, at some point, can get you lost in the choices available. Not to complain about it — we like to customize our tools the way we want. I am thankful to Wacom for offering such an amount of customization. You can program the keys to act as any type of click (Click, Left click, Center click, Double click, Fourth or Fifth button click), it could be a keyboard key (with any modifier key you want), a modifier key itself (or a set of), Back, Forward, or Application Switching, just to name a few. If you do not find the default functions set useful to you, you can change it the way you like.
The Touch Ring can be used for up to four different functions. The central button on the Touch Ring select the function you want to use. The Touch Ring does not have small on-tablet displays that describe the functions you have chosen. There are four LEDs that are located along the side of the Touch Ring, from top to bottom, that tells you which mode you are in. When you click the central button, a translucent window appears on your screen telling you which function has been selected for the Touch Ring. The Touch Ring is similar to the one you have on an iPod Classic. You simply drag your finger on it, but there is no moving part. The Touch Ring can be used for zooming, switch layer in Photoshop, change brush size, or canvas rotation. If you are not happy with the default sets, just program a forward and backward action in the preferences pane.
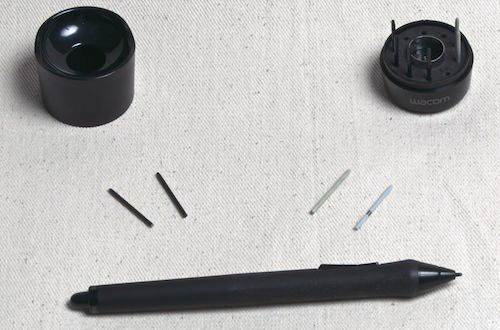
The stylus is very comfortable, and it is a pleasure to keep it in your hand. The tip can be changed for one of the nibs included in the package. For example, there is one of the nibs that has a spring in the middle of it, which gives you a different feeling when using it, say, for painting something. It is a feature that many artists will appreciate for sure. If you tap the tip of the stylus on the tablet, it will act as a click. When you paint on the tablet surface, if you apply different pressures, the result is immediately visible on the screen. With 2048 levels of pressure sensitivity, it should be enough for every artist to feel like working with a real stylus on real paper.
The stylus has two side buttons that are easily reachable with the thumb. Those buttons can be customize the same way the ExpressKeys can. I personally customized one for Photoshop CS5’s new on-screen Color Picker that is activated by pressing Control, Option, and Command. Turn the stylus upside-down, and you have an eraser. In Photoshop CS5, this eraser is mapped to the Eraser Tool in the Toolbox. This confuses me sometimes when I’m using a selection brush and want to remove an area from my selection. Instead of working with the selection brush as expected, it erases the content.
The tablet, your software, and yourself
One of the advantages of a tool like the Wacom Intuos 4 series is the fact that it can be customized on a per user basis. Even more, it can be customized to different sets of functions on an application basis. In the System Preferences panel for the Wacom Tablet, in the Application section, hit the + button and select the application you want to customize. If the application you want is launched, you can select it from there, or use the Browse button to select an unopened application. Then in the Application section, select it and start customizing it to your need. Every application that is not defined there will use the default set of functions. In the Tool section, you can customize either the tablet buttons, the pen, or any other additional accessories you have on a per application basis.
The default set of functions is, from my testing, well designed for applications such as Photoshop CS5 or Photoshop Elements. With that default set, I had no issue using those applications for many tasks that I use to do. But that said, I prefer customizing the tablet to my liking with the functions I use the most in CS5.
When it comes to applications such as Aperture, I found that the default set does not do any good. Customization is mandatory. I am not using Adobe Lightroom, Adobe InDesign, or Corel Painter, but I suspect you may face similar limitations with the default set.
The good thing is all that can be triggered by a keyboard shortcut can be customized to a tablet function. And considering that all professional applications, such as Photoshop CS5, Aperture, or LightRoom, let you customize your keyboard shortcuts, that means you can do most of the work without having to touch the keyboard. But this requires a little work from the end user. In my case, I’m trying to make the most of the Radial Menu. For example, by customizing the Radial Menu for Aperture, and putting it on one of the Express Keys, I am able to use the loupe, change my views, or select the adjustment tabs without having to hit the keyboard.
Bundled and reduced software
One of the benefits of buying a Wacom Intuos 4 tablet is that it comes bundled with a few applications. The applications are not on the driver CD, but on the registration site at Wacom.com. All applications are available for either Mac or PC. You have the choice of Adobe Photoshop Elements 6 or 8, Autodesk SketchBook Express, or Corel Painter Sketch Pad. You also have Nik Color Efex Proâ„¢ 3 WE6 and a set of Wacom brushes for Photoshop.
Wacom also has some offers with many software makers. Where the real deal comes in, is for an upgrade to Photoshop CS5 and to the full Corel Painter 11. If you ever wanted to step into the C5 version of Photoshop, you can upgrade the bundled version of Photoshop Elements to CS5 (Standard Edition) for only $299. If you do the math correctly, buying the Intuos 4 at $399 and upgrading Photoshop CS5 for $299, you reach a price of $698, wish is the price of the full Photoshop CS5 alone. In other word, for the same price you get a professional Wacom tablet for free. There is also an upgrade from Corel Painter Sketchpad to Painter 11 for $129 available. Those offers may not be there forever, so if this is a buying factor for you, don’t wait too long.
Let the fun begin!
The pleasure of working with the Intuos 4 is not easy to describe. It is like working on a real piece of paper with a real stylus. The more pressure you put on the pen, the more virtual ink you put on the screen. That is really awesome. In Photoshop, this works equally with the paint brushes or with a selection brush. Where it become very interesting is when you use the new Bristle Tips in Photoshop CS5 <http://www.adobe.com/products/photoshop/photoshop/whatsnew/index.html?segment=design>, because it really feels like you have a brush in your hand. Twist the pen a bit, and the brush follows your hand movement on the screen.
When using the pen to create a complex selection in Photoshop, if you want to select a large area, apply more pressure on the pen. When you need to select a more precise part of an image, just be gentle on the pressure, and it can become as specific as you want.
What really makes this tablet blue the sky out, is the Touch Ring. Zooming in and out on an image without reaching the keyboard, or changing your working tool, is a time saver more than you can imagine. Even more useful is when you put the mode of the Touch Ring to the brush size in Photoshop. Put your pen on the area that need to be painted, turn the ring until you get the brush size you need, then paint. No need to reach the keyboard or the tool adjustments at all. And if you take the time to customize the Radial Menu for each of your applications favorite’s shortcuts, you get even more productive than ever.
Conclusion
The Intuos 4 Wireless Wacom tablet is certainly the best tool I’ve added to my gear recently. It makes working on my pictures, or other form of art, a charm. The fact that it is wireless is great, just because you can bring it to your workspace, or put it back when no longer needed, without having to deal with the cable. I have a wireless keyboard and mouse too, so changing my workspace is a matter of seconds, not hassles. And the battery lasts a long time before draining completely. You don’t need to charge it that often, even if you are a heavy user.
One thing I found out is that to make it comfortable for your workflow, you first need to do a lot of customization to the Express Keys, buttons, or Touch Ring functions. It would be great if we had the possibility to load customized sets from other people. Say, for example, that you have a friend who has been using one for years, and came to a great set of functions for Photoshop CS5. We cannot easily exchange our templates on a per application basis. We can export our set of commands using the Tablet Utility provided with the driver, but it is all or nothing. It cannot export or import only the set for a specific application. It would be great from Wacom to provide some kind of exchange template feature between users.
For now, Wacom is offering the Inuos 4 Wireless only in the medium size. If the size of the tablet is correct for you, I highly recommend that you buy the wireless one. Having no cable around when you need it, or want to get rid of it, is really the best thing that happens to a tablet. But be prepared to customized the features before you really can lift off with it. And having the opportunity to upgrade to Photoshop CS5 at a great price, while the promotion lasts, is a bonus that you are likely to appreciate.
MyMac Review Rating: 8 out of 10
email -Â MyMac Magazine -Â Twitter -Â Advertise -Â Reviews Archive -Â Podcast
![]()
Leave a Reply
You must be logged in to post a comment.