
Data Backup 3.0.5
Company: Prosoft Engineering
Price: $59.00
Time Machine 1.0
Company: Apple
Price: Comes with OS X 10.5
The value of good backup software cannot be overstated. In its latest iteration, the Mac OS comes with a built-in backup program called Time Machine that creates incremental backups on external drives. It is designed to operate in the background with little interaction from the user, and should the need arise to recover lost or damaged files, the Time Machine interface is intuitive and simple to navigate.
This begs the question: why bother with third party software?
The short answer is that as good as Time Machine is, it is an inflexible tool designed to be used in just one way. Third party programs offer much more flexibility, in particular over the type of backups performed and the range of devices to which your data is written. One of the best backup programs in the Macintosh marketplace is Data Backup, a program we reviewed late last year.
So let’s put Time Machine and Data Backup head to head and figure out their differences. Once you understand where each application scores best, you’ll be better able to decide whether to fork out the $60 for Data Backup or stick with the copy of Time Machine you got with OS X Leopard.
Backup destinations
Time Machine is designed to back up files either to an external drive (via USB or Firewire) or else to a specific type of network drive produced by Apple called a Time Capsule. What Time Machine cannot do is back up your files to non-Apple branded network drives, WebDAV devices such as the iDisk, or optical devices such as CD-Rs or DVDs.
By contrast Data Backup will not only write to external drives, but also to networked drives, the iDisk, and to writable CDs and DVDs. So in terms of flexibility, Data Backup scores here much more strongly than Time Machine.
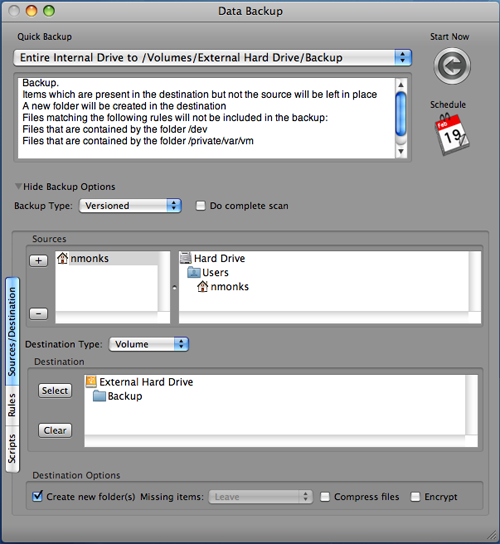
Data Backup operates through an application window offering a plethora of options
That said, in practice some of these options may be of more notional than practical value. While Data Backup copied files across to the iDisk happily enough, the iDisk itself is usually so glacially slow as to make it almost worthless for backing up anything over a few megabytes. Backing up your entire Home folder would likely take many, many hours. Moreover, after completing the backup, errors were reported by Data Backup. Opening up the Log revealed nothing even remotely explicable to me (and likely not to most other Mac users either) so without going through the backed up files on the iDisk manually, there’s no easy way to check if they’d been copied across safely. Seemingly the errors have more to do with operating system housekeeping than the content of document files themselves, with Word documents and various graphic files copying across just fine. The only files in my limited testing that consistently failed to copy properly were text clippings.
Backing up to CDs or DVDs is increasingly seen as a old school approach, in part because of the limited amount of data that can be placed on each disk. But CDs and DVDs are cheap and easy to use, and consequently remain very popular among less demanding users. Time Machine can’t use either type of disk, but Data Backup handles them quite nicely. If your backups are small, then you can write multiple sessions to one CD (for some reason DVDs can’t be used this way). If you have a lot of data to backup, then Data Backup will split your files and arrange them across multiple disks.
Backup types
Time Machine is limited to a single type of backup, known as an incremental backup. Essentially this works by first creating a copy of your Home folder and then with each update it keeps track of any changes. Outdated files aren’t deleted but retained, so that the user can go back in time through the Time Machine interface and recover old copies of files from different points in time. The Time Machine metaphor plays upon this idea, putting across to the user the idea that it isn’t files that are being backed up or recovered, but what was on the user’s Macintosh at the time a particular backup was made.
Data Backup offers four different types of backup: simple copies, clones, versioned backups, and synchronized backups. Let’s look at those in turn before passing judgement on how this compares with Time Machine’s one trick pony.
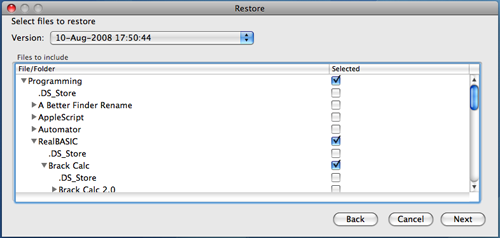
The Data Backup Restore window is minimalist but functional
Simple copies are just that, copies. First time around Data Backup copies across all your files and folders, and after that it removes deleted files and folders while updating or moving those that have changed. On the plus side, simple copy backups are very efficient in terms of speed and disk space usage. But the big negative is the lack of a “time axis”. Unlike incremental backups the keep copies of files that were deleted on your computer, simple backups do not keep copies of such files. If a file wasn’t present on your computer the last time you did a backup, it won’t be in your backup either. Data Backup does offset this disadvantage by offering both data encryption and file compression, making this approach useful for doing one-off archives to CDs and DVDs, for example.
Clones copy not just the files and folders but also the hidden files that makes the hard drive in your computer a bootable drive. The prime value to this is where you need a perfect copy of your hard drive including the operating system and applications. It’s useful to have a cloned copy of your computer if you have a lot of applications and system add-ons installed. Should your computer crash and the hard drive need reformatting or replacing, copying everything back from the cloned drive will be a lot easier than installing everything from all their different disks. Mac users working in lab environments or classrooms will find this very useful because they tend to have to work with dozens of computers with (at least initially) similar hard drives containing the same operating system and applications.
Versioned backups are how Data Backup does incremental backups. While there’s no fancy interface as there is with Time Machine, the functionality is the same.
The final option available to users of Data Backup is the synchronized backup. This is not so much a backup as a way of merging the contents of two different drives. It’s a special sort of simply copy backup in the sense that there’s only one version and outdated files are removed. But instead of one set of files, the backup, being copied from the master set of files on the computer, Data Backup synchronizes both sets of files so that deleted files are removed from both and the newest version of a file is copied to both. The classic example of where synchronization is useful is where someone wants to work on one set of documents in two different places, using a portable hard drive (like an iPod or USB jump drive) to shuttle files between the computer at home and the computer at work.
So, which is best? For most users, the versioned (or incremental) backup is the best, and both Time Machine and Data Backup offer this option. The other types of backup have more specific uses and will be attractive to only a subset of Mac users, so their absence from Time Machine will quite likely go unnoticed.
Scheduling
Time Machine and Data Backup are very different in how they approach backup schedules. Time Machine essentially only has a single configuration, and whenever the external drive is plugged in, it will follow a strict timetable involving hourly backups for the first day, daily backups for the past month, and weekly backups thereafter until the drive is filled.
Data Backup is much more flexible. Backups can be schedules to take place on specific days; after particular intervals of time (measured in anything from minutes to weeks); when certain things happen (e.g., after system startup or when a particular drive is plugged in); or at certain times each day or on specific days within the week. Unlike Time Machine, which stores incremental backups until your external drive is filled, Data Backup can be configured to keep only a certain number of versions, allowing the user to trim away really old stuff more easily.
Data Backup can also be run in association with Apple Scripts and Automator Actions. This is a great feature that makes it possible to automate tasks such as quitting other applications, emptying the trash, or removing application and browser cache files before the backup is started. You can also set scripts to run after the backup is finished.
Unquestionably Data Backup provides many more options than Time Machine, so again, if the Time Machine default doesn’t suit you, Data Backup will be a lot more useful.
Interface
Time Machine is fairly harmless in its backing up mode, being an invisible application that runs in the background of OS X and is configured through a pane in the System Preferences.
But once you switch to recovery mode things become crazy. Crazy in a good way, but crazy nonetheless. A single Finder window animates onto a swirling galaxy background while the rest of the Finder, including the Desktop and menu bar, slide downwards and off the screen.

Time Machine is configured via a simple Preferences pane
Once there you’re presented with sort of linear Rolodex of Finder windows through which you can flip backwards through time to locate files that as they were when a certain backup was made. Now, it has to be said that the interface uses a lot of non-standard buttons and general eye candy. But the non-standard purpose also serves a purpose by making it clear that the user is “going back in time” pulling files out from earlier backups.
How does this compare with Data Backup? In this case the application uses one of the all-grey windows that Prosoft seem to like so much. Although it won’t win any prizes for looks, its basically laid out in a simple and reasonably intuitive way. Pull-down menus give quick access to the key options, things like backup type and destination media type. Various other options can be accessed via tabbed windows and other buttons.
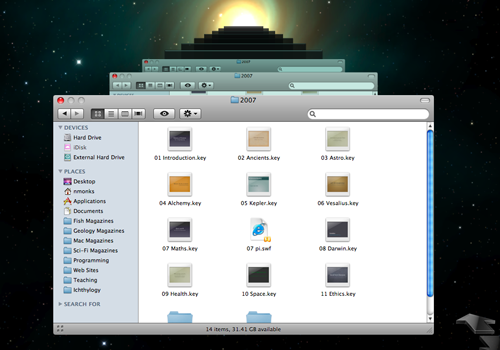
Restoring files in Time Machine is a funky but intuitive experience
Recovering files in Data Backup is relatively straightforward if a bit less intuitive than Time Machine. The Restore window steps you through a series of options where you choose disks and select folders and files until you’ve selected everything you want. You’re then able to choose where you want to put the recovered file, and then off you go. Some of the interface elements are a bit vague, but nothing too serious. For example when it comes to choosing folders and files to restore, the check boxes are either empty or selected, there’s no intermediate state that shows you that some of the things in a certain folder have been selected, but not all of them. (You’ll have seen these three way radio boxes if you’ve ever configured an OS X installation, where radio boxes are either empty, struck through with horizontal line if partially selected, or ticked if everything in that set of options was selected.)
Speed and stability
A while back I reviewed Data Backup 2.1 for Macworld UK, and was a bit disappointed with its speed and stability. In its latest incarnation Data Backup is dramatically better, working smoothly and rapidly. When performing the same sort of incremental backup as Time Machine to the same external hard drive, it was noticeably quicker. But that said, both applications work efficiently and reliably, so there’s really not much to choose between them in this regard.
Conclusion
So how do you choose between them? It’s really this simple: Time Machine is a great application that does precisely what it promises with minimal fuss. If your backup plan fits what Time Machine offers, then this is a no-brainer: stick with it. However, for a lot of users Time Machine will be limited and inefficient. If you want to backup only certain files, or use a wider range of media, or need to configure your backups around a specific schedule, Data Backup is an infinitely more flexible alternative.
Data Backup 3.0.5
Pros: Flexible backup options; can write to CDs/DVDs
Cons: Built-in help can’t be searched; flaky behavior with iDisk
Price: $59.00
System requirements: Mac OS X 10.2.8 or higher; Universal Binary.
Time Machine 1.0
Pros: Simple to use; neatly fits into OS X
Cons: Very little flexibility
Price: N/A
System requirements: Mac OS X 10.5
email – MyMac Magazine – Twitter – Advertise – Reviews Archive – Podcast
![]()
Leave a Reply
You must be logged in to post a comment.