
Adobe InDesign CS3
Adobe Systems, Inc.
Price: $699.00 USD, $199 upgrade
LAZY AND CRAZY, TOO!
Until I started working on this review, I’d never used the software. (Uh-oh.) InDesign CS3 isn’t for beginners, yet I’m no beginner as a writer. From my perspective, I take it as a given that InDesign CS3 is a professional-level layout and desktop publishing program with far more capabilities and control over all aspects of typography and design than any word-processing application. If I could craft a better manuscript with it, I wanted to try — no one should be afraid of using the very best tools. Hearing that I was going to write a review, however, my brother Bob in Austin emailed me to say,
With features like indexes, libraries, table of contents, links, & bookmarks that you probably won’t notice and might not ever appreciate unless you actually wanted to build a table of contents, an index, publish in both print & eletronic formats with a fancy PDF containing “click-able” table of contents or multi-media features, it’s a daunting assignment. I know you’re not asking, but I’d recommend you at least try to touch on the Library palette, Paragraph Styles, and Character Styles. Also check out Drop Shadows, Corner Effects, Transparency, Word Wrap, Glyphs, Find/Replace and Drop Caps. That way your review will appear like you know what you’re talking about. ;-p
Did he say “dauntingâ€? Indeed. So this will be a streamlined story very different from the usual review. Experienced users may find what follows intolerably frustrating, while novices, dreamers, or pros in other areas could end up commiserating or cheering from the sidelines. Let’s find out!
TAKE ONE
I knew nothing. I wanted something. How best to make InDesign CS3 actually deliver? I decided that the best approach would be to produce a mini-manuscript of perhaps a dozen pages. At this stage, there was no way I’d be able to take advantage of everything the application offered, but if I could do one, I could do another, and another, and so on, and eventually I’d learn. But even coming from a raw beginner, the end result would be an InDesign document that I could output to print or electronic publishing, and when working with my favorite graphic designer, I could send her a working document for her to fix. The workflow would begin and end with InDesign.
 Naturally, I got stuck right away. Poking around the menus made me feel like I was in another country, so I knew I had to break down and open Adobe Help, where I watched a video by Colin Fleming on “Creating a New Document.†He did a nice job but had me hopping madly back and forth from Google or my Dashboard dictionary so I could understand the lingo — in the Land of Print, they don’t speak English! A “slug,†for example, is a variably sized area of white space around and below the document where one can have notes and print job information. I also learned that the default margin of “3p0†refers to three picas, 1.27 cm., or half an inch. (This required googling “three picas,” because searching for “3p0†returned a zillion android hits…) “Pica,†incidentally, means 4.23 mm, an eating disorder, the Portland — or Perth — Institute for Contemporary Art, the Pacific Islanders Cultural Association, the Podiatry Insurance Company of America, and the Photo Imaging Council of Australia, among many other things. If you spell it with a “k,†you get a rodent!
Three hours later, it was clear that “lazy†smart guy wouldn’t cut it. After plodding through more Help pages that I could count, I still didn’t know what the zero in “3p0†meant and seriously considered changing the subheading of this review to, “If an idiot uses InDesign to write a thank-you note, will anybody care?â€
Humbled, I devoted the rest of the day and most of the night to reading pages in the Help Viewer and trying to make sense of online tutorials. Believe me, there are scads of them. Adobe is very helpful in this regard, although no one seems to design instructional material for people from another planet, which was basically my position here. Searching for “how to actually make text appear inside a window on your screen†will get you nowhere, for example, yet that was exactly what I needed to know. Eventually, of course, I found out that text goes inside a “text frame,†which you either create on the page with the Text tool or else end up with in full page size if you select “Master Text Frame†when you create a document. I did that for my initial 12-page experiment, using default margins and a custom 5.5 x 8.5 inch paper size (for paperback books).
As one might guess, I crashed and burned. There’s no better way to learn fast, however! 12 pages was too small, my master page was set up wrong, etc. And as I saw more and more of what InDesign could do, my ambition grew. I decided to scrap the first attempt and start all over. But first, the answer to a burning question on every Adobe PR rep’s mind:
HEY, WHERE ARE THE SCREENSHOTS?!
Okay, here’s one (below). As you can see, screenshots are useless in this context because a) the interface is complex and humongous, b) you can’t read much at 600 pixels wide, c) this thing is all-business and frankly kinda ugly, and d) I don’t know what half of these panels do. Also, be advised that InDesign CS3 is an awfully tight fit on a MacBook desktop: you’ll want the biggest monitor(s) you can find. The good news is that Adobe has designed everything you see here to snap together so you can create a much leaner, customized workspace once you know what you’re doing.

TAKE TWO
No more “manuscript†nonsense, I would create an EBOOK! It worked, too. You can download it now (PDF, 312 KB) and follow along or wait until the end of the review. This would be set up for printing as a paperback at 5.5 x 8.5 inches like before — in case I expanded it for publication — but since I’d only be exporting it to PDF at first, I left out the print-specific blank pages.
InDesign CS3 allows you to create a Book file, which is actually a package containing separate InDesign documents relating to the different sections of a typical book. I created two documents, one for the actual text, consisting of four previously-published columns for Horse Fly, a monthly Taos newspaper, and one for the “front matter.†Front matter is all the junk at the front of a book: title page, copyright info, table of contents, and so on. Using separate documents for each section allowed me to use a different master page for each one. As you might think, the master page contains items (objects) that apply to all pages in that document. I didn’t want a header or page numbers in the front matter, so this was very handy. Yes, there are other ways to do this, but this is how I managed it, and managing is the entire thrust of this already too-long review.
I created the ebook itself by choosing “Export Book to PDF†from the Book panel menu. Here’s a screenshot of the first two facing pages opened in Preview (details below):
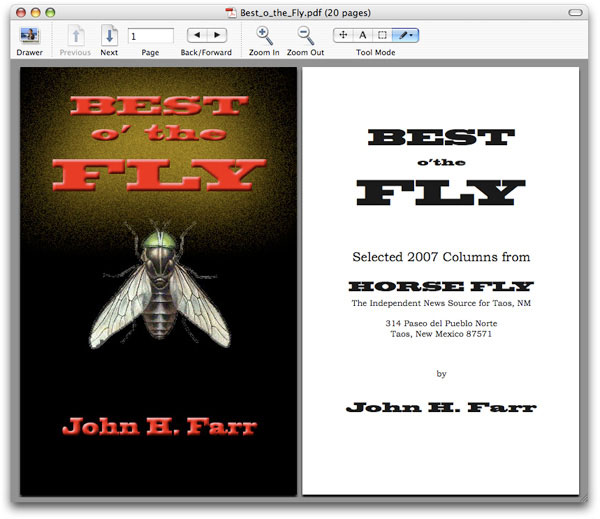
1. Cover created in Photoshop CS3. Copying and pasting images into InDesign CS3 is super-easy.
2. Ebook is 20 pages long, 5.5 x 8.5 inches, maybe hell to print out. I used Acrobat Pro to link the Table of Contents items, but I’ll bet that can be set up first in InDesign. The bookmarks mostly work: for some reason they don’t show up at all anymore in Acrobat Pro, do show up in Adobe Reader, and sometimes function in Preview. Chalk it up to ignorance on my part.
3. Fonts used are Blackoak Std, Bookman Old Style, and mostly Book Antiqua.
4. Haven’t downloaded yet? Go for it!
CONCLUSIONS
This is high-class software, more than capable of handling virtually any publishing project. At $699 a pop, most writers and creative professionals aren’t going to rush out and buy a copy just for the hell of it. On the other hand, it seems there’s nothing it can’t do. It’s hideously complex, but the Help section mostly rocks, and Adobe directs you to some excellent video tutorials. But I just made an ebook! It took me 72 hours of trial and error, but I did it, with absolutely no prior experience with the application. Not only do I now have an actual product (which you can have for free), but I can send the original InDesign CS3 files to someone who knows what she’s doing when I’m ready to have the book expanded or re-designed. I’m working with InDesign from the get-go, and every time I launch it, I’ll learn a little more.
In doing my research for this article, I found that there are folks who call Photoshop and Illustrator “plug-ins†for InDesign. After this week, I think I know what they mean! Look for more articles about my continuing adventures with InDesign here at MyMac — one just isn’t going to do…
System Requirements:
PowerPC® G4 or G5 or multicore Intel® processor
Mac OS X v.10.4.8
512MB of RAM
1.4GB of available hard-disk space (additional free space required during installation)
1,024×768 monitor resolution with 16-bit video card
DVD-ROM drive
Internet or phone connection required for product activation
Broadband Internet connection required for Adobe Stock Photos and other services.Blackoak
Leave a Reply
You must be logged in to post a comment.