
Adobe Dreamweaver CS3
Adobe Systems, Inc.
Price: $399.00 USD, $199 upgrade
www.adobe.com
Overview
Yes, you want it, especially if you have an Intel Mac. The new universal Adoble Dreamweaver CS3 that replaces the Macromedia-branded Dreamweaver 8 (PPC only) is faster, more capable, and actually fun to use. This review is aimed more at current users than new ones, and I’ll focus mainly on the changes, covering topics in this order: speed, CSS-related features, Bridge Home, Spry effects, Photoshop integration, Adobe Device Central, and my conclusions. The testbed machine is a 1.83 GHz Core Duo MacBook manufactured in 2006, with OS X 10.4.9 and 2 GB of DDR2 SDRAM, and all software components are up to date. I installed the application as part of the Adobe CS3 Design Premium Suite, and any quotations below come from included Adobe press materials. If you’re in a hurry, check out two new Dreamweaver tricks you might enjoy, here and here. (Will open in new windows)
Bottom line: not only does it scoot, but it does things it never did before.
Speed, oh Blessed Speed
Wiith the Welcome Screen turned off, a few informal side-by-side trials produced the following results:
LAUNCH TIMES
DW 8 : approx. 25 secs. on cold start, 15 secs. on quit & relaunch
DW CS3: approx. 17 secs. on cold start, 3.5 secs. on quit & relaunch
OPEN 15KB FILE
DW 8: approx. 3.5 secs.
DW CS3: approx. 1.5 secs.
That’s right, it opens all your old files twice as quickly! And having something like Dreamweaver (253.2 MB application size) start up in less than four seconds is a real joy. Remember how much you hate it when you’ve just quit a slow-starting app and find you need to relaunch to edit that file again? — that won’t happen to you with Dreamweaver CS3. Saving a few seconds here and there wouldn’t get that project finished early by itself, but given how much better you’ll feel, it just might. Even FTP transfers are faster. Overall, the increased responsiveness alone is worth the money.
CSS
Background and confession: I build Web sites, but I’m more a writer and artist than a bleeding edge designer. I love Macs, the digital medium, the dynamics of Web publishing, and generally have more fun making sites for myself and friends than for business clients. Since I also do more than play a Webmaster on TV, I’ve been late getting on the CSS layout bandwagon. 2006 was the year I began to catch up, but I’m still learning, so imagine how glad I was to find that Dreamweaver CS3 has 32 built-in CSS layouts to get me going (the old version had only six). Well-timed for me, because this is exactly what I’ve been studying. Toward that end, Adobe has seen to it that these CSS layouts are heavily commented, as seen in the following example taken from the “Three column liquid, header and footer” layout CSS. To anyone in the process of learning CSS, this can be a godsend:
/* Tips for mainContent:
1. the space between the mainContent and sidebars is created with the left and right margins on the mainContent div.
2. to avoid float drop at a supported minimum 800 x 600 resolution, elements within the mainContent div should be 300px or smaller (this includes images).
3. in the Internet Explorer Conditional Comment below, the zoom property is used to give the mainContent “hasLayout.” This avoids several IE-specific bugs.
*/
.thrColLiqHdr #mainContent {
margin: 0 24% 0 23.5%;
/* the right and left margins on this div element creates the two outer columns on the sides of the page. No matter how much content the sidebar divs contain, the column space will remain. You can remove this margin if you want the #mainContent div’s text to fill the sidebar spaces when the content in each sidebar ends. */
}
.thrColLiqHdr #footer {
padding: 0 10px;
/* this padding matches the left alignment of the elements in the divs that appear above it. */
background:#DDDDDD;
Browser Compatibility Check / Adobe CSS Advisor
All these layouts are cross-browser compatible, although as Adobe says, “because technology changes so quickly, browser issues and possible code fixes have to be updated on a constant basis.” Dreamweaver CS3’s Browser Compatibility Check feature will flag any issues, explain the problems, and send you to the Adobe CSS Advisor Web site for solutions. Very reassuring, this.
Once you get your CSS sea legs and can work with a few styles without getting woozy , you may enjoy the new Manage CSS feature that “makes it easier for you to move CSS rules from document to document, from the head of a document to an external sheet, between external CSS files, and more.” I’m not sure how useful this is to anyone who already knows his way around a style sheet, since all this really entails is cutting and pasting, but it may help prevent errors.
What About the Bridge?
I praised it when I finally discovered it in Photoshop CS2, but stayed stuck in my old ways. Call me a troglodyte, but I still haven’t adopted this central feature of all the Creative Suite packages. (Maybe this is why we aren’t all meeting for a party on my island.) If you know what Adobe Bridge is all about, you’ll like this version even better because of handy links to a site called “Bridge Home,” where you can watch video tutorials and access all kinds of bulletins and information about your software. “Workflow” being something of an oxymoron to this reviewer, something tells me I’ll be going there.
Spry Framework for Ajax
Ajax (Asynchronous Javascript and XML), is “a development technique for creating interactive Web applications,” according to Adobe. This eWeek article, sporting the worst opening sentence in the history of reworked press releases (“Adobe Systems released May 10 the Spry Framework for AJAX to extend the Adobe Engagement Platform and accelerate the development of engaging experiences.”), may tell you more. Whether you know it or not, Ajax has been a part of your Web experience for a while now. Basically, what this does is make things happen on a Web page without having to reload the whole thing. I’ve built several sites with WordPress, an open-source blogware package that also makes for a cool CMS (Content Management System), and some of the available themes make heavy use of Ajax for things like opening and closing comments, displaying pop-ups of large images (Lightbox), and so on. This makes everything chug along a little faster, with less server load, and those are both good things.
Spry Widgets
Utilizing this framework, Adobe has created over a dozen Spry Widgets for use in Dreamweaver CS3 that you can access from the handy toolbar. These components include XML-driven lists and tables, accordions, tabbed interfaces, and form elements with validation, among other things. Amazingly, I’ve never created an “accordion” (although I know what they sound like, haha), so I decided to give it a try. Just click here (this and example below open in new windows). I can’t say that’s the most exciting thing I’ve ever done with a Web page, but there’s a whole lot more to play with here, as in the Effects section below.
Spry Effects
The Spry Framwork for AJAX also enables the application of numerous visual effects to divs and other selectable objects. We’re getting into Web page woo-woo here, but have a look at this example of the “shake effect,” to name just one. According to Adobe, available Spry effects include:
Appear/Fade: makes an element appear or fade away.
Highlight: changes the background color of an element.
Blind Up/Down: simulates a window blind that goes up or down to hide or reveal the element.
Slide Up/Down: moves the element up or down.
Grow/Shrink: increases or reduces the size of the element.
Shake: simulates shaking the element from left to right.
Squish: makes the element disappear into the upper-left corner of the page.
Now, there are a great many ways to customize and apply these effects. Whether this is actually useful in a design sense is something I can’t personally answer yet, but the possibilities are intriguing. For example, the shake effect used above can be applied to HTML objects like address, blockquote, dd, div, dl, dt, fieldset, form, h1, h2, h3, h4, h5, h6, iframe, img, object, p, ol, ul, li, applet, dir, hr, menu, pre, or table. Kudos to Adobe for giving us these tools, and watch for shaking, shrinking, squishing, and fading Web pages in a browser near you. This could get interesting in a hurry.
Photoshop Integration
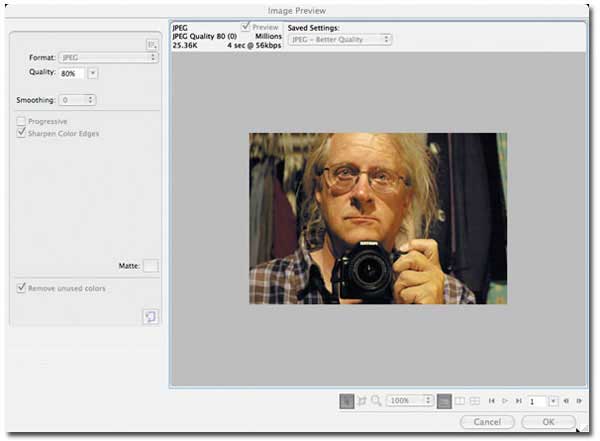
Someone needs to tell me why this feature is a good thing. [Please leave your comments below!] Yes, you can copy an image, layers, or selection in Photoshop and paste directly into a Dreamweaver document. But what exactly happens then? As soon as you paste into Dreamweaver, you’re presented with an Image Preview window like the one below. (That’s me all blown out after an 8-mile hike, but I could play with the optimization settings to make myself look better — maybe!) If everything looks fine, click “OK” to bring up a normal Save dialog window: the image is saved and then shows up in your document.
This seems to work with any image on the Clipboard, by the way. I dragged a picture off a Web page, opened it in Preview, pressed command-C, and pasted directly into Dreamweaver. Interestingly, the images are saved as Plain Text documents with .jpg file suffixes and Dreamweaver icons, and here’s where it gets tricky. Say you’ve just pasted an image into Dreamweaver, and you decide you need to edit it. Option-double-clicking on the image in Dreamweaver opens the original source image in Photoshop (assuming you’ve remembered to make Photoshop the primary image editor in Dreamweaver’s preferences). When you make your changes and save them, the copied image in Dreamweaver changes too. Voilà !
This even works if there isn’t an original Photoshop image. Option-double-clicking on the image file I pasted in from Preview, for example, opens it in Photoshop, but when I save it, it doesn’t “go” anywhere: the image in the Dreamweaver document changes to reflect my edits, but there isn’t any other image file by that name on my Mac except the one created by the original pasting process. Using Spotlight, I discovered the existence of a “Macromedia Design Note” file with the .mno file suffix in the “_Notes” folder for each of the pasted images. That’s how they do it, with a design note file that tells Dreamweaver what just happened to the source. If I build site pages this way, however, I’ll end up with a root folder image directory filled with odd Dreamweaver files instead of Photoshop JPEGs. They work fine as Web images, but if I downloaded one, it would overwrite my original Photoship file. So why did Adobe put so much effort into this? Why not just use Photoshop in the first place?
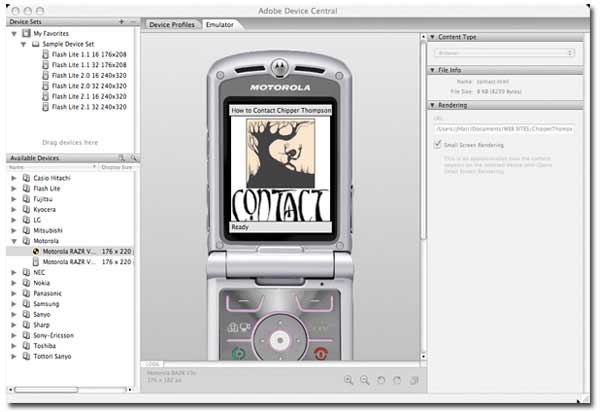
Adobe Device Central
Now this is something I think is really cool, at least in the abstract. Say you’re designing mobile content or interfaces, or you want to see how your Web page would look on a particular mobile device like a Web-enabled cell phone. Adobe Device Central — a separate application bundled with CS3 applications — has regularly updated profiles of various devices, enabling it to to display HTML content as you would see it on the real thing. You can even scroll the tiny little screen. Have a look at how a page from a client’s Web site looks in small screen rendering mode (SSR) on a Motorola RAZR:
Why “in the abstract”? Because all I want my cell phone to do is send and receive phone calls, naturally. But if you’re into this development area, Adobe has you covered.
Conclusion and Rating
If you’ve been using Dreamweaver all along, you definitely want this upgrade. It runs faster and does lots more. If you’ve been using Dreamweaver 8 on your Intel Mac, you’ll be very happy after upgrading to CS3. It’s also excellent for working with CSS-based layouts, and you can learn a lot by working your way through all the options. This is heavy duty software, however, best utilized for creating large sites from scratch and managing them all from within a single application, so beginners should look elsewhere for simpler Web authoring programs or use iWeb. Overall, Adobe has added enough remarkable new capabilities to give the Dreamweaver CS3 upgrade solid value, and the added speed is truly welcome.
System Requirements:
PowerPC® G4 or G5 or multicore Intel® processor
Mac OS X v.10.4.8
512MB of RAM
1.4GB of available hard-disk space (additional free space required during installation)
1,024×768 monitor resolution with 16-bit video card
DVD-ROM drive
Internet or phone connection required for product activation
Broadband Internet connection required for Adobe Stock Photos and other services
Leave a Reply
You must be logged in to post a comment.