
I’ve been an avid fan of iPhoto since it was first introduced about five years ago. Of course the revolution in digital photography inspired me to take videography and photography to a professional level, but having an effective way to organize and edit my photos was equally inspiring.
Now that I’m working as a wedding and event photographer, I’m shooting hundreds of pictures on each job and am having to meet the challenge of uploading, managing, and outputting photos for my clients. The process hasn’t been easy. I’ve been looking at management systems like Adobe’s Bridge and Lightroom programs, and even iView Media Pro, but with the latest update of Apple’s Aperture, I think I may have found solutions to my larger and more complex digital photo management and processing problems. And believe me, when you’re processing hundreds of photos for a waiting client, digital management is a problem that is not easily solved with iPhoto or even Adobe Bridge.
If you haven’t heard yet, a trial version of Aperture can be downloaded from the Apple site and used full version for thirty days. Before purchasing the program, I wanted to see how well Aperture would work on my Powerbook G4 with 1.5gb of memory. Of course Apple recommends for best performance its G5 dual Intel processor computers, but so far I’ve found Aperture to work pretty well on my Powerbook G4. Though it slows to crawl when processing batches of RAW photos, it works just as well or better than iPhoto on large 2+mb JPEG image files. I plan to max out my Powerbook to 2 gigs of memory to possibly get even better performance. Down the the road, though, I’m just going up upgrade to a faster computer for Aperture.
What’s Good About Aperture
The latest version of Aperture addresses many of the problems and demands that kept professional photographers from using the program when it first came out. For example, unlike iPhoto, Aperture 1.5 now allows you import your photos and put them where you want. You can import them directly to Aperture’s library and allow it to manage photos for you in the background or you can import and organize on your internal or external hard drive. You can even work with photos burned to a DVD. Aperture will reference your files where you place them. You just have to remember where your files are placed and know that if you for example have your master files on external drive that it the drive will need to be plugged into your computer if you want to work on them in Aperture.
However, Aperture also includes a way to view preview files of your master files. So even if your master master files are not connected or stored in your computer, your Aperture library will have previews stored that you can use for making slide shows, posting on the web or as desktop pictures. In other words, they are lower resolution files that are there if you need them, however if you’re amassing a large collection of photos, they can take up some space. So check out this Apple document on previews and how to use them or get rid of them all together.
Here some other features I’ve found compelling about Aperture:
1. Custom import controls: Aperture can be set up to label, keyword, rate photos during the import process. Additional metadata information like titles, captures, copyright information can be added automatically during the import process. And I’ve even recently discovered an Automator application that enables you to import, erase, and eject one or more camera media cards consecutively when they are of course all plugged into your computer system. That’s a significant problem solver and time saver. When you have several 1gb media cards to import files from, it’s very tedious to sit and upload cards, eject them (I never have iPhoto or Aperture erase my cards for me. It’s just not a secure way to go about it.), and then change the cards for another importing. I like having it all done while I’m off doing something else.
The are several import strategies for Aperture, especially now that you’re not limited to importing all your photos to Aperture’s library. You can now import digital photos into Aperture as referenced files from your internal or external hard drive. Apple took heed to this particular request by most photographers. But the ability to store or reference your photos means that you need to have a strategy for where you will store photos and how you will access and manage them. Currently, my plan is to keep the master files of my current projects—no more than three at a time—stored on my laptop, and after completing them, transferring them to my external drives for archiving.
You can also back-up and archive your photos and modifications using Aperture’s vault system. I’m already started using it the vault but I can’t attest to how well it restores your modifications if something happens to your originals/masters. It is equally great to be able to backup the vault on more than one drive. I have a small computer-powered portable drive that also contains copy of my Aperture fault. Thus, if I lose for any reason my master files on my laptop, I simply need to pull out my DVD copy of my original files for a particular project and restore the settings and changes I made in the project.
2. Better interface and navigation: iPhoto is of course about simplicity. All its controls and features are pretty accessible and clear to most intermediate and advance Apple computer users. But Aperture comes with a more dynamic structure. Not only can you work on files as the import process takes place, which is something you can’t do with iPhoto, but you have several ways to mix, slice, group, and view your images. Stacking is one of Aperture’s most popular features. Though it takes a while to get used to, Stacking means that Aperture groups sets of photos that were taken in a short given time period. This works well for when you want to focus on a small set of photos and identify the best of that particular capture. It’s sort of like when you view photos using the Date feature in iPhoto. The photos are displayed according the time stamp of your camera’s clock. But Stacking puts them, well, in stacks for even better viewing. Learning to use Stacking is a great time saver.
Similar iPhoto, you can also view thumbnails in a browser setting and one or more selected photos in the larger viewer pane. You can compare photos, view a stack of photos, and of course rate selected images.
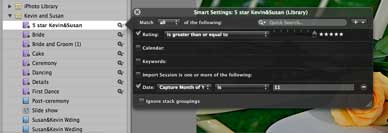

3. Smart Folders, Ratings, and Key Words: If you use these features a lot in iPhoto, you’re going to love how they work in Aperture. All three features work similar to iPhoto but you can change Smart Folder parameters a lot faster in Aperture. Just right clicking on a smart folder enables you to change the parameters for that folder. The choices you have for creating smart folders are ten times longer than in iPhoto. You can even option click a smart folder which makes a copy of it, so that you can easily create another similar smart folder from the copy.
Keywording is also easier and more dynamic in Aperture. You can create keyword sets and access and apply them to photos in a few different ways. Plus, you can also have keywords applied to your photos during import, which is a serious time saver.
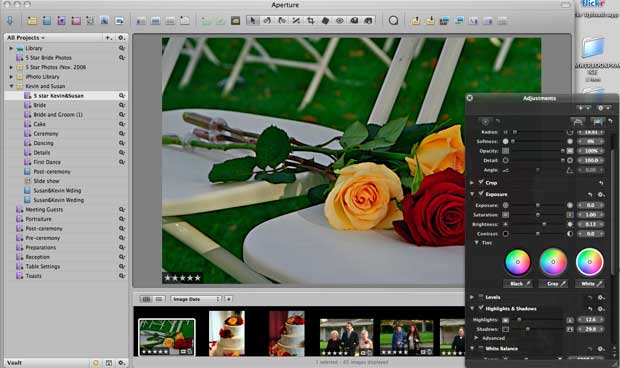
4. Photo Editing: So far I’ve only used used four or five image adjustment features in Aperture. But that doesn’t mean there are not plenty. Aperture includes many of the basic and advance image adjustment features (exposure, shadow and highlight, levels, sharpening, white balance and color corrections controls, and RAW adjustment features) that you find in Photoshop. The biggest plus, however is that you can batch process changes to photos using the lift and stamp feature a lot easier than you can in Photoshop. I just also read on another site, that Aperture automatically sharpens your photos when you export them. So there’s plenty to learn and use in Aperture’s adjustment area. While there’s no quick and dirty Enhancement feature like in iPhoto, you can set up and save presets for various adjustments and apply them as needed.
Another handy feature is that Aperture allows you to create versions of a photo and make adjustments or changes all while never affecting the master copy. Also when you open a photo from Aperture in Photoshop, guess what, it carries out the most obvious action between any two image editing programs: it actually creates a duplicate version of the photo that you’re seeking to edit in Photoshop. When your work is none, you don’t have to Save As, you simply save your Photoshopped version and Aperture will do the rest of the work for you. Done. Simple.
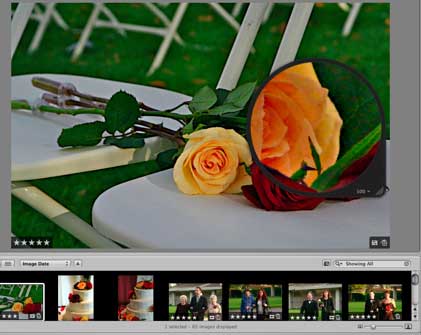
Aperture’s Loupe feature is also very powerful and unique. It works like a loupe in analog photography, but of course with increased abilities to closely examine the details of images right down to single megapixels.
An entire another article could be written about Aperture’s photo editing features. While Aperture is not a replacement for Photoshop, I can say you can get a lot done in this area without having to open your files in a second photo editing program.
5. Slide Shows, Web Galleries, Books and iWeb: As expected, Apple does extend output and export features found in iPhoto. Aperture’s slide show templates are minimal to what you find in iPhoto. There’s no Ken Burns effects and a few less transition effects. The web gallery templates are also minimal, but I have no doubt that more will be forthcoming in future upgrades of Aperture and from 3rd part developers.
Where Aperture outshines, is with its book creation features. You get a lot more control over placing photos and text on individual pages. You also much more control over redesigning templates. The printing of books however looks pretty much the same as in iPhoto. I’m looking forward to professional album printing companies like GraphiStudios, Pictage, and AsukaBooks creating plug-ins for Aperture which will allow you to layout and upload albums directly from Aperture their production site.
Suggestions for Use
I’m learning more about Aperture each day. And as I’m working current wedding projects, I’m developing my workflow for using Aperture. Though this program might seem daunting for some when first opened and used, Aperture is really not that difficult for intermediate and advanced Apple computer and program users. But here’s just a few suggestions off the top of my head for using the program.
1. If you’ve never used an advanced digital photo management program like Aperture, simply buy a guide to help you get up and running. I recommend Ben Long’s Apple’s Pro Training series book on Aperture or Ellen Anon and Josh Anon’s Aperture Exposed (Sybex Books) books. Also, check out the quicktime tutorials on Aperture website. I believe tutorials come with the boxed version of the Aperture software. Finally, I want to recommend Steven Weller’s Bagelturf blog site. He’s putting together some excellent and very accessible tutorials and articles on Aperture. The man has a knack for breaking stuff in language that is easy to understand. Why someone hasn’t approached him to write a book about Aperture I don’t know.
2. Develop an important and organization strategy for using Aperture. As you discover what features are available to you in this area, you will want figure how to best use them. For example, because I’m using Aperture on my laptop, I’m only importing my top two current projects onto my computer. All other files are referenced on a separate hard drive. Once a project is completed, it will get offloaded to the external drive where it can be referenced by Aperture. Aperture makes this entire process almost automatic.
As I alluded to earlier, I realized that after doing a couple of large batch photo adjustment changes that Aperture wants rebuild all my previews. That was taking too long and I was wondering what could be done about it. I headed over to the Apple support site for Aperture and discovered this excellent document link for how to use previews or even get rid of them.
3. Create a workflow for the type of photography work you do. I would guess than any photographer who upgrades to Aperture is probably doing so because he or she is shooting an awful lot of photos. Therefore you need a way manage your workflow with a programs like Aperture and Photoshop so that you’re not becoming frustrated with all the tasks involved in getting a project completed. When I first started management and processing wedding projects using iPhoto 6, I developed and documented for myself a workflow that would use for each job. I got as detailed as possible about rating, folders, and other software programs that I would use to get project completed. I didn’t have to reference the guide each time I started a project, but in developing it, it made me think strategically about how to best use iPhoto to get projects completed.
Now I’m doing the same thing for Aperture. Already, I have figured out, for example, that it’s a good idea from the start to rate all my photos for a wedding project a 3, since most of them turn out to be three’s as process through them. Aperture makes this easy. I can have each photo automatically rated a three as they get imported. Next, I go through and keyword sets of photos and begin to reject any images that simply are not good. After setting up smart folders for my project, I back up all the files on a disk and on an external hard drive. Then I begin to re-rate photos below or above 3 stars. The 4 and 5 star photos are ones that might get included in a wedding photo album or for other printing purposes. I hang on to the photos rated 1 and 2 until the end of the project. I might keep a few from that smart folder if I think the client would want them for any reason.
4. Check out the Aperture Card Importer (http://automator.us/aperture/aci.html) This little action will enable you to import consecutively one or more media cards that you have connected your computers. Another serious time saver.
Give it a Try
If you take a lot of photos and feel like you’re outgrowing iPhoto, you should download and give Aperture a try. The download page for Aperture includes a Compatibility Checker that you can download to verify if your computer supports Aperture.
In testing it out, I’ve been using the Quicktime tutorials found on the Apple Aperture website. Ellen Anon and Josh Anon’s Aperture Exposed (Sybex 2006) also been very useful in helping me learn the program. The book will need to be updated for the current version of Aperture, but these authors break down the program very well. Even without the book, the 400 page Help manual that downloads with the program is also very accessible and useful.
After a few days of giving it a try, I went on Amazon.com and purchased the newest version of Aperture and saved thirty bucks. The software comes with intro book that is very useful for getting started with the program.
Leave a Reply
You must be logged in to post a comment.