

In Macspiration #37 I wrote about tips for using iTunes. This week it’s iPhoto’s turn. Here’s five iPhoto quick tips for you.
1. Export
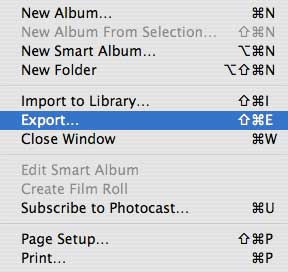
In iPhoto 5, Apple moved the Export command to the Share menu. Why? I don’t know, but you would think they would keep it there for iPhoto 6. If you thought that, you would be wrong. For some reason, they have moved it back to the File menu. So if you need to Export files from iPhoto stop looking in the Share menu, and go to the File menu.
2. Merge Rolls
Have you ever gone on a trip and used two or more memory cards? When you import these photos into iPhoto they will be imported as separate rolls in your Library. Sure, you can make an Album and collect them all in there, but you can also combine the photos into one roll.
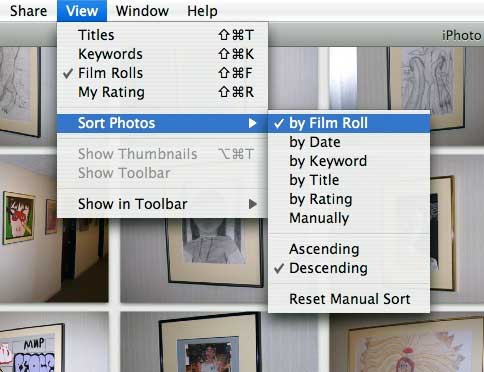
To do this you need to have your photos organized by rolls. Under the View menu choose “Sort Photos…by Film Roll.†Make sure “Film Rolls†is checked under the View menu. This will do exactly as you’d expect. Your Library will be organized into rolls, and separated by an icon of a roll of film.
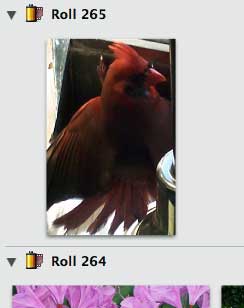
For the record, a roll of film in iPhoto is actually an import of photos from your camera or another source. Every time photos are imported, a new “roll†is made.
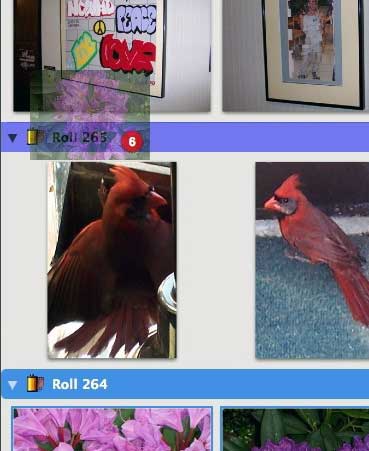
To combine rolls you want to start by clicking and holding on one of these film canister icons. Then drag that icon to the roll you want to merge it with. When you see the second roll become highlighted, let go of the mouse button and the two rolls will now be one.
3. Batch Change
By default, images in iPhoto have a number for a name. If you want a group of photos to have the same name (maybe vacation or graduation), you would use the Batch Change command.
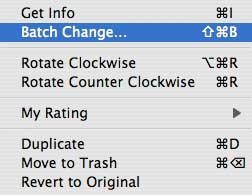
First, select the photos that you want to rename. Then in the Photos menu choose “Batch Change.†A window will drop down.
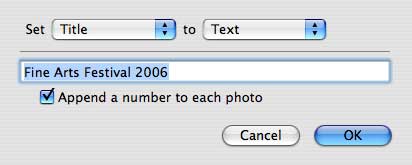
Make sure the “Set†pull down says “Title,†and the “to†pulldown says “Text.†When both of these options are chosen a text bar will appear where you would type the common name for the photos. If you want a number after each photo, check of the box next to “Append a number to each photo.†This option will give you names like “vacation 1,†“vacation 2,†etc.
Click “OK,†and the process will begin and your photos will be renamed.
You can also use the “Batch Change†command to change the dates of photos and add a common comment to each photo. There are also other options for changing the title of a group of photos instead of the names. Experiment and see what works for you.
Another option to find the “Batch Change†command would be to select the photos, and control-click on of them. “Batch Change†will show up in the menu list that appears.
4. Quick Rotation
Need to rotate a photo? Instead of double clicking the photo and putting it into edit mode you can choose “Rotate Clockwise†or “Rotate Counter Clockwise†from the Photos menu after selecting the photo.
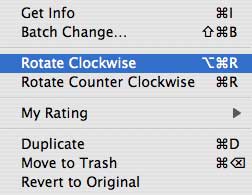
Like the “Batch Change†command, you can also access this option by control-clicking a photo.
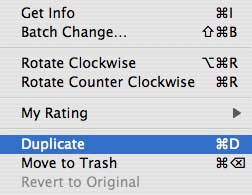
5. Duplicate
If you ever edit a photo and make a mistake you can always go back and choose “Revert to Original†from the Photos menu. What if you want an edited version of the photo and the original in your Library? All you have to do is duplicate the original before you make any changes.
Like my previous two tips, the “Duplicate†command is found in the Photos menu, and by control-clicking. Choose the photo, or photos, first and then choose “Duplicate†from either method.
Look for more Quicktips for iPhoto, iTunes, and other applications in future Macspiration articles.
Leave a Reply
You must be logged in to post a comment.