

In my Macspiration article from October 3, “Emailing Photos Using iPhoto,†I discuss how to email photo attachments using iPhoto’s email feature. In this case iPhoto creates the email for you, with the photo attached. What if you need to email an image not in iPhoto, or another file like a text document? Sure, you can add the image to iPhoto and email from there, but you can’t add the text document to your iPhoto library. In this Macspiration, I’ll tell you how to do that.
Before we start: I am going to discuss emailing an attachment in Apple’s Mail program. There are many other email program options out there. While they are not identical, most of what I describe below will be very similar. I am also assuming the reader knows how to write an email. Now, let’s get started.
The first thing you need to do when you want to email a file is open your email program and start a new email. Address the email, add a subject if you like, and type any message you want to tell the recipient.
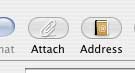
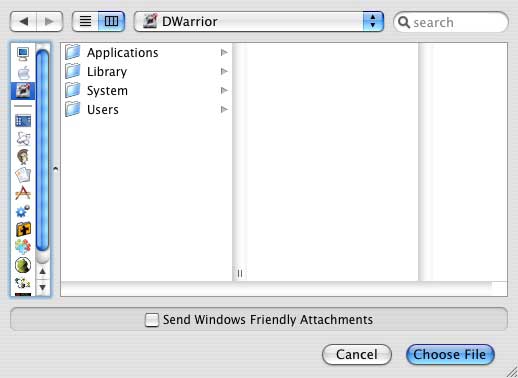
Now to add the attachment. If you can open a file in a program, you can add an attachment. First click the paper clip icon at the top of your email window labeled “Attach.†This will open a window, similar to the window you see when you open a file. The difference here is that you are not opening a file, you are attaching one. Navigate to the file you want to attach, highlight the file, and click attach. The file is now attached to your email. You could also double click the file to attach it. To attach additional files, repeat the process.
For the more advanced user, you can even drag and drop a file into a blank email and it will be attached. No need to use the “Attach†button.
The file is now attached to your email. Click “Send.†The email, with the file, is off.
Did you notice the little check box in the attach window marked “Send Windows friendly attachments?†If you are sending an email to a person with a Windows machine, it is a good idea to check this box. With the box unchecked, your Windows friend will probably receive two files. One will be the right one. The other file will have “_†in front of the name and be unusable. Checking this box will avoid that problem.
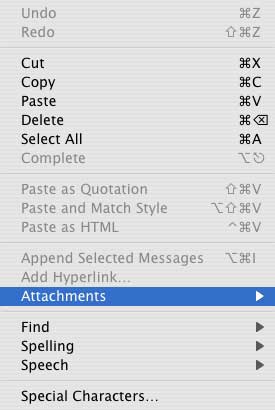
You can set this to always happen by going to “Attachments†in the Edit menu, from the main Mail window. Here you can select “Always Send Windows Friendly Attachments.†I always send attachments this way at work, because there are times when I don’t know if I am sending to a Mac or Windows machine. I have never had any issues sending to a Mac with this option checked. However, according to Apple, a Mac user could receive a file that is missing date or it might be totally unusable.

That’s it. Emailing attachments is pretty easy. You can now send files throughout the world via email.
Leave a Reply
You must be logged in to post a comment.