

While iTunes has playlists for organizing your music, podcasts, etc, iPhoto has albums for organizing your photos (and video if you import video from your digital camera). Albums in iPhoto are just as easy to make and use as playlists are in iTunes.
Just like iTunes, iPhoto has a Library. In the Library, all of your photos are stored from your digital camera or other sources. To see all of these photos, click the Library icon located in the top of the left window called the Source Window.
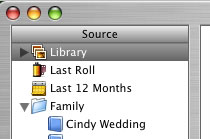
You might want to group these photos into albums, so that you can find certain photos easier. For example, you might want an album for family photos, all of your trips, or landscapes. The possibilities are endless.
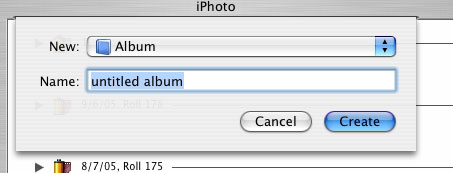
To make an album, click the “+†button below the Source Window.

A window will drop down prompting you to enter a name for the new album, with the default name being “Untitled.”
You now have an album ready to fill with your pictures. To start you will need to go to your Library. Once in your Library, click the photos you want in the album and drag them to over to the album name. When a green “+†appears you can let go of the photo, and it will be dropped into the album.
To move multiple consecutive photos at once, hold the shift key down while selecting your photos to move. If the photos are scattered through your library, you can hold the Apple key while click to select multiple photos. A blue border will appear around a photo when it is selected.
If you want to remove a photo from the album, click the photo and press delete on the keyboard. This will delete the photo from your album, but not your library, so you will still have it for future albums.
If you want to permanently delete the photo from your library, click and drag the photo to the trashcan in the Source Window. Just like adding photos to an album, a green + will appear letting you know when you can drop the photo in. You still need to empty the trash. To do this, control-click the trashcan and select Empty Trashfrom the menu that appears. You will be asked if you definitely want to do this. Once this is done the photo will be gone, and you will no longer have access to it.

![]()
To delete an album, click the album and press delete. Just like deleting a photo from an album, this does not remove the photos from your library. It only removes the album from your source list.
Once your album has the photos you want in it, you can do several things. You can print the entire album, you can turn it into a book, you can burn a CD, and more. Many of these options will be covered in future Macspiration articles.
One note- this article is based on iPhoto 5. Some of the steps mentioned above might vary slightly in older iPhoto’s.
Until next week, e-mail your comments and questions to donny@mymac.com or leave a comment below.
Leave a Reply
You must be logged in to post a comment.