

As autumn yields to winter, light is clearer and shadows are in evidence throughout much of the day. Our minds sense drama in the contrast between highlight and shadow, but our photos often don’t capture the experience, as we perceive it.
All current versions of Adobe Photoshop and Photoshop Elements have a feature called Levels, which use black, white, and gray point sliders to alter darks, lights, and midtones in images. This tutorial refers to Adobe’s new Photoshop CS2, and if you are using an earlier version, or Elements, you can achieve the same affect. Hint: the keyboard sequence Command (or Apple) and the L key should bring up your Levels box.
1. LOCATE your desired shadow photo, and drag it over the Photoshop CS2 icon in your Dock to OPEN IT. If necessary, use Image / Rotate Canvas to view the picture correctly upright.
2. In the Menu Bar, choose File / Save As, and RENAME your picture something like “Strong Shadows†when the Save As box appears. For Where, choose Desktop, and for Format, choose Photoshop, at the top of the drop down list. Ignore the other check boxes, and then click Save.
3. Again in Menu Bar, choose View / Fit on Screen, and your newly named Strong Shadows.psd will occupy as much screen space as possible. Hint: PSD stands for Photoshop Document, which is the application’s preferred file format.
4. This time choose Image / Adjustments / Levels, and you’ll see a strange new little box appear that looks something like this “mountain range†screen shot:

Hint: You may need to move the Levels window over a bit, so you can see both it and your photo at the same time.
5. If the TINY UPPER TRIANGLES at far left (black) and/or right (white), underneath the mountain range don’t actually begin at the “foothills,†slide them over until they are at the beginning of “solid ground,†and not blank space. This is called “setting black and white points,†and tells Photoshop where to base all subsequent lighting adjustments.
6. Click and drag the CENTER (gray) triangle until your shadows become more dramatic, and your image still retains its original character. This center triangle relates to your midtones, and a little change can go a long way toward improving image contrast. Hint: Don’t overdo it! Subtle is better than excessive.
7. Click OK in the small Levels box.
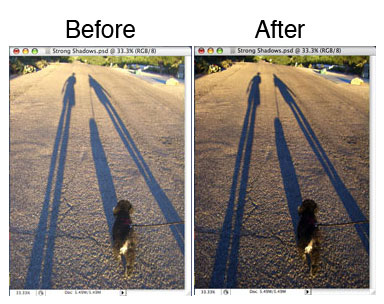
8. If you want to SEE THE DIFFERENCE before and after your Levels manipulation, choose Edit / Step Backward and Edit / Step Forward. Below are my before and after images:
9. Remember always to File / Save your completed Photoshop image, then close all windows and observe its icon on your Desktop, complete with TINY THUMBNAIL view of the picture.
10. Strong Shadows.psd is now ready for printing and emailing, both of which will be covered in future Ten Point Tutorials.
Hint: Make sure you are familiar with Donny Yankellow’s basic Mac tutorials to enhance your computer skills.
Leave a Reply
You must be logged in to post a comment.