
PearPC running Mac OS-X 10.3
A How To!
By Owen Rubin
There it was on the net, something called PearPC, which is a G3 emulator for Windows and Linux environments. Of course, a PPC running on a Windows machine just screamed out for me to try and get it to run Mac OS-X. A quick view of the about page for PearPC at Sourceforge says Mac OS-X 10.3 runs well with some caveats. Cool, how difficult could this be?
Well, the answer was difficult, but not as difficult as I would have really expected it to be, and I have tripped over the problems so you will not have to. And there were some caveats for sure. For one, sound does not work and neither does networking, but time will correct that I hope. And it also noted that it fails to start-up at times as well, and I still do not know why, but rebooting it again seems to make that problem go away. Lastly, the cursor support in PearPC has some issues on occasion, and I have had the Mac cursor stop tracking the Windows cursor correctly, also requiring a restart of the PearPC emulator. (Note, when it is running, F12 toggles the cursor in and out of PearPC, but so does Alt-Tab!)
So, if you are interested in trying to make this work for you, read on and I will walk you through an end-to-end creation of a system on your PC that will run Mac OS-X. A few things you should know first:
A). It requires a very fast PC. I have a very high end Dell, and it is marginal in performance at best.
B). It requires a LOT of patience, and the willingness to do it over if you screw up.
C). It requires a lot of time. A lot of this can happen while you do other things, but it is a slow process overall.
D). You will need at least 3 GiB of free disk space to make a virtual MacOS hard disk image on your PC. You will need another 1 GiB to hold the temporary files needed to make this all work.
E). It is not perfect, some thing do not work yet, like sound and networking, and it crashes at times. I did not do this to run Mac OS programs.
F). It is not very fast, as I said before.
SO LETS GET STARTED ALREADY
All the instructions for getting and running MacOS-X are, in one way or another, on the Sourceforge website site scattered over several places, but the instructions are not complete, and I ran into a lot of problems making it work the first time. That said, I have narrowed heavily from those instructions to create step-by-step instructions on how to get this to work for you, hoping to keep you from hitting the roadblocks I stumbled upon in making this work.
On your Windows machine, you will need at least 3.5 GB of space available (6.5 is better!) to make this work. Most of this space is for a virtual hard disk for the emulator, the rest for iso files for setting things up.
STEP ONE
Start off by creating a new folder on your machine and call it PearPC. I recommend putting this near or at the top level of a drive, as you will need to type some paths into configuration files later, and the shorter the path to the folder, the easier it is to remember. I put this folder in my downloads folder on the D drive, so I now have D:\downloads\PearPC\
GET THE FILES
Now, lets gets some files we will need on the PC to make this all work:
1). Get a copy of PearPC, which is available at <a href=”http://pearpc.sourceforge.net/downloads.html”>HERE!</a> I used the latest version of PearPC, version 0.3.1. Download the generic win32 file “pearpc-0.3.1-win32.jitc.zipâ€
2). Grab an empty “disk†image. Just below the PearPC downloads on the same web page, there is the ability to download a zip image of an empty disk, either 3 GiB or 6 GiB in size. Do not worry about the size, these are zip images of a zero filled disk image, so the zip is VERY small, about 5K or so. I took the 6 GiB disk file image, but it should work just fine with the 3 GiB, unless you plan to add a lot of applications later.
3). Grab the 3c90x network driver just below the disk images. This is supposedly necessary to get networking working, but I have been so far unsuccessful to make it work. It is supposed to emulate a 3C90x network card, but when I try and use it, the emulator fails to run.
4). You will need a Apple Macintosh Darwin iso image, which is available from Apple for free from <a href=”http://developer.apple.com/darwin/”>HERE!</a> Scroll down to the “Darwin 7.0.1 Installer CD as this is already an iso image file, and save this file to your PearPC folder. NOTE that this comes down as Darwin-701.iso.gz. This is NOT an RAR file, it actually IS an so file, so remove the “.gz†and use this as it is, and it works fine.
5). You will need iso copies of the Mac OS-X disks. I created mine from my OS-X CDs and a copy of Nero on my PC, and saved the images as a .iso file. (Note that MacOS disks DO show up on download sites as well, but PLEASE, either buy a copy of Mac OS-X if you do not have one, or use your disks if you do. If you need help creating an “iso†image, let me know in the discussion section below.) I named these images “Mac OSX.10.3.4.disk1.isoâ€, “Mac OSX.10.3.4.disk2.isoâ€, “Mac OSX.10.3.4.disk3.isoâ€, and “Mac OSX.10.3.4.xcode.iso†We will use these later.
6). A copy of WinZip and WinRAR to uncompress files. The evaluation versions are enough to get you through this exercise, you can find both on the net with a quick Google Search.
OK, now that you have all these files, lets use them.
USING THE FILE
First thing is to unzip the PearPC file you downloaded (pearpc-0.3.1-win32.kitc.zip) into the PearPC folder you created above. After you have done this, find the file named “ppccfg.exampleâ€, make a copy of it, and rename this copy to “macosx.pearpc†We will get to this file in a minute.
Next thing is to uncompress the disk image file (pearpc-6gb.img.bz2 or pearpc-3gb.img.bz2) with WinRAR to create an empty virtual HD. This is a large file that the emulator will use as a real hard disk. I opted for the 6 GiB for two reasons: First, I had the room. Second, as with EVEY computer I have ever owned, I always wished I had more disk space, and I just knew that 3 GiB would not be enough long term. This is your call of course, and will depend on how much room you wish to dedicate to a hack.
Simply open the compressed disk image file with WinRAR and decompress the file into the PearPC folder you created. You will note that the compressed file is only about 5 KB because it is mostly zeros, and compresses very well. However, the uncompressed file will be either 3 GiB or 6 GiB large, and the decompressing WILL TAKE A LOT OF TIME. Be patient, it is creating a very large file.
You can set aside or delete the zip and RAR files when done if you do not think you will need them any more. I placed them in a folder called “zip file†just in case I needed to start over.
EDIT THE CONFIG FILE
While the hard disk is uncompressing, lets get the configuration file ready to run. (I will refer to this as the “config file†from now on.) You will need to open the copy of the config file you created above (macosx.pearpc) with an editor. I used WordPad, which works fine. To open it, however, you have to select the program to use to open it. Unfortunately, the type “.pearpc†is not associated with any program at this time. You can associate it with WordPad (or your favorite editor) if you like, but later you may wish to associated it with ppc.exe so you can run PearPC by simply double clicking this config file. If you do not mind being asked which program should open it every time, just go with it, select from the list (Windows is kind enough to put the program you used last at the top of the list), and remember to UNCHECK the “Always use the selected program†when doing this.
A quick look at this config file and you will see a number of configuration settings for the emulator. For example, the starting resolution is the first item in the file, and it is currently set to 800×600 and 15 bits deep. This is an OK starting resolution, and you can change the screen size later using MacOS’s display properties. However, Mac OS-X uses a driver that lest your change the resolution from within Mac OS, so you do not really have to change this here.
The first change I suggest is to change the boot selector from auto to manual. Scroll down until you find the line that says
prom_bootmethod = “autoâ€
and change the word “auto†to “selectâ€. This will force PearPC to always give you a list of items you can boot from so you can select the right one. The first time I did this, I did not know about this, and the emulator kept trying to boot unbootable disks and failing. Took me a long time to get around this as later in the set up, you will “insert†a virtual CD and restart the emulator, and you do not want the emulator trying to start from the wrong disk.
Next, find the line that says
prom_env_bootargs = “â€
and add –v between the quotes so it reads
prom_env_bootargs = “-vâ€
You will probably not need this long, but it is nice to see what the boot process is doing when it starts up, and this makes that happen. When you no longer want to see behind the scenes of the boot, and would be happy to see the spinning circle again on the gray Apple Logo screen, simply delete the -v, and it will look more like a normal Mac boot. But I suggest waiting until you are close to done before doing this.
Right below the line you just changed, look for a line that says:
prom_driver_graphic = “video.xâ€
We need to change this line to point to the PearPC folder where the file “video.x†actually lives. Edit this line to have this point to the proper file in the proper location on your PC. In my case, this looks like:
prom_driver_graphic = “D:\downloadPearPC\video.xâ€
Without this change, som every strange errors happen when booting.
Scroll down to the line for “memory_sizeâ€, which is probably set to HEX 0x8000000, or 128 MB. If you have enough memory in your PC, I suggest changing this to a larger number. I changed mine to the value “0x10000000†or 256 MB of memory. Mac OS-X in the emulator runs MUCH better if it has more memory.
Right below the Memory Size, is a place to set up IO devices, and specifically we are interested in the PCI IDE configuration. Note that the emulator CANNOT actually read a real CD (yet?), so we need to fool it by loading up a virtual CD-ROM from an iso file. We also use this place to set up a pointer to your hard disk image. Assuming you named things as I mentioned above, make the following changes (if you called your image something else, put in the right name and path):
Change the line
Pci_ide0_master_image = “test/imgs/linux.imgâ€
to point to the HD image you created. In my case, this was:
Pci_ide0_master_image = “pearpc-6gib.imgâ€
Note that the path will default to where ppc.exe runs from, so if you keep the image in the same folder, you do not seen to specify a path. If concerned, you could also have done this:
Pci_ide0_master_image = “D:\downloads\PearPC\pearpc-6gib.imgâ€
Do not change the other two lines around this. This now has the HD image set up as the default PCI device.
We also need to mount the Darwin CD the first time we run, so change the CD ide config line as well, which is middle of the following three lines. The default looks like this:
Pci_ide0_slave_installed = 1
Pci_ide0_slave_image = “/dev/cdromâ€
Pci_ide0_slave_type = “cdromâ€
Change the middle line to now point to your Darwin image, which should look like this:
Pci_ide0_slave_image = “Darwin-701.isoâ€
OK, START YOUR ENGINES
OK, you all set up for the first run of the emulator. Bring up a DOS command window (Start->Run->cmd). Navigate to your PearPC folder (ie, cd to the right place in the DOS window), and type the following:
“ppc macosx.pearpc†(note that if you renamed your configuration file differently, that is what you should put after the ppc.)
The emulator should start and hold in a screen that shows you your choices for boot. Because the HD has nothing on it yet, it will obviously not boot (and may not even show up actually.) But the Darwin CD can boot, so pick the boot number that corresponds to the Darwin CD by looking at the two choices given, I believe it is #1, the line that says ‘crdom’ in it, select it and hit return.
You should immediately see a familiar gray screen with a dark grey Apple on it. Do not get too excited yet, we have a long way to go, but it was cool when I first saw that, knowing I was making progress! Darwin will continue to boot in text mode, and eventually say:
The following devices are available for installation:
1. EIN GEBUESCH! @ disk0
Enter ‘shell’ to drop into shell.
Which device would you like to install Darwin onto?
We are not quite ready to do the install, we need to set up the partitions on the HD first, so type ‘shell’ to get to a shell prompt in Unix, which should look like this: sh-2.05b#
PARTITION THE HD IMAGE
You now have to create a partition on the HD (when asked to enter something, do NOT enter the quotes):
1). Enter “pdiskâ€
2). Enter “e†and then “/dev/disk0†to edit the partition map of the HD image.
Note that this is NOT talking to your PC partition map, have no fear!
3). Enter “i†to initialize the disk, and confirm the default values to continue.
4). Enter “p†to print the partition map, and take note of the length of the Apple_Free partition. You will need this number in the next step.
5). Enter “C†(upper case) to create a new partition entry. Enter “64†as the first block, then enter the length of the Apple_Free partition you noted above. Enter “Mac_OS_X†as the partition name, and “Apple_HFS†as the partition type.
6). Enter “w†to write the map back out the HD, confirm with “yâ€
7). Enter “q†and “q†again to exit.
You are done with the partition of the disk, now enter “reboot†and wait for PearPC to quit. It will not actually reboot, it will shutdown and exit. Restart PearPC again (“ppc macosx.pearpc†at the command prompt in DOS, which you can get quickly by pressinf up arrow in the DOS window). The emulator will reboot, and the Darwin CD will boot again to the same place you typed “shell†last time.
This time, DO NOT TYPE ‘shell’, but rather enter “1†to pick the hard disk to install onto, and then “yes†to confirm installation of Darwin to the HD. Now would be a good time to go get some lunch or dinner, as depending on the speed of your PC, this will take some time. You can watch the install take place if you like, but after a while, it is not very interesting.
When this is done (it will be obvious), we should now test it. In the config file, once again edit it and find the PCI line that described the Darwin CD. On the first line, change the “1†to a “0â€, which tells the system this drive no longer exists, to:
pci_ide0_salve_installed = 0
Once again, start PearPC, and select the only boot device that now shows, the HD. Darwin should boot up to the login prompt (it takes a while) and you may get a network error over the prompt. Simply hit return a few times to see a new login prompt. Login in as “root†and when it asks for a password, simply hit return, as there is none. You are no running the basic underlying Unix system for Mac. Cool, somewhat fun, but not very interesting really. Now its time to install MacOS on this baby.
ADDING MAC OS-X
Darwin is cool, but what we really want is Panther running on this thing, so lets make it happen.
First, do you have the iso files of the first two Mac OS-X install disks ready? We want to mount the first CD and restart the emulator. So back to the configuration file, and once again, find the CD-ROM ide spec you changed to 0, and set the installed flag to 1 again. Also set the image to point to your first Apple disk. It should look something like this:
pci_ide0_slave_installed = 1
pci_ide0_slave_image = “D:\downloads\PearPC\Mac OSX.10.3.4.disk1.iso
pci_ide0_slave_type = “cdromâ€
Restart PearPC, and this time, select the CDROM to boot. The system will boot, but this time the Installer 1 CD will boot, and take you through the install. Ok, this is familiar territory and you will recognize what you see, but to keep things running smoothly, and to make the install a bit smaller as well, we want to shut off a few items we really do not need when we install Mac OS.
Walk you way through the first few screens of the installer, select English, continue past the Welcome screen, and again past the “Important Information†screen. Agree to the license, and this should take you to the “Select Destination Screenâ€, select your hard disk and hit Continue. On the next screen, select CUSTOMIZE, and uncheck the following: Print Drivers, Additional Speech Voices, Additional Asian Fonts (under Fonts), and Language Translations. None of this is needed. Click INSTALL, and go have lunch again, go shopping, what ever, as this will take a while. Depending on your system speed, this could take at little as 30 to 45 minutes, or as long as several hours. (If it takes longer than a few hours, you really do have a slow PC and probably should not be doing this anyway!)
When this install is done, it is going to want the second CD. This is where it gets tricky. Unfortunately, there is only 1 virtual CD drive, and no way to eject or insert another CD while the machine is running. Now what?
Don’t panic, this is not a problem. Go ahead and exit and shut down PearPC if it has not already done so. Now simply edit the config file once again, and this time point the CD image to the second Apple Install CD.
pci_ide0_slave_image = “D:\downloads\PearPC\Mac OSX.10.3.4.disk2.iso
Normally this would fail to reboot, and I got stuck here for a long time, because PearPC would try and boot the second CD, which it cannot., and it would hang. But because we set the boot to “select†earlier on, we can force the system to now boot the HD and not the CD. There is enough of a system on the HD image to start up far enough to know it needs disk two of the install. And because we just “inserted†it, the install should continue automatically with disk two. Again, wait for that to finish, edit the CDROM config one more time to again say “0†on the installed option (no more CD) and restart PearPC one more time. (At this point, I also edited out the “-v†argument in the prom_env_machargs back to nothing so it would boot like a normal Mac.)
LET IT RIP
If all was done correctly, your PearPC should now boot into Panther, and the system should work just fine for the most part. It is not fast, and there are things you can do in Panther to cause it to crash (like selecting a screen size larger than the one you have), but it is a fun toy with which to play, and Mac OS on a Windows machine is just too cool anyway. My next step is to install Virtual PC into the emulated Mac on PearPC, and see if I can run emulated Windows on an Emulated Mac. If I have time, I will be really crazy and try and run PearPC on the emulated Windows inside the emulated Mac on my PC. Perhaps I have too much time on my hands?
Here are a few screen shots to whet your appetite just a bit more. If you get stuck and have questions, post them below, I will do what I can to help. I ask that you please not email me directly with questions; I just do not have the time to answer personal questions. If I need more info, I will ask for it. Have fun, and If you get networking or sounds working, DO post how you did it. On the SourceForge website, there is a place where you can download and experiment with a networking card, but that does not work for me. Every time I turn it on at the bottom of the config file, the system fails to launch. But give me time, I will get it eventually.
Happy hacking..
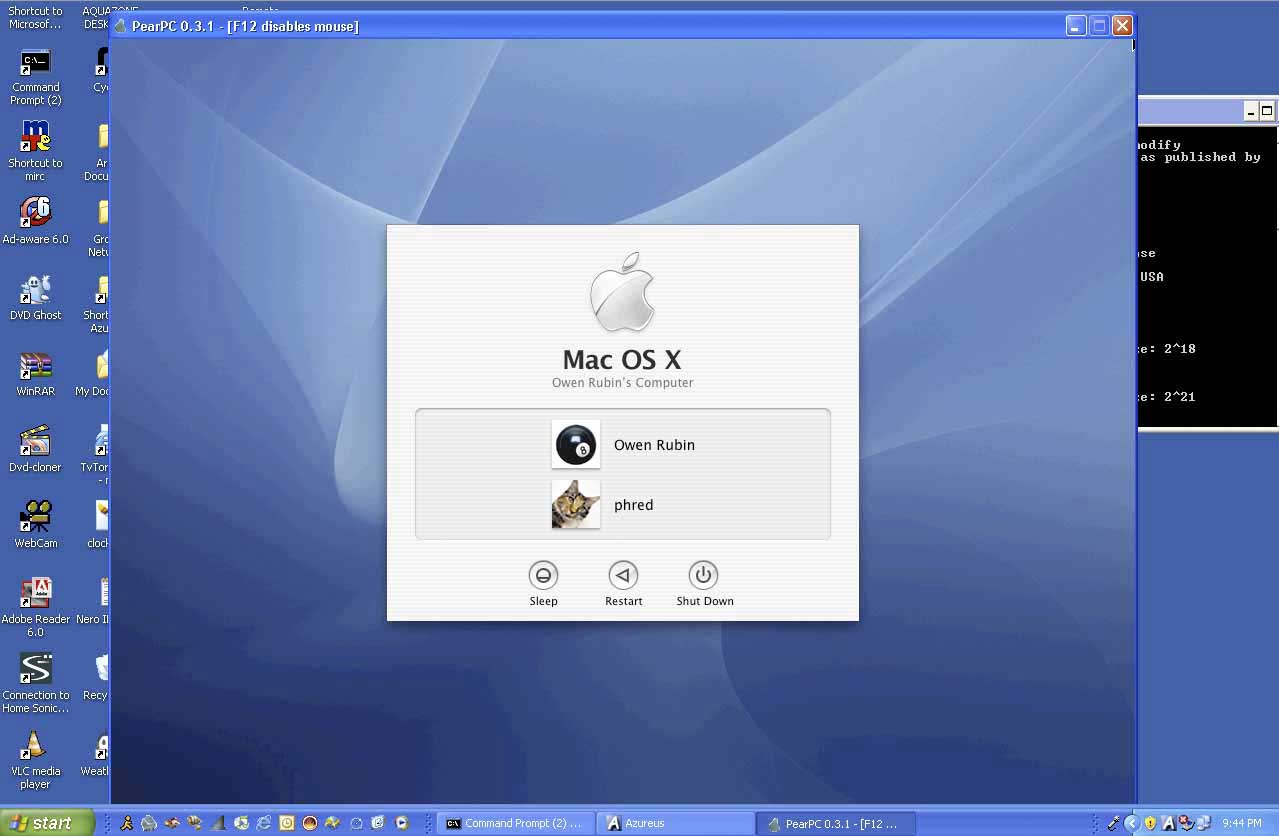
(Click picture for full-size image)
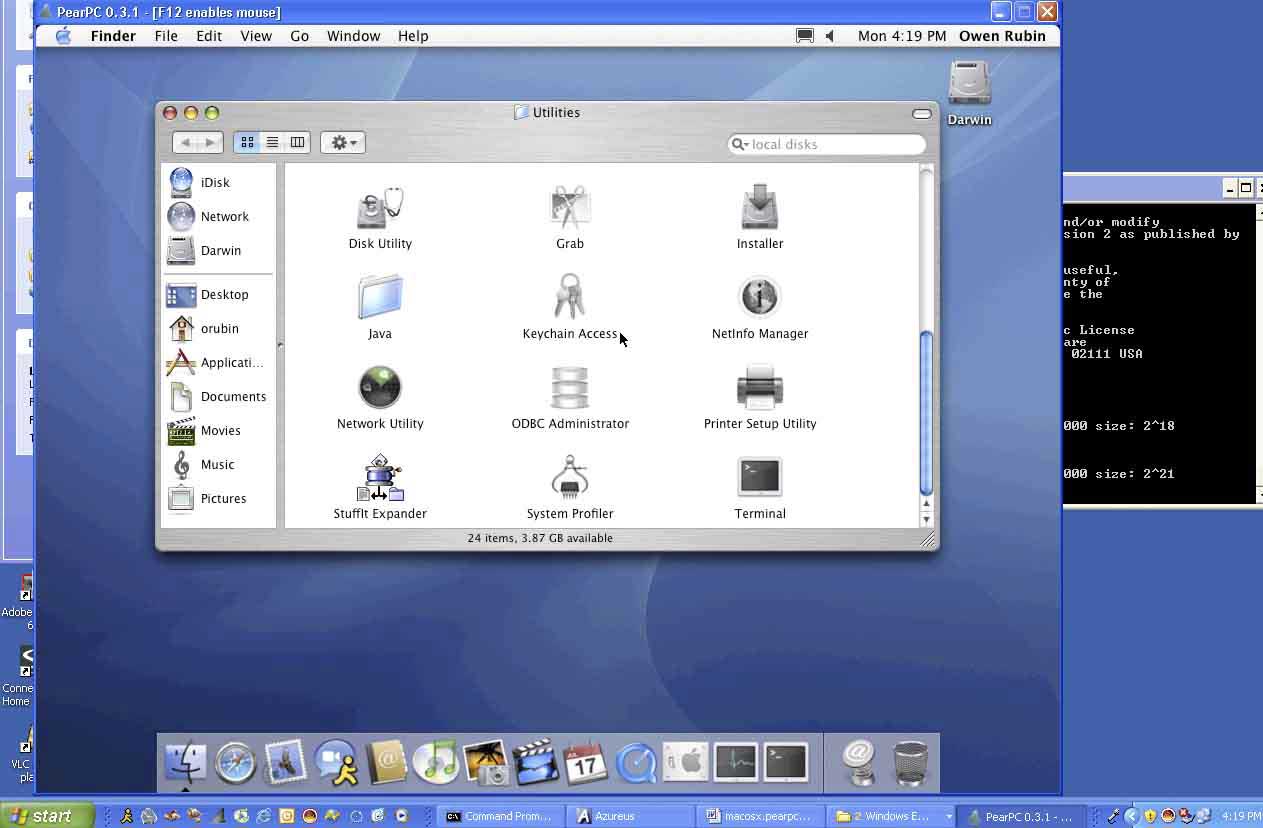
Utilities Opened. I wanted to run CPU monitor.
(Click picture for full-size image)
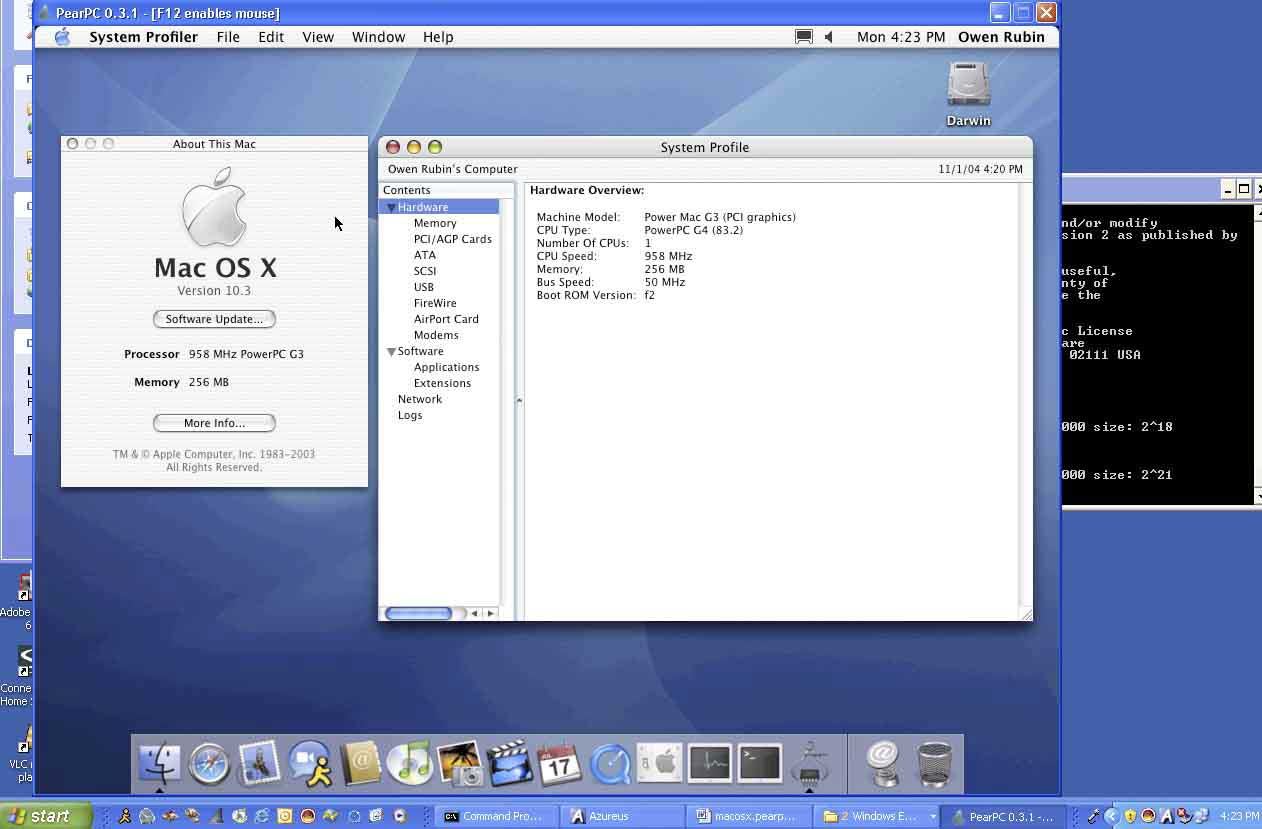
(Click picture for full-size image)
Hard to read, but it says:
Mac OS X, Version 10.3
Processor: 958 MHz PowerPC G3
Memory: 256 MB
On the right window, it says:
Machine Model: Power Mac G3 (PCI graphics)
CPU Type: PowerPC G4 (83.2)
Number of CPUs: 1
CPU Speed: 958 MHz
Memory: 256 MB
Bus Speed: 50 MHz
Boot ROM Version: f2
What I do not understand is why it thinks it is both a G3 and a G4. Also, the speed seems to change depending on what else I am doing on the PC when the emulator is running. I can’t help but wonder if Apple actually calculates that value somehow.
Leave a Reply
You must be logged in to post a comment.