
Starry Night Pro Plus for Macintosh OS-X and Windows
Company: Space Holding Corp., Canada
Price: $199.95 retail
http://www.starrynight.com
I love looking up at the stars, but trying to find constellations, planets, and other celestial objects has always escaped me. Except for maybe Venus and the big and little dipper, I am mostly useless at finding these objects. And I cannot tell you how many times I have looked at a bright object in the sky and said, “What is that?†So a chance to play with Starry Night Pro, self-proclaimed as “the world’s most realistic astronomy software†sounded like a great opportunity.
Starry Night Pro Plus comes packed with a number of different items in the box. First was the Starry Night Pro CD that installs on both Windows and Mac computers. In addition, 2 “PlusPaks†CDs were included. PlusPak 1 adds additional Mars, Moon, and Earth high-resolution planet-surface and horizon images as well as a 16-minute mini-movie. PlusPak 2 adds 11,000 additional galaxy, nebula and star cluster images as well as 10 additional Milky Way images. Also included in the plus box was a DVD called “Atlas of the Sky†which contains more than 2 1/2 hours of original movies showing some amazing images and visualizations of astronomical objects and phenomena. An additional CD was included in box, which is also called “Atlas of the Sky†and is a multimedia CD similar to the DVD that installs as an option into the program. Additionally, 2 books are included. The first, Starry Night Companion is a 240-page guide to better understanding the night sky while using the Starry Night program, but is not a User’s manual. Instead, it includes Astronomy Basics, Observational Advice, info on Earth’s Celestials Cycles, and info on our solar system and deep space constellations. The other book is the 168-page User’s Guide to using the program. I can see before I start that this is not going to be a trivial program to learn. Time to install the software.
Starry Night is big and has high system requirements. You will need OS 10.1 or greater to us this program, and at least 1 GB of free disk space to install. This is not a typo! If you install all the additional packs and CDs, reserve at least 2 GB! The application alone is 557 MB, and if you choose to install the multimedia movies, add an additional 600 MB of space. The PlusPaks will also require about 500 MB of additional disk space each to install as well. Installing was easy, just insert the Starry Night CD and click on the Install icon. The installer does the rest. You will need QuickTime 6.0 or later to run Starry Night, so install that if not already on your computer. After accepting the license and choosing where you want the software to install, sit back and relax for a while, as there are nearly 6000 files to be installed for the main program. This will take some time, about 10 to 15 minutes depending on your computer. If adding the PlusPacks, add another 10 to 15 minutes or longer to install each of those as well (PlusPak #2 installs nearly13,000 files!) After installing the software, you can then install the Starry Night Multimedia content as well. And although these installers ask for an install location, where they actually put the files was a mystery to me until I rebooted and noted that the StarryNight application “container†for the main application was now close to 2 GB in size. Obviously all files are installed inside the main application container, keeping the install very clean actually.
One final note, if installing version 4.5, there is a 4.5.2 update available from the StarryNight website that should be run before using this software.
While memory requirements are not spelled out, and it ran fine on my 1 GB PowerBook with 5 other programs running, but some animation was not so smooth in this mode. So, the more memory the better, and for best results, run it alone with no other apps running.
Also note that while using this on a PowerBook (or laptop) seems the most logical choice for outside star gazing, the power saving modes of the PowerBooks while running on batteries caused sporadic and jumpy animations and updates. To make things smoother while on batteries, go to the System Preferences and open the Energy Saver panel. Under “Settings for:†select “Battery Power†and then under “Processor Performance:†select “Automatic†for some improvement t. For even better performance, select “Highest†under performance but note that this will use your battery charge up considerably faster than normal, resulting in less than half your normal battery time. Do not forget to set this back to “reduced†or “automatic†when done with the program. (I would love to see Apple add a setting in Energy Saver that allows you list programs that run at a specified processor performance while running on batteries automatically.)
If you are familiar with earlier versions, 4.5 now includes enhanced observations planners and logs, equipment lists, and LiveSky panel (more on this later.) it also includes more than 2.5 hours of multimedia visualizations.
Getting Into Space
When I first launched the program, if connected to the Internet and checked for and download updated information and program patches. New asteroid, comet, and satellite information (if any) as well as other new and updated data and program patches can be checked and downloaded each time you run the program. Startup and Auto Update options can set how often to check, and how much to download on each check.
The first time you launch the program, you will be asked to set your home location (you can change this later) from either a long list of cities, from a very cool world map that shows the daylight and dark areas, or by specifying your longitude, latitude and GMT time offset. A view of the southern facing sky, based on the current time of day (as set by your computer) will be displayed. For me, I first launched this program at 12:30 AM from my home and saw an amazing view of the night sky that was mostly visible just outside my south-facing window at the same time. The horizon appeared to be a grassy field, not exactly what I saw from my home, but this too can be changed. At first view, I must saw I was quite intimidated with the number of options and setting this program offered, and because of space I cannot cover them all here. Suffice it to say, this is a complicated program to master, but easy to use and get started.
Where I Could See the Stars
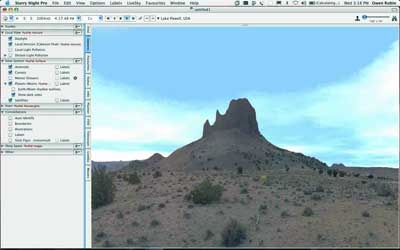
I am now continuing to write this while on a two-week vacation on a houseboat on Lake Powell. Since I needed my computer to download pictures from my digital camera anyway, I decided to take this program along too. I thought, what better place to see the night sky than from the surface of a dark lake! Using a GPS we had on the boat, I entered the longitude and latitude of our location on the lake and set it to Arizona time, but the program and sky did not quite agree with what we saw. Seems parts of the lake are on Utah time while parts are on Arizona time, and Arizona does not do daylight savings time, so there were some issues of our clock being off by one hour from our view! Setting the view clock ahead one hour solved the problem, but only trial and error solved this.
Once again, the grassy view of the horizon was also wrong as I was looking at wonderful buttes and lots of water. So I went into the options, selected “local horizon†and picked Cabezon Peak, the closest looking horizon to what I was seeing. Not too bad a match, minus the water that is, but it would have to do. And while you can change the horizon to a number of, you quickly start to ignore its picture as there are too few to choose from and none seem to look exactly like any place I have really been! Especially the view from the Mars Rover setting!
This is an amazing piece of software with so many features and options that I could not possibly do them all justice here, so I will not even try. Once the program is running, you can use the mouse to move the view up/down/left/right as well as set the view to see the actual time, or any other time you wish in the future or past. Holding the SHIFT key while using the mouse moves your location on earth. A bar above the view lets you select and enter any time, adjust the rate at which time passes (from 1x to 30,000x) as well as time speed controls to set the direction of time, or pause or stop it like a VCR. Compass point names (N, S, E, W, SE, etc) are displayed in the horizon to aid on setting your viewing direction. You can also switch on other positioning aids, such as grids, meridian lines, pole lines, and equator lines (known as Alt-Az Guides) as the relate to the earth and straight up from your viewing location, as well as Celestial guides (axes, equator, grid, meridians, and pole lines) which set around the north star.
A zoom control allows you to set the magnification of the field of view, and an altitude control lets you set your height from your starting point, which can also be used to fly you off the planet into space from a few meters in height to many light years in distance. The view from outside the Milky Way at .15 million light years from Earth is amazing! Sadly though, as you climb in altitude the view begins to look “down†back at the earth, and a strange splitting of the local horizon line and the “visible horizon†line appears which is confusing (basically indicating what the earth would block you from seeing as you move up.) Not sure why this was different from the local horizon however. If you continue to go up, you will leave the earth looking back at the planet and fly off into space. An interesting and fun thing to do once or twice.
And if you get totally lost, simply go to the Options menu and pick your home location “with reset: option to reset everything and start over again at your home.
So Many Options, So Little Time
Along the left side of the window are a series of tabs for accessing almost all the program’s functions, in most cases duplicating items available under menus as well (Note in the full screen view the menus disappear.) Clicking on any tab slides open a panel into the active window to access the controls of that tab.
At the top is Find, which lets you find and center the view on major planets, the sun, the moon, satellites, asteroids and comets. This pane also tells you where these items are at the current time, indicating if they are visible or not by graying out the non-visible items. For example, the moon had just set, and this program displayed the moon at –2 degrees below the horizon, invisible. Double clicking on a visible item in the list will scroll the display to a centered view of that item and turn on a label to point to the object. Double clicking on an item that is not visible will give you the option to hide the real horizon, or pick the best time to view the object. Clicking on a small ‘i’ gives additional information on each object as well. Lastly, typing the name or part of a name of an object will display a matching list of items that can be found. For example, typing “ple†listed three items, “Pleiadesâ€, an open cluster; “Pleiades, Seven Sisters (M45)†an open cluster; and “Pleioneâ€, a star. All were marked as being below the horizon at this time.
The Options tab, gives quick access to turning on and off objects in the sky as well as grids, guides, labels, and indicators settings. Here you can switch on and off daylight, the local horizon, and local and distant light pollution. You can also choose to display (with or without labels) Asteroids, Comets, Meteor Showers, Planets and moons, earth/moon shadow outlines, and SOME satellites. I say some as looking into the night sky from the lake we saw dozens of satellites orbiting overhead in the night sky that did not show up in the program. (Perhaps I can download these when I get home?) Here too you can switch on stars, clusters, pulsars, and the constellations in many forms (including a strange illustration mode which was more annoying than useful) as well as deep space items. I found myself using this tab quite often to turn on and off items in the sky view.
The Favourites (sic) tab lists popular pre-saved views of the solar system, stars, constellations, and deep space items. One such example, the Autumnal Equinox as seen from 122 km NE of Chibougamau, Canada on 9/19/2002 at 7:32 AM with time moving forward at 30,000 x gave a view of the sun crossing the Celestial Equator. If you set up a view you like, you can save it here as well. These views save everything about the current state of the program, so you can easily return to something you really liked at a later time. The long list of items
The Status tab give a great deal of info on where and when you are, where you are looking, and other info on settings, plus a view labeled “Hertzsprung-Russellâ€, which I had no idea what this is, but I guess it controls what stars you can see based on brightness and distance. (Should have brought the manual.)
The Info tab gives you info and data on the last item you looked (select an item and click on it) with the ability to add log entries, export the information, or obtain additional info from LiveSky.com, which is well integrated into this program. Also listed here is the “position in the sky†based on the 12 signs of the zodiac of the object chosen. So I went to Favourites, selected the Moon, and right now, at 5/12/04 at 2:40 PM, the moon is in the Constellation Aquarius, and the azimuth, altitude, and both galactic and ecliptic longitude and latitude are displayed.
Just for fun, I set the time ahead to 3,000x to see when it entered the next sign. I let it run until it changed, then set the time back slow (300 x) to find the exact time and date of the change. After a short time, I discovered that from my position at Lake Powell, the moon would enter Pisces on 5/13/04 at 10:53:45 PM. Not sure why I wanted to know this, and I am sure there was an easier way to find this out, but it was fun doing it.
Also in the Infotab is the ability to turn on tracking of an object in the sky. This will draw a line from data point to data point and drag a line across the sky showing you the objects path, with data points placed strategically along the way. For example, the comet “Neat (C/2001 Q4)†is visible in the night sky these days just after sunset. I set the time to today at 6 PM and turned on labels for Comets, then went to the Info tab. All the info about the NEAT comet was there to read about. I went to More Options and selected “Local Path†and then set the time to 3000x forward. I stopped the time forward when the comet hit the horizon. There in front of me was the path this comet would take with markings about every 20 minutes or so, and I went outside on May 12th to see it!

The Field of View tab lets you enter data about your own telescopes and binoculars and the program will generate a small circle on the screen that lets you see what you would see if you were looking through them.
Just below this is a tab called Telescope. Unfortunately, I do not have a telescope, but if you do have a newer one that has a computer interface, you can have the screen follow where the telescope is pointing. And if your scope is motor driven, you can use this area to move the scope to the area of sky you are looking at on the screen. Currently, 12 scopes are supported (Meade LX200, LX200 GPS, LX200 Compatible, and ETX Autostar, Clestron MexStar 4 GT, NexStar 5/8, NexStar5i/8i, NexStar8/11 GPS. CGE series, Advanced series, and Astro-Physics German Equatorial) and all connect via something called “Bluetooth-PDA-Syncâ€, but I am not sure exactly what that means.
A tab labeled LiveSky allows you to view images that can be downloaded from a “real time†system of images from various satellites around the globe. Clicking on an entry will display the last image loaded into the program while double clicking on the image will fetch a recent new image if available. For example, you can view solar images from the SOHO satellite, or see Earth images from satellites taken in almost real time like GIES-E/W N.A. infrared satellite. This is cool, but you have to be on line to see the latest images, and updates were often not available.
Other tabs include access to saved movies, and a viewing planner for future events you mark while playing with the program.
Playing With The Program
Suffice it to say that there are enough features and options in this program to keep you playing for a long time, especially if you own a telescope that will connect to it. But even if you do not, this program is a lot if fun and very educational as well. It was great to sit atop the houseboat and stare into the night sky, find a star or group if stars, and find them again on the screen to determine what they were. Or look on the screen for a planet or star, and then find it again in the night sky using the guide marks given.
One very cool feature is to select Earth from the “Favourites†/ Solar System menu. This will swing to a view of the earth from 5829 km out in space. You can rotate the planet around (which actually rotates your view above the planet) and moving your cursor over the earth’s surface will indicate major cities and locations. Now select your hometown from the “Options†menu and you will be ‘flown’ to the view from your home location again in a very cool animation. You can also do this from the Milky Way view, flying through space to return to earth.
Starry Night is an excellent program for anyone interested in amateur astronomy or simply enjoys looking into the night sky and wants to learn more about what they can see overhead. Since I am heading onto Lake Powell early next month where I will get a GREAT view of the night sky, I plan to take my computer along so that I can locate and view stars I could never see in the city, or never find without this program.
I was also impressed that the program knew of my 17†wide screen, and expanded the window to fill the monitor. For a program that runs on both Mac and Windows, the interface is very Aqua complete (I do not know what it looks like on Windows) and operated correctly in the Mac environment. This is not some Windows conversion but rather a program written for the Mac.
A Few Disappointments
One unfortunate issue for our nightly stargazing was the fact that the moon was not only up during the night, but was close to full for the first 4 to 5 days. While this program did show the moon in the sky, it did not seem to add to the “light pollution†the moon causes when displaying what stars should be visible. There are two options for local and distant light pollution, which add haze and light to the horizon and block out dim stars, but I found nothing for the moon. So the same stars where shown to be visible when the moon was full as when the moon was not present at all, and that is just wrong. Perhaps there is an option I missed because this seems like a very simple oversight for such a complex program. The bottom line, a full moon night showed the same stars as a no moon night in the program, but that is not what I saw!
My other issue is with the way the view works when going up in altitude. Lake Powell is near 3600 feet, yet raising the altitude does not seem to change what objects you can view near the horizon in this program. And the splitting of the picture of the horizon and the “blue arc†that represented (I believe) the visible sky over the curvature of the earth also did not take into account altitude, as I would expect. I also did not like the fact that you start looking down as your altitude increases, which is not what I wanted to see. If I climb the 1000-foot peak near me, I want to see what I would see from that peek, not that location at sea level or that location looking down at my feet!
I was also disappointed at the size and processing need of this beast. Granted there is a lot of information in here, but when installing, you have no idea what you will need to so naturally everything gets installed. And performance on a 1.3 Ghz PowerBook 17†laptop while on batteries was disappointing as stated above. However, given the amount of mathematical calculations this program has to make each second to keep track of all its objects, I am not surprised at the amount of power it needs.
All in all, this is one amazing piece of software that will take me some time to master, but it is still very fun, even at my beginner level. I highly recommend it if you are at all interested in watching the night sky. Now I want to go out and buy a Telescope to attach to this program!
Leave a Reply
You must be logged in to post a comment.