
Macphun Creative Kit
Macphun Software
Price: $149.95 U.S.
![]()
How many times have you tried to learn Adobe Photoshop or Aperture and given up in frustration? Or maybe you decided, as I did, since you’re not a graphic designer, you really had no need to invest in what’s required to unlock the power that Photoshop and Aperture boast. I don’t have the time or patience for that.
I’m a photography amateur, or hobbyist. I have other things I’d rather do than spend all day sitting in front of a computer trying to make my images look better.
The developers at Macphun Software understand this. They created five photo editing applications and bundled them as their Creative Kit. It’s a great product because you can start using it without reading a manual or learning a lot of arcane terminology. By “using it†I don’t mean you’ll get the full benefit of what these applications have to offer. What you’ll get if you don’t read any tips or watch some video tutorials is the surprise and satisfaction in seeing an anemic photo dramatically improved. There is no actual manual.
Macphun Photo Editing tools Update:
As of October, 2015, Macphun’s various photo editing tools have been combined into its Creative Kit, which comes with an easy installer. It is no longer necessary to install each app individually. Most important, all the apps in the Creative Kit now install as plug-ins for Apple’s Photos app, significantly boosting Photos’ anemic editing tools. To find the Macphun apps after installation, launch Photos, select a picture, click on Edit, and look for Extensions at the bottom of the list of editing tools. The various Macphun apps bring some of the functionality of Aperture and Photoshop to Photos. Also, you can continue to use the Macphun apps in Aperture or Photoshop after installing the plug-ins for Photos. See the updated Creative Kit at http://macphun.com/creativekit
Once you spend more time with each of the apps and get beneath the surface, you’ll find yourself mesmerized and entertained by the additional possibilities available. Nearly anything a Photoshop user can do, you can accomplish with Noiseless Pro, Snapheal Pro, Focus 2 Pro, Tonality Pro, and Intensify Pro, the apps included in Macphun’s Creative Kit. All of these apps are relatively easy to learn, but that doesn’t mean the end result will be amateurish images. On the contrary, the results can be stunning.
Each of these apps can run as stand-alone programs but they are also easily installed as plug-ins, or additions, to Photoshop, Photoshop Elements, Aperture, Lightroom and other popular photo editing applications. For several years I’ve been using Apple’s Aperture app, a difficult piece of software to master but something I needed to do for one of my jobs at the time. I also used Photoshop for some tasks but once I started using Creative Kit as a plug-in, I found myself using Aperture primarily as a repository or catalog for photos. When it’s time to edit my images, I simply turned to the Macphun plug-ins.
The same applies to Photoshop. I always found it difficult to navigate but I liked the Adobe Bridge file viewer. Sometimes I’ll find the image I want in Bridge, open it in Photoshop and edit it with Macphun’s Creative Kit apps. You don’t even have to do that if you choose to bypass Photoshop entirely. I keep my Creative Kit icons in the Dock, which means I can open Bridge or any other photo browser, and drag an image to Intensify Pro or one of the other Macphun apps. That opens the image, ready for editing.
The best way to learn these apps is to explore and play with them, but here’s a quick summary of their functions:
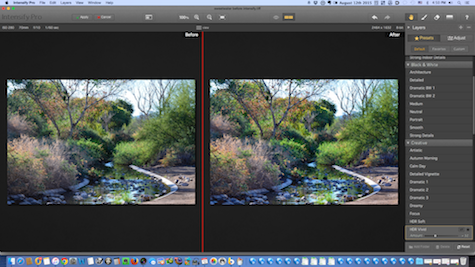
Intensify Pro: Load a photo into Intensify Pro and you can use any of roughly 60 presets to increase clarity, enhance details and improve mid-tone contrasts. Glance at the toolbar at the top of the screen and you’ll see two rectangles side by side. Click it to see before and after versions of your image. Also look for the Layers button, which enables you to combine several different presets and adjust each, using sliders, as much as you like. Note that when you increase contrast using Intensify Pro, it does not obliterate details. Here’s a sample of the Intensify Pro screen:
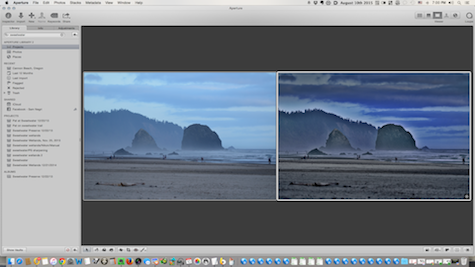
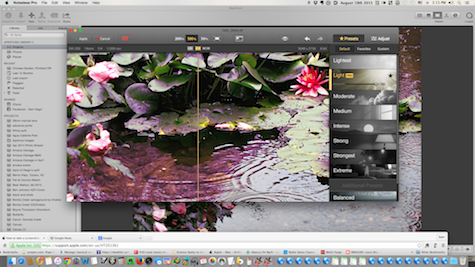
Tonality Pro: The basic function of Tonality Pro is to turn color photos into stunning black and white images. Depending on which preset you choose, you can also do wondrous things with a color shot rather than convert it to black and white (see sample from Cannon Beach). Our MyMac colleague Bob Wood addresses Tonality in greater detail but in his review of an earlier version he notes, with considerable insight: A wise man once said that turning a color photo into monochrome automatically gives it a dose of gravitas that it didn’t have before. Tonality, with its 160 one-click presets, ability to stack up to 5 layers and all the other powerful controls has earned a place on my hard drive. If you are serious about your photography, it should be on your hard drive as well.
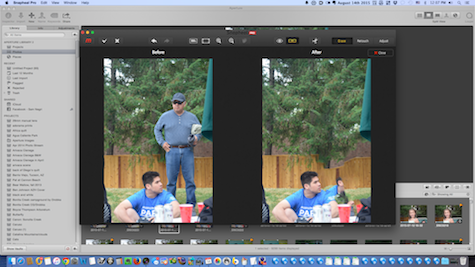
Snapheal Pro: This is the app you use to remove unwanted objects from your pictures. It works easily and well, especially on smaller objects like electrical wires or facial blemishes. If you try removing larger objects, it can become confused. I tried removing an adult from the background in one shot and it picked up a piece of someone’s head in the foreground and created a ghost image next to the seated figure.
Focus 2 Pro: This is one of the older Macphun apps and has a significantly different interface from what you’ll see in the others apps. Use it to make quick fixes. It can sharpen and shift attention in the image with its vignette feature, which you can easily change by moving the horizontal guide up and down. But the app is is limited. For example, you won’t find the Before and After icon in the toolbar. You find a handful of presets along the bottom of the screen: Portrait, Nature, Architecture, Macro, and Custom. The adjustments panel in the right column changes with each preset you select.

Noiseless Pro: If you’re not adept at adjusting your ISO, aperture and shutter speeds manually, you can easily end up with grainy pictures, but Noiseless Pro can save your bacon with little effort. Just load your photo into the app and it will immediately apply a Noiseless filter. If you like what it suggests, you’re done. Otherwise, the panel on the right offers options to increase the noise reduction. Look at the toolbar and notice you can view your image at 50, 100 or 200 percent to check on how much grain you’re removing. Click on Adjust at the upper right corner of the screen and you can fine tune all aspects of the noise reduction process.
Almost everything you can do with the Creative Kit apps you can also do in most professional photo editing applications. I have yet to find another software suite that combines such admirable ease of use without sacrificing professional results. Macphun’s Creative Kit is highly recommended.
MyMac Review Rating is 9 out of 10.
Hi Sam – Wow—Thanks for the thorough review of Creative Kit and the 9/10 rating! I’m glad that the apps have proven themselves worthy of your Mac! A couple of extra notes I hope your readers will find useful:
Snapheal: the app comes with 3 different erase modes, so if you don’t get the result you like the first time, it’s easy to try different ones. In your example, I might suggest trying the “Global” mode so Snapheal looks at the overall image vs. the “Local” mode where it’s using very close pixels to calculate a background fill.
Focus: Minor point – you’re right that this interface is a bit older; however, the before/after control can be found in the lower right – it’s a button called “Compare.” Being a native Tucsonian, I also really enjoyed the photo of Southern AZ!
Thanks again for taking a look at Creative Kit – as you point out, for most photographers it’s all they’ll ever need. 😉
Cheers,
Kevin
(full disclosure: I’m w/ Macphun)