
Adobe Photoshop Lightroom CC/6 – Review
Company: Adobe
Price: $149.00 standalone version, upgrade $79
$9.99 per month in the Creative Cloud Photography Program
$49.99 per month in the Creative Cloud Complete Program
![]()
Adobe just released a new version of Adobe Photoshop Lightroom to photographers. We were waiting for a new version last year, when Adobe released Photoshop 2014, but it never came. The wait is over and it was worth the wait. This new version is named Adobe Photoshop Lightroom 6 if you buy the standalone version, or Adobe Photoshop Lightroom CC if you subscribe to it from one of the Creative Cloud programs. For this review, we’ll simply call it Lightroom CC.
The latest version of Lightroom CC brings many new features, including new HDR and Panorama tools. In the past, for either one of those tools, you had to export your images to the full Photoshop or to a third party plugin. You no longer have to buy any of those programs if you are satisfied with the results Lightroom CC provides.
One interesting feature of the two merge functions in Lightroom CC is that they create a new DNG file if you begin with RAW images. Doing so will keep all the RAW information from the original pictures, while many software programs will save the result in a lossy JPEG format. You’ll see one advantage of this when editing the resulting image in the Develop Module: some slider values will extend up to +/-10 instead of the default +/-5.
To use either function, simply select your bracketed (for HDR) or segmented (for panorama) files in your library, go to Photo/Photo Merge and select the desired menu option (HDR… or Panorama…). A dialog will appear on screen; you’ll have to wait a few seconds for the software to create a preview, then you can adjust some parameters to your liking. The number of parameters you can play with is very slim in each dialog, but they are effective. Once you’re satisfied, just click the Merge button and Lightroom CC will add the new image in your library with a “-HDR†or “-PANO†added at the end of the file name. Once you click on the Merge button, the merge will be completed in a background task that lets you continue your work.
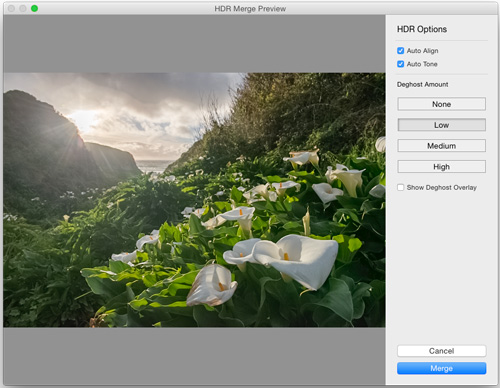
In the HDR dialog, you can choose to Auto Align and Auto Tone the picture. The Auto Align should probably be checked all the time, since there is no option to manually align the pictures if you unchecked it. The Auto Tone will give you a basic realistic toning that you can fine tune in the Develop Module later. The last parameters is the Deghost Amount you can apply to your HDR merge. This is mostly useful if you have moving objects in the frames, such as people, that may have moved from one frame to the other. Lightroom CC will do its best to make sure you do not have shadows of those movements in your final image. It can be selected from None, Low, Medium or High deghosting.
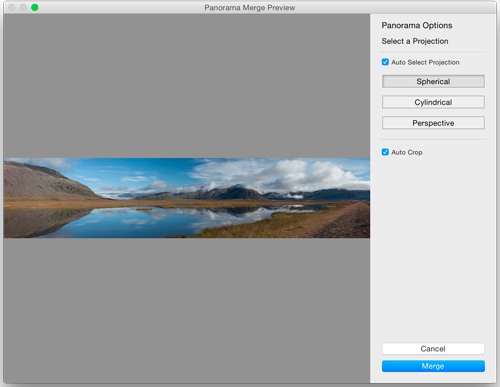
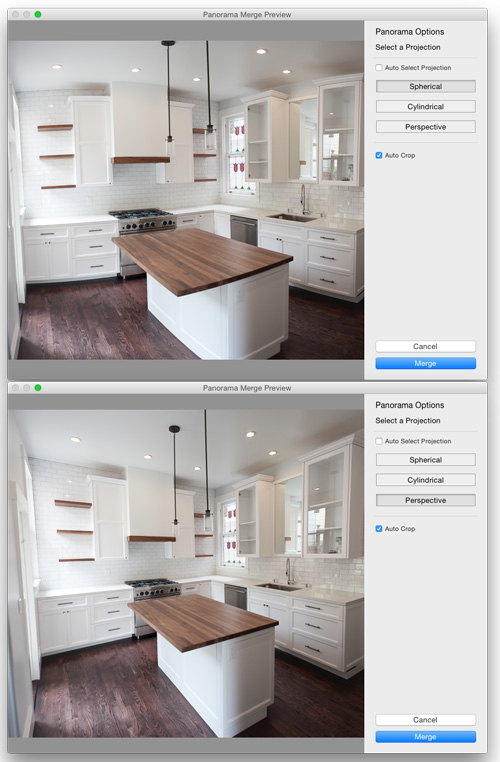
The Panorama dialog is also very simple and straightforward as the only options available are Projection and Auto Crop. The Projection will permit you to select between Spherical, Cylindrical, or Perspective. The first two options are better suited for landscape photography, while the last one will be mostly useful for architectural or interior shots (see picture below). The Auto Crop option will save you some time by removing the unwanted area of a merge image that has no pixels. It will crop the image to the edge of the transparency of the result.
You can even go further with HDR and Panorama by combining the two together. For example, you can take a multi-shot HDR (say three exposures) and move your camera to extend the field of view, take another three exposures, until you have your complete panorama. To proceed, first do the HDR on each of the set of three exposures, then take the HDR merged files to create a panorama of them. Because Lightroom CC is creating RAW files in each step, you’ll get in the end a great panorama that is also very rich in details and contrast with the HDR process.
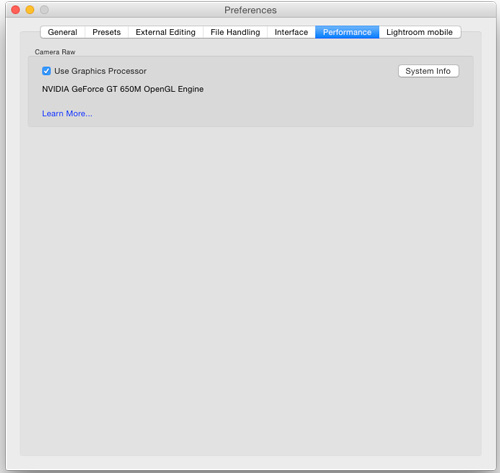
One new feature of Lightroom CC is hidden in the Develop module. Adobe added GPU acceleration in the Develop module to help edit those large files generated by new cameras and file merging. For example, the panorama file of the kitchen above is composed of five 11MB original RAW images which end up into a file of 80 MB on disk once merged. By using the GPU to develop those files, Lightroom CC frees your main CPU from those complex tasks. While invisible to the eyes, the use of the GPU provides the user a faster rendering and a more efficient user experience.
![]()
Adobe also added facial recognition in Lightroom CC. If you are one of those users who previously played with the similar feature in iPhoto and Aperture for Mac, you already know what it is all about. In the Lightroom CC toolbar you’ll find a small icon depicting a face. Click on it in a folder or collection where you know you have people in it, and Lightroom will show you those faces and ask to enter or confirm their names. In the Keyword List panel, Lightroom CC now shows a People category that help you filter based on identified faces. In short, the software is adding the name as a keyword.
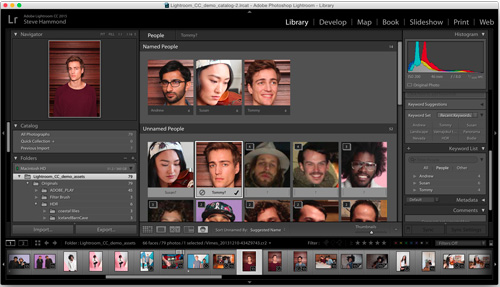
Like in Aperture and iPhoto, there is some hit and miss in face recognition. Sometimes Lightroom CC will flag a face where there is none. As for matching existing name in your library, it may match the wrong face with an existing name. But the software will become better as you use the feature. You can add missed faces easily by drawing a square around them. Approving suggested name or changing names on multiple pictures is also very easy to perform by selecting multiple images at once.

Overall it is a nice addition to the software, but it may or may not appeal to everyone. While this feature is effective for keeping track of your friends and family pictures, it may not be so useful to deal with if you’re a portrait or events photographer. For example, in my personal library I had a few events with lot of people. Lightroom detected thousands of faces in those photo shoots that I do not know and can’t name. On the other hand, it proves that the face recognition is working as expected.
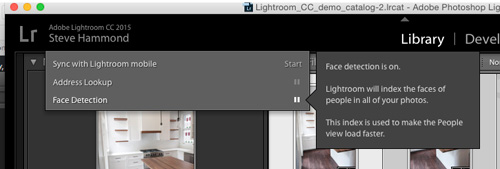
When Apple introduced the feature to Aperture, professional photographers asked for a way to disable it. In Lightroom CC you can disable the face detection by clicking on your identity plane and pausing it. In Aperture in was in the Preferences, and was probably easier to find. In Aperture, when you disabled the face detection, the software was removing all traces of the feature. In Lightroom CC what you are really doing is disabling the background task of face detection. If you click on the face icon in the toolbar, you can still use it but may have to wait for the process to execute the face recognition. We have not found any way to remove the face icon from the toolbar.
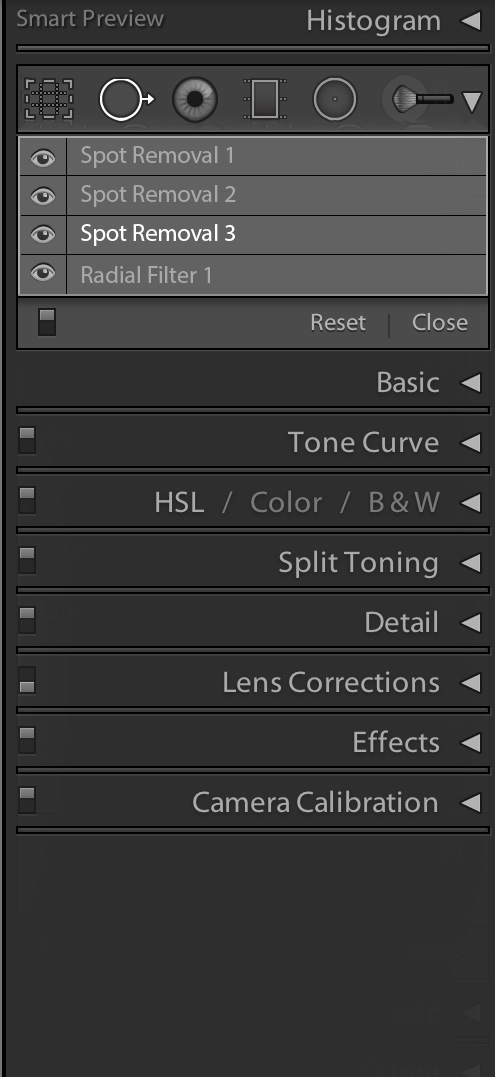
In Lightroom 5, Adobe added the Graduated Filter and the Radial Filter. With the new version of Lightroom CC you can now brush in or out the effect created by those filters. For those of you using Photoshop, it is the equivalent of using a layer mask to brush where the layer effect is displayed or not. You will then be able to better tune your picture in Lightroom CC without having to go to an external editor for some fine adjustments. If you look at the picture below, you’ll see on the top a washed out sky. In the second picture I have adjusted the image with a Graduated Filter to make the sky look better.

But you’ll also notice that the top of the rocks got that blue tint, which is not what we are looking for. By brushing out the Graduated Filter from the rocks, we can recover the original colors while keeping our sky blue. If you use the brush on the sky area, you can add more effects to it. You can see where the filter is applied and by which amount by clicking Show Selected Mask Overlay checkbox. The reddish areas are where the filter is applied: the darker the red is, the more effect you have in this area.

While the addition of the brush tool within the filters is great, we have to deplore the fact that Lightroom CC still does not display the adjustments in a way I like. In our previous review of Lightroom 5, we proposed a Photoshop like layer display in the right panels. That way we could name the adjustments, like we do for Photoshop layers, to remember what they do, hide them by clicking the eye, and see the details by clicking on them in the panel (see my mockup below). The Edit Pins are not really intuitive and even distract the eyes while editing the picture.
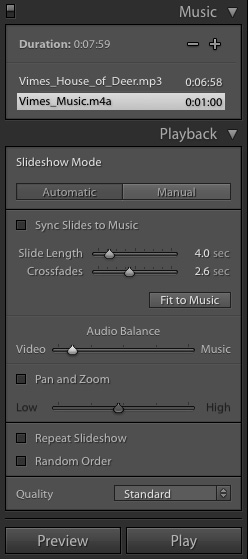
Some other improvements to Lightroom CC can be seen in the Slideshow module. You can now add up to ten musical tracks to your slideshows to enhance the experience. You can let Lightroom CC sync the slides to the music automatically, or do it manually. Another option lets you choose to Pan and Zoom the photos in the slideshow (remember the Ken Burn Effect?); a slider lets you select how much of this feature you want to have. While this is a nice improvement, I still feel that Lightroom falls behind the defunct iPhoto with all of its 3D effects.
One really welcome addition to Lightroom CC is the Pet Eye red eye removal. If you ever photographed pets, you know how their eyes are prone to get red or yellow from the light or flash used. A standard red eye correction for humans never worked well on pets. The Red Eye Correction tool in the Develop Module now has a subsection specifically dedicated to make your pets look at their best.

There is a bunch of smaller features that were added to Lightroom CC. The Web Module now features three new HTML5 templates that are compatible with desktop and tablet computers. Lightroom CC adds features to Windows touch-computers. A new field on top of your collection list lets you filter it.
All of the above features apply to the standalone version of Lightroom 6 and the Creative Cloud version Lightroom CC. You get some additional features with Lightroom CC when you are subscribing to one of the Creative Cloud plans. You can sync selected pictures to the cloud and use them with any of the mobile Lightroom versions (on iOS for iPhone and iPad and Android phones or tablets) and with the web version of Lightroom [link]. MyMac will cover those functionalities and features in a soon to be posted new review article.

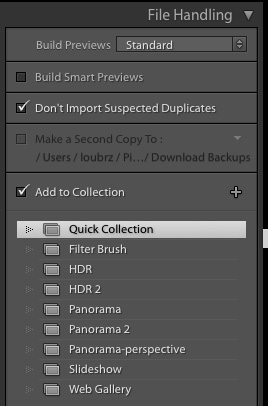
Syncing with Creative Cloud is nothing new to Lightroom CC; it was introduced in the previous release. To sync pictures with your Creative Cloud account from Lightroom CC, you need to create a Collection and enable syncing for it. We still can’t sync a folder or a Smart Collection, sadly. But the new version of Lightroom CC now offers us a way to import new images into a collection in the Import dialog. You can create a new Collection directly in the Import dialog and choose to sync it with Lightroom mobile.
This way you can import a set of pictures in Lightroom CC, have them synced to the cloud, and browse them with your phone or tablet once you’re on the road. You can flag or reject pictures. You can also give them star ratings, and make some basic adjustments to them. All of this information will sync back to your desktop version of Lightroom CC so you can continue your photo editing from there. One missing thing I would like to be able to do in the Lightroom mobile versions is refine my keywords.
The new Adobe Photoshop Lightroom CC brings lots of welcome improvements for photographers. The HDR and Panorama merge are probably the fancier of the lot. But the one you’ll benefit the most from is probably the GPU acceleration in the Develop Module. Even if you do not plan to use the HDR and Panorama features very much, the GPU acceleration is worth the upgrade from the previous version. If you subscribe to a Creative Cloud plan, you get even more features out of the software that let you edit and show your pictures everywhere you go.
MyMac Review Rating: 8 out of 10
[ Supportive information from Martin Evening, author of The Adobe Photoshop Lightroom CC/Lightroom 6 Book: The Complete Guide for Photographers, just published. ]
Steve’s review has covered all of the key new items really well (leaving aside the new Lightroom mobile features for a separate review). To be precise the Photomerge HDR and Photomerge Panorama are not actually creating a true raw file. This is because the DNG created is demosaiced and therefore partially processed. It has jokingly been referred to as more of a ‘rare’ state than raw because of this. However, this still allows opportunity for photographers to process these files just as they would a true raw file and also to apply later process versions and gain benefit from doing so in the future. So not a true raw, but to all intents and purposes photographers are not really going to notice a quality difference in practice and overall the benefits really are great compared to previous HDR/pano stitching workflows.
Regards syncing collections it isn’t likely Lightroom will ever support smart collections for the time being. There is a 30,000 image limit and if you think about the dynamic nature of smart collections this could cause all sorts of problems – Lightroom mobile would not be up to the bandwidth requirements or be able to reliably keep up. You could mention the ability to link Lightroom mobile syncing with tethered shooting, which in an ideal situation (i.e. with fast enough bandwidth) could allow people on a shoot either in the studio or the other side of the world to monitor the progress of a shoot as it happens. I remember doing this once using iChat many years ago with Jeff Schewe in Chicago watching the shoot progress.
[ Learn more about Martin’s Lightroom title here: http://www.peachpit.com/store/adobe-photoshop-lightroom-cc-lightroom-6-book-the-complete-9780133929195 ]