
Leading up to Macworld | iWorld 2012, reviews editor for MyMac.com, John “Nemo” Nemerovski contacted me with a sole purpose.
To collaborate like never before!
I was to find out that John had ideas far grander than simply remote editing and posting of articles and photographs. I love a challenge, and to be able to watch a master like John at work and assist in anyway possible is privilege.

In the months leading up to the Expo we tested and perfected what was going to be a unique real-time video post production setup half a world away: 7434 miles or 11963.86km to be exact.
All the preparation in the world could not prevent John from coming down with a serious cold after day one of the Expo that put both of us and our master plan out of action but keep reading, please!
We may have missed our main event but there is no escaping the fact that the planning we did leading up to Macworld | iWorld will benefit MyMac at future Expos. Hopefully this will inspire many of you to try the same real-time collaboration techniques.
Take an iPod touch, IK Multimedia iRig Mic, FaceTime, Wi-Fi Internet connection, and a guy in Australia sitting in front of his iMac for the entire Expo. Interesting scenario isn’t it?
Let me add that we would then record the video interviews live on my iMac in Australia as John was undertaking the interview at the Expo in San Francisco. All on his iPod touch with the IK Multimedia iRig Microphone and the help of FaceTime. You may wonder why John doesn’t have an iPhone. It’s simple he doesn’t need one, and for now, he doesn’t want one.
See, I told you it was interesting!
Going with FaceTime was not an easy decision, but it did give us the highest quality video production over the Internet. We took a look at Skype but were thoroughly disappointed with the lack of clarity in that recorded video. We decided to have Skype as backup one.
Our secondary backup option was to have John record the video interview locally on the iPod touch. Upon completion he would send it to our Dropbox shared folder for remote editing. It may sound like an ideal solution, especially since the Dropbox app will do background transferring. We did find the transfer to Dropbox was tediously slow and we hit a limit of 180MB file sizes or around five minutes of actual recording time. This limit is only present in iOS devices.
John is known for his quick to-the-point interviews. It is this skill that makes him perfect in the role as host of the AppMinute podcast. Video interviews generally need to be a little more detailed, and as such would have in many cases exceeded our available limits.
Once we decided to go with FaceTime we had a problem. How do you record a FaceTime call? Is there an app for that?
I was not aware of any and a Google search yielded no results, but through pure stubbornness and constant testing we found a way.
I found quickly that recording the video from FaceTime was a rather easy process. Utilizing QuickTime Player in Mac OS X Lion 10.7 offered a simple solution for recording the FaceTime calls. This is due to the expanded options that Apple introduced in version 10 of the QuickTime Player. Other screen recording applications are available that arguably do a better job, but for a free application it is more than satisfactory.
Another problem we came across was how to record the audio, and allow me to talk directly with John during the interview, without my voice appearing on the recording. I needed to be able to communicate with John to advise if we lost any packets of data in the transmission. This would allow him to ask the question again so we could get an answer without a drop in audio or visual quality and have all extra material edited out later.
The solution was to have my Samson Meteor Mic set as the default audio input from the Menu Bar (System Preferences) in Mac OS X. Then within the QuickTime Player application I would perform a new screen recording. When you bring up the Screen Recording option within QuickTime Player, there is a drop down selection that allows you to chose not only the quality for the recording but the input audio options. I selected Built-in Input: Line In.
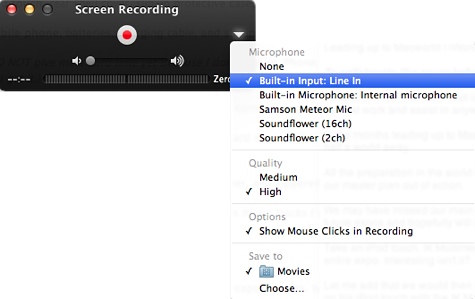
I then connected a stereo audio splitter to the headphone port on my iMac with one end going to my headphones to monitor the audio, and the other going into the audio input port on the iMac. I would then control the system audio volume as normal and monitor the recording levels in the QuickTime Player application.
With the audio under wraps it was then a matter of simply pressing the record button, selecting the FaceTime window, and letting John begin the interview.
When I heard the audio come through clearly on the recording and my audio was not included I did a little geek happy dance!
The trails and tribulations were not over yet!
FaceTime users know that you have a small video clip of your own video in the lower left hand of the FaceTime call window. Whilst you can move it around, it can not be removed and that causes a problem.
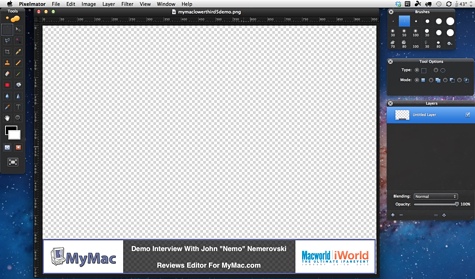
The answer: Build a lower third graphic in Pixelmator and import into iMovie. It worked extremely well and completely removed me from the equation, whilst also providing valuable information about who was being interviewed.
So there you have it. A Yank, an Aussie, and some seriously cool consumer products that give us world class production capabilities. Okay, maybe not world class, but you must admit it is an amazing achievement using only consumer-grade equipment across seven thousand miles of ocean and land.
Nicely done, Mark!
In the video above, I was hand-holding a current generation iPod touch and an iRig Mic, communicating with Mark via FaceTime.
[Nemo]
Mark,
Not sure I understand the audio routing with the splitter. Can you explain that in a little more detail?
Thanks!