
WiPNET Cable Ethernet Adapter
Company: Wi3 Inc.
Price: about $175 each (at least two required), available now
This review is pretty long, but I wanted to share with you, dear reader, the thought process that went into my home network architecture, and how wrong I was about a lot of things. I also wanted you to see a few of the challenges you may or may not experience when performing network surgery. Maybe you can learn from my (expensive) mistakes.
I don’t know about your situation, but my home network is a wreck. It’s a mishmash of 2.4 and 5 GHz systems, some power line Ethernet, and some long stretches of CAT5 cable running under my carpet, etc. I have tried almost everything in an effort to get better throughput to and from my media server, a 7.5 terabyte Synology DS-509+ NAS that I use to back up the main NAS, to my 1.83 GHz Core 2 Duo Mac mini (and my HDTV) without dropped frames and jittery display. Likewise I wanted better performance maintaining a large iTunes media collection.
If only it were easy.
Some History
When I first set this system up, I connected to the downstairs media server/NAS through a pair of power line networking devices (with claimed 200 megabit speed–HAH!). It was pretty darned painful. I don’t know if there was a latency problem that just compounded itself with big file transfers or maybe my house electrical wiring is just screwed up. To see how good/bad network performance was, I moved the NAS into my office upstairs and tried to watch movies stored on my NAS downstairs, using the Plex media server application running on the Mac mini. The skipped frames and choppiness made the movie(s) unwatchable.
My next attempt involved upgrading my home wireless router, going with a fairly expensive dual-band Cisco (it manages separate 2.4 and 5 GHz wireless networks that run simultaneously) device, and I added a 5 GHz D-Link wireless bridge downstairs. Without access to fancy signal-measuring equipment (I’m open to suggestions), I really can’t tell if the antenna orientation of the wireless bridge is optimized for use with the wireless router upstairs. In any case, performance was only marginally better than the power line solution. Movies were still pretty crummy (no wholesale dropouts, but still a lot of jitter due to dropped frames), and iTunes maintenance was similarly weak. (read that as being glacial).
Updates to my 300+ GB iTunes library (a combination of music, audiobooks, and video) are similarly glacial. My iTunes library is stored on the NAS (in my living room–a testament to its quiet operation), but updates (even daily podcast updates) are annoyingly slow. Mind you, I’m controlling this with a rather elderly 2 GHz G5 PowerMac tower, and simply trying to manage that much data over a network connection with a wimpy G5 may, in part, be my problem. Updating album cover art takes as long as 30 seconds per track. It’s probably time to finish cutting over to my new 2.93 GHz Core i7 27-inch iMac.
By now, the only solution seemed to be to get an electrician or network installer to punch holes in my drywall so they could snake CAT6 Ethernet cable runs where I needed them, terminating in wall plates somewhere in the living room and a few other places. The cost of wiring/drywall patching was prohibitive, so I abandoned that idea. I was even considering getting a 50-100 foot run of CAT6 Ethernet cable, which I was going to snake along the baseboard, run under the carpet, and goodness knows what to get around my concrete staircase.
My Network, the Way it Was
Enter my good friend, MyMac.com’s very own John Nemo. He’s been trying to get me to resume writing reviews and blogs on the MyMac.com website for some time, and he finally piqued my interest with a couple of items that he needed to be reviewed: a dual-drive NAS with cloud-like pretensions, and a networking device that uses your home’s cable TV coaxial cable as the medium to move Ethernet signals from room-to-room, floor-to-floor.
This is how my home network was configured before I began this review. As you can see, I’m using a 5 GHz (40 MHz bandwidth) 802.11n link to my master bedroom and using a Wireless Bridge to feed a Gigabit switch in my living room, because, as I mentioned previously, the power line Ethernet system didn’t work very well, though I still use part of it to talk to my networked laser printer. It’s fine for that purpose.
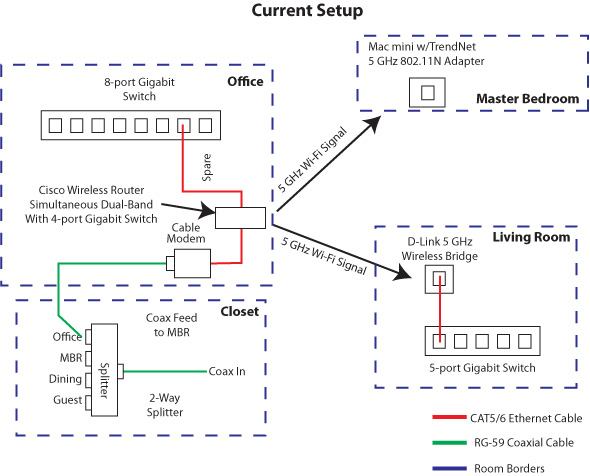
In the living room, the “Smart†TV, Mac mini, NAS, Blu-Ray player, and Wi-Fi bridge connected to a 5-port Gigabit switch. In the master bedroom, the Mac mini connected directly to a USB-based 5 GHz 802.11n Wi-Fi adapter, as I hadn’t yet bought the “smart†Blu-Ray player (another Christmas present for myself). The upstairs office is connection central, with two Macs, two printers, routers, switches, etc. Pretty complicated, huh? The reason the cable TV splitter looks so empty is because as of a few months ago, I cancelled cable TV services and went one of the major satellite providers. The only thing running on my cable TV wiring at present is broadband internet.
So, yeah, there’s a lot of stuff to tie together. All I needed was some speed, so I could take advantage of the great (at least on paper) capabilities of the Synology NAS, my Plex media server, and my network in general. I wanted to be able to maintain my iTunes library from my new iMac and not have to wait for moss to grow on its (or my) north side before the files finished transferring and iTunes filed, categorized, and adjusted the volume on each of those MP3 files. I wanted to be able to watch movies stored on my media server in any room in my house that had a Mac mini set up to do so (currently the living room and master bedroom). Let’s see if the Wi3 device(s) worked as well as they were hyped to do so.
Enter the WiPNet Wi3 MoCA Device
The folks at Wi3 have come up with some interesting technology, supported by a fairly new standard for home networks, called MoCA (Multimedia over Coax Alliance), managed by a trade group that promotes the use of coaxial cables to connect consumer electronics and other networked devices. The WiPNET solution involves replacing your cable TV wall plates with devices that slip into the hole left by the wall plate. They claim speeds up to 175 megabits per second, with a WiPNET network supporting up to 16 of their devices. Next-generation MoCA systems will be even faster, with promises of gigabit speeds. This is serious stuff, and if it works as advertised, it could solve a ton of home network issues.
There are two WiPNET Ethernet-to-Cable devices available for homes with coaxial TV wiring and the recently-announced device for homes with DirecTV coaxial wiring:
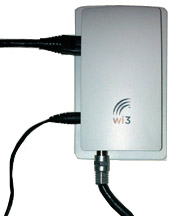
- Ethernet: Two RJ45 jacks and a CATV F connector.
- WI-Fi Access Point: One RJ45 jack and a CATV F connector. I guess it creates an independent wireless network (not bridging to your network) for wireless devices close to it.
You can run up to 300 feet of coaxial cable between the WiPNET boxes. For installations where AC power is not conveniently located, you can obtain a 4-port power inserter to power the devices over the coax cable. This requires professional installation, ensuring that you don’t fry your components or those components that belong to the cable company. Cable companies take a really dim view of customers frying their gear—especially if frying was avoidable. Besides, I don’t know about you, but the odor of burning Bakelite is not one of my favorite fragrances.
Before you start, you should assess your needs and requirements by doing a hookup diagram of all your network devices. Consider things such as:
- Do I have to run cabling under the carpet, over the doors, along the baseboards?
- Is there a power source next to where you want to locate the WiPNET device?
- Is there a cable TV wall plate in the same room, and is it close to my networked devices? If not, can I run CAT5 or CAT6 Ethernet cable along the baseboards so as not to be in the way?
- Do I have drywall or lath and plaster inside wall construction?
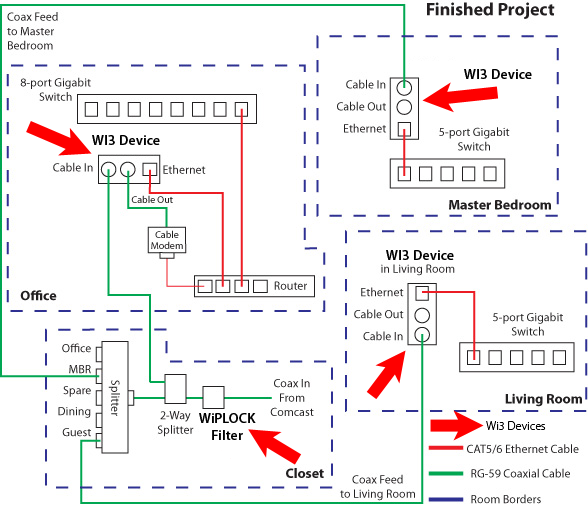
Here’s what I came up with. This drawing eliminates all the equipment that connects to the Ethernet switches, making it easier to read, though it still might look pretty complicated. Each room where something is to be installed is isolated within blue dashed- line boxes. Each coax cable feed is colored in green. Each Ethernet run is colored in red. One thing I didn’t show was proximity of cable TV wall plates to AC power connections. Keep this in mind as you plan your installation. I also didn’t show the detail (in my house) of having to run the new cable through the wall that divides my living room from the downstairs guest bedroom. Another minor complication.
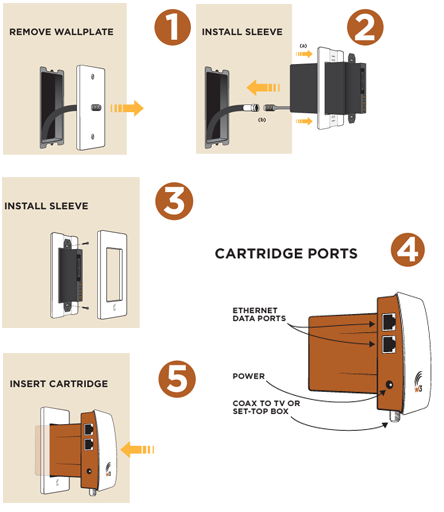
Installation is well-documented. You are directed to remove everything behind your cable TV wall plate, install the various pieces provided, or in some cases you may be dispatched to your local home center to get a few pieces, connect the cable to the Cable In port on the sleeve, connect a CAT5 or CAT6 Ethernet cable to the RJ45 connector and run that to your Cable Modem and router, respectively. Remaining WiPNET boxes are even easier to install.
Potential Installation Challenges
In a brief digression, the fine folks at Wi3 have also announced a version of the WiPNET box that mounts on the surface of a wall—just the thing for those of you with concrete block, lath and plaster construction, or cases where the pocket behind the Cable TV outlet is just not deep enough. For those of you who can’t handle any sort of in-wall or on-wall configuration, there’s also a desk stand kit.
And we’re back.
I had a few installation challenges in my two-story townhouse.
For whatever reason, the boneheaded cable installers who first wired my townhouse for cable TV long before I lived there did not put a cable TV wall plate in the living room! The guest bedroom (on a shared wall) had a cable TV wall plate and it fed the living room through a small hole that was drilled through the adjoining wall by a previous owner. After I enlarged the hole slightly, and with the aid of a metal “fish tape,†I pulled the CAT6 cable through. The hole was then caulked up to prevent any “critters†within the walls from paying me an unwanted visit (after all, I do live in S. Florida, home of cockroaches so big you can ride them like a pony).
Because my townhome was built with galvanized steel studs, the metal-frame low-voltage electrical boxes could not be removed without a Dremel tool (to cut the sheetmetal screws coming in from the walled-up side of the stud) and a lot of patience, so I left them in, which only caused a problem on a shared wall, which was shallower than the walls in the two upstairs bedrooms. That shared wall installation wasn’t the prettiest (it’s a little bulgy), but it does do the job. This is where the surface mount kit would be ideal.
I’m telling you these things because you may encounter challenges when you begin your WiPNET installation adventure.
The Installation
I started in my utility closet where the cable TV wiring enters the house and is routed via a splitter to the various outlets (see the Finished Project drawing above). I inserted the WiPLOCK filter (purchased separately) into the main cable feed. This filter is used to prevent your Ethernet data from leaving your house. I attached the filter to a two-way splitter (not supplied). I used a male-to-male “F†adapter to connect one half of the two-way splitter to the 4-way splitter that feeds the house. I then located the RG-59 coax that fed the upstairs home office (I kept disconnecting cables one at a time until the cable modem lights went out), and attached it to the other connector on the two-way splitter. That wrapped up the installation in the equipment room.
I had to run 25-feet of CAT6 Ethernet cable from the wall plate to my router in my home office, but otherwise, the hookup was a piece of cake. I attached the coax coming out of the wall to the loose coax cable with a female “F†connector attached to it on the sleeve, and secured it into the low-voltage bracket on the wall (see installation sequence below). As directed, I connected the RJ45 connector on the 25-foot CAT6 cable to one of the two jacks on the side of the WiPNET device, and connected the male “F†connector on the RG59 cable that went to my cable modem, plugged in the power supply, and slid the plug-in piece into the sleeve. I connected the other end of the 25-foot run of CAT6 cable to an unused port on my wireless router. After a few seconds, the status indicator on the WiPNET device lit up with the correct color, and all was well.
I repeated this process for the master bedroom and the living room with only a few glitches that were easily resolved.
Well… How Well Does It Work?
Connections made, I performed some basic tests to ensure I still had a functional network. I was able to successfully connect to my NAS from Macs in the master bedroom and office, and in fact, the connection and authentication were much, much faster. So, I had a network. Then I checked the third Wi3 device set up in the master bedroom. First, in the computer room, on my 2 GHz dual G5 Mac, movies stored in .ISO format (in effect the physical disk converted into a computer file) were not perfect, with occasional skipped frames and pauses. The same movies stored in MP4 format were much smoother, but scrolling through them using the horizontal scroll bar in the QuickTime client resulted in a lot of beach ball time. I have not tested the .ISO files on my newer, much faster Core i7-powered iMac, as I wanted to minimize the number of variables in my testing. The less-than-stellar performance may simply have been because of the much slower G5-based Mac tower not being able to handle that much streaming data effectively.
In the master bedroom, connecting to the server was a bit slower for whatever reason. The .ISO files, played on the master bedroom system, behaved similarly to the G5 (running through a Mac mini powered by a Core Duo – not a Core 2 Duo – processor). In other words, they didn’t perform terribly well (skipped frames, stuttering, etc.). Like the G5, the Core Duo Mac mini was probably not the best choice for playback of ISO images (the equivalent of playing a DVD over your network), due to being firmly rooted in the past in terms of architecture and performance. Maybe it’s a good thing that I re-encoded my entire movie collection into MP4 format with Handbrake, using some tips I heard on a recent MyMac.com podcast. Speaking of MP4, those files ran quite well on the Core Duo Mac mini, though I didn’t try the horizontal scrollbar trick, as I use a wireless keyboard/trackball combo on that machine, which makes such moves very inconvenient. Within Plex, I connected to various Internet video sources, such as Crackle, Hulu Plus, Revision 3, and others. All ran glitch-free. I switched to my Sony Blu Ray player that had similar Internet connectivity and tried the same services as well as a few others. Again, they performed flawlessly.
Now, with the cable-based network up and running, it was time to run some very unscientific performance tests. I used the PowerMac G5 tower to transfer files to my Synology DS-509+ NAS, which resides in the living room next to the home entertainment center. First, I copied and timed the transfer of a single large file (I used a 4 GB .ISO file) over the WiPNET network. I repeated this process with a 1 GB folder of loose files of various sizes. Next, I installed some new music in my iTunes library, which also resides on the Synology NAS downstairs. All of the comparisons I had planned to perform weren’t possible, as the 802.11n wireless bridge chose that time to stop working.
The Results
In a word or two, quite good. As I said before, I was not able to get my older 802.11n wireless bridge configuration to work again, so I could not do a direct comparison between the two networks and give you some quantitative numbers, but I can say with certainty that the WiPNET network felt much faster. Logging in to the NAS was much snappier, and interaction with iTunes seemed faster than before. Logging into the NAS was quite snappy, unless the NAS was performing other disk-intensive tasks, such as converting large .ISO images into smaller MP4 files (the source files and the destination directory were both on the NAS, while the processing was being performed on the media center’s Core 2 Duo Mac mini).
In Closing
This was a really fun experience. I’m pleased with the performance of my reconstructed network. iTunes is again a pleasure to use (and to add more content to). I was saved from having to take serious home-wrecking action (running CAT6 wiring throughout the house), and, well, it just worked. Is there anything more Mac-like and Mac-friendly than that? Installing these devices did take a little time and planning, not to mention that some of you may need to perform some minor wall surgery–but even that issue is being addressed with the surface-mount and desktop mounted products that were announced at the CES Show. The instructions were very clear, the documentation more than adequate (and even more help is available from their website). The WiPNET Cable Ethernet Adapter system is a highly satisfactory substitute for house-wide Ethernet cabling, and if you can wait a little while longer, gigabit speeds are just around the corner. $175 (each) seems pretty cheap compared to bringing in an electrician or network specialist to run CAT6 Ethernet cable throughout your home. If you are remodeling or doing new construction, by all means run CAT6, but if you don’t want to mess up your lovely walls in a finished home, the WiPNET Cable Ethernet Adapter may be just the ticket.
At this time, the WiPNET devices are being sold through distributors. Please go to the Wi3 website and click the Where to Buy link to find out more.
MyMac Review Rating: 8 out of 10
Leave a Reply
You must be logged in to post a comment.