
CS5: Dreamweaver
Company: Adobe
PRICE:
- Dreamweaver CS5:Â Upgrade: $199, New: $399
- CS5 Web Premium (which includes Dreamweaver): Upgrade: $599, New: $1799
- CS5 Master Collection (which includes Dreamweaver) : Upgrade: from $899, New: $2599
Adobe continues to improve its entire CS suite of products with CS5, and I had the chance to have a quick first look of Dreamweaver CS5’s new features. This is not a simple product, and it was already packed with features. And now there is even more, with a few older features tossed out if they were replaced with even better ones. I will give a brief overview and comments on the new features here.

Upon launching, I have to say, the user interface has not changed drastically from my previous version, and that is from someone who is actually using Dreamweaver MX, a fairly old product. That is the good news in my view. Often, as has happened with other products over the years, and seems to happen with every new Microsoft release, the improvements move, replace, or change just about every menu, control, or toolbar item, so you spend a great deal of time looking for controls that used to be right at your finger tips, simply slowing down your work. CS5 Dreamweaver is just the opposite. The updates all seem to be designed around making things go faster and smoother and easier than ever before.
While there are many many new features since I last updated, I will try and focus on what is new in CS5, as I know many of you may be coming from CS2, CS3, or CS4, and want to know what has been added this time. Lots of things are new to me, but lets focus on a list of features new to Dreamweaver CS5:
The following is a list of top new features that Adobe highlights, so that is good enough for me. Of course, I have commented on each as well.
Live View
Live View was actually added in CS4, but seems to work even better now. Normally in Dreamweaver, you can see your code in Code View, and you can see a visual editor view called Design View, and you can split between those two. However, looking at your site in Design View was not exactly a good representation of what it will look like in a real browser as some editing marks and images show up for designing (obviously.)
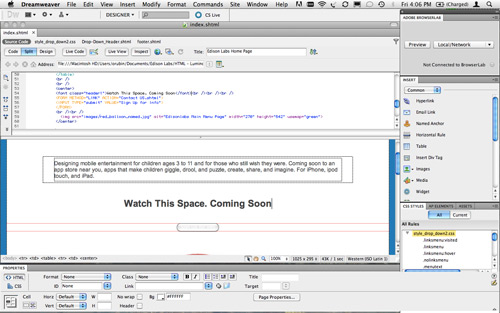
This first view is Design View. Note that the box of text is not showing any color, and the button has no text and is surrounded by red lines for placement. Not exactly a real representation of your site. But press “Live View”, and the windows changes to this:
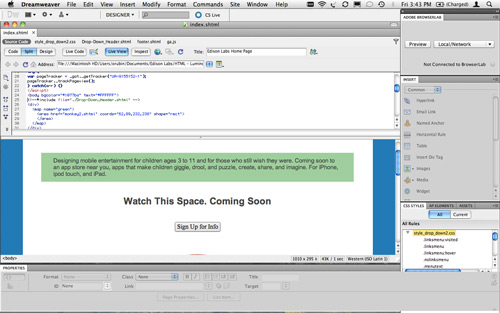
Live View basically switches that Design View to let you see the page as it would appear in a browser window, and, the window is still live, so changes to the code or to the css styles will show up directly on the screen in the Live View. This makes tweaking positions, margins, fonts, and other design elements so much easier to understand, and see their effect rather quickly without having to launch a browser preview as in the past.
Added to CS5 is Live view navigation, which activates links in Live View mode allowing you to interact with server-side applications and dynamic data. The feature also allows you to enter a URL to inspect pages served from a live web server and edit pages you have browsed to if they exist in one of your locally defined sites.
Adobe BrowserLab
Dreamweaver CS5 integrates with Adobe BrowserLab, one of the new CS Live online services, which provides for cross-browser compatibility testing. You can preview web pages and local content using multiple viewing and comparison tools, on Adobe’s servers. If interested in more info, here is a link to  BrowserLab.
This is a GREAT new feature, Basically, rather than start up multiple machines or several virtual machines on your Mac, you just “send” your current design, through a built-in Dreamweaver panel, right up to Adobe’s browser lab, they render it for each selected server, and see what your site will look like on many different browsers and operating systems. The first time you use preview, you will be taken to a web page on Adobe’s site to register.
After registering and confirming my email address again, I was given access. CS Live opened a browser window to BrowerLab, and said it would run my design on Safari 3.0 for OS-X, Firefox 3.0 for Windows, and IE 7.0 for Windows. OK, but which version of Windows? Which version of OS-X? Upon first trying, I received the message “Firefox 3.0 – OSX has failed to load. A screenshot cannot be loaded for the following reason: page error.” I got fails for all three options I tried. But again, what page error? This did not seem to be working. It took a bit of digging to find the answer.
Well, it seem you have to first switch to LiveView in Dreamweaver before trying preview, or it will not work. This really should have popped up a dialog telling me to do that, or just do it for me, rather than send something that failed. Once I corrected that issue, this worked great.
You can actually pick any or all 12 different combinations of Chrome, Firefox, IE 7 and Safari for Windows and Mac OS-X , although there was no test for Safari on Windows, and none for Chrome on Mac, so this is not a complete test by any means, but does cover a great deal. Sadly, I have often found Windows Safari and Mac Safari do not behave the same at all actually, so I hope this list continues to grow. It would also be nice to see it on Windows 7, Vista, and XP, and not just “Windows.” I would also like to see iPhone Safari, iPad Safari, and several versions of OS-X as well. Since this is a cloud service, they can easily update it later. Stay tuned for improvements here I am sure.
After you are registered, the next time you fire off this feature in Dreamweaver, the BrowserLab window will show you progress of the rendering right in Dreamweaver, so you can continue to work on Dreamweaver until the server is done rendering. Once finished, you can switch to your local browser, where you will see on Adobe’s servers, a screen shot of your website in the browser/OS combinations you have chosen. A pop-up menu lets you see an image from each of the choose you have selected.
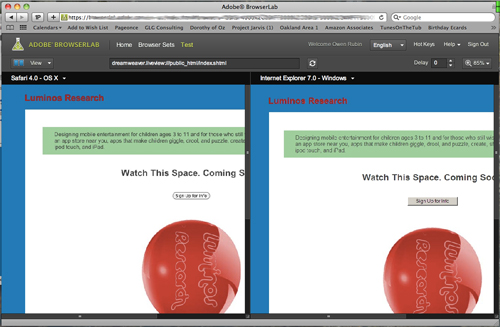
But it gets even better. In the preview window, you can do a 1-up view, or compare 2Â side by side in a 2-up view, or do what they call “onion skin” view, which lays one over the other in a transparent mode, where you can compare them on top of each other. Using a slider to choose one, the other, or some combination of both, you can compare differences between two browser’s results of your web code, and look for obvious errors easily.
Now, since this is a still image, how do you see your site “in action” if you have Javascript? Well, in LiveView, you get the page exactly as you want it, say hovering over a menu. and simply press F6 to freeze JS in Dreamweaver. Then press the preview button in BrowserLab. Whatever you see in LiveView will now be previewed in BrowserLab. Unfortunately, the site is not “running” in Browser Lab, it just shows a snapshot.
Business Catalyst integration
Adobe Business Catalyst is a free, hosted application tool that replaces traditional desktop tools with one, central platform for web designers. This makes it easy for you to access many of the features provided in the Admin Console within the familiar Dreamweaver workspace. The application works hand-in-hand with Dreamweaver, and lets you build everything from basic data-driven websites to powerful online stores. Using Dreamweaver, a browser and an Internet connection, you have instant access to all the power the BC Platform provides. See Adobe Business Catalyst Integration for more info.
CSS Inspection
CSS Inspect mode lets you visually display the CSS “box model” properties—including padding, border, and margin—in detail, visually, without reading code or requiring a separate third-party utility such as Firebug. More detailed info can be found at Adobe CSS Inspection. This is so much easier than trying to build it all by hand through trial and error with different sizes, colors, and padding.
Integrated with the next few features, using CSS styles just got a lot easier, because now you can see your changes visually right as you make them. Pressing the INSPECT button on the interface will start displaying visually the boxes that surround your elements, displaying in various colors the padding, margins, and box locations. Simply selected the area you want to examine, and in the CSS panel on the right, you can now live edit the CSS values to see how they will effect your total design, live and in real time. And changes will go back to your stylesheet automatically.
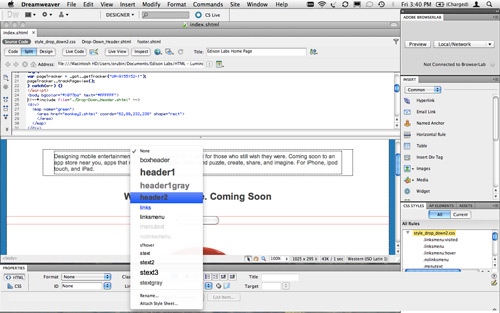
Take a look at the picture above. Note the CSS style pop-up in the properties box near the bottom of the scree It now shows you the style IN the pop-up itself as a contextual menu, so you can see what you are selecting before you pick it. Makes setting up styles easy, especially when you list gets long, as you do not have to do any trial and error. A small, nice touch.
CSS Disable/Enable
CSS Disable/Enable lets you disable and re-enable individual CSS properties directly from the CSS Styles panel. Disabling a CSS property simply comments out the specified property without actually deleting it, so you do not loose your work, you simply “remove” it from acting. More info at Adobe CSS Disable/Enable.
Simply put, the Disable/Enable feature lets you comment out one or more of your CSS elements and properties from the CSS Styles panel, without having to make changes directly in the code, or editing the css style sheet file. When you do this, you will see the effects particular properties and values have on your page immediately.
This does effect your CSS stylesheet directly however, and disabling a CSS property will add a CSS comment tags and a [disabled] label to the property you’ve disabled. You can then easily re-enable or delete the disabled CSS property according to your preference.
CSS starter layouts
CS4 layouts contained a number of complex descendent selectors, which were difficult to use. (if you do not know what that means, just skip past this section, or read the more info link.) These have been replaced in CS5 with updated and simplified CSS starter layouts which are much easer to understand classes. More on Adobe CSS Layout.
Dynamically-Related Files
The Dynamically-Related Files feature extends the functionality of the Related Files feature by allowing you to see the related files of dynamic pages in the Related Files toolbar. Working with dynamic pages and content management systems (CMS) was never easy in Dreamweaver. The Dynamically-Related Files feature now lets you discover all of the external files and scripts necessary to assemble PHP-based CMS pages, and displays their filenames in the Related Files toolbar. By default Dreamweaver supports file discovery for the WordPress, Drupal, and Joomla! CMS frameworks.
To use the Dynamically-Related Files feature, you must have access to a local or remote PHP application server running WordPress, Drupal, or Joomla!. One common approach for testing pages is to set up a localhost PHP application server, and test the pages locally. In my case, an old PC running Ubuntu acts as my server, so not only do I have local access, but easy access through Dreamweaver now too.
More info can be found at Adobe Dynamically-Related Files.
PHP custom class code hinting
Like so many good editors for code, CS5’s code editor now supports PHP custom class code hinting, and displays the proper syntax for PHP functions, objects, and constants, helping you type more accurate code. Code hinting also works with your own custom functions and classes, as well as third-party frameworks, such as the Zend framework.
Simplified site setup
The newly redesigned Site Definition dialog box (now the Site Setup dialog box) makes it easier to set up a local Dreamweaver site so that you can start building web pages right away. The remote server category lets you specify your remote and testing servers in one view.
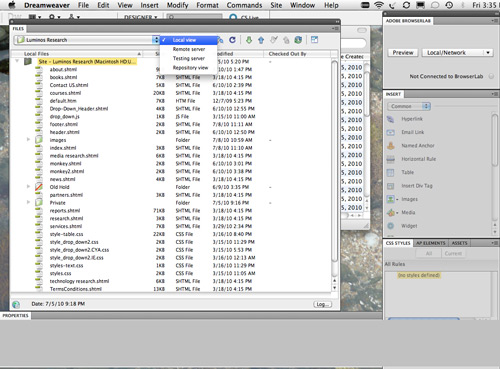
Note the picture above. One thing missing for me however is in the old “Site Files” window, now replaced with the “Files” window. In previous versions, you could display your local files and the remote files side by side in a “Site Files” window. The new version lets you see one or the other through a pop-up selector (see image), but not both at the same time. I found it very handy to be able to see both my server and my local files, because sometimes I “cloak” (prevent files from syncing) files or folders, but still want to see what is in them.
Site-specific code hints
The Site-specific code hints feature lets you customize your coding environment when working with third-party PHP libraries and CMS frameworks such as WordPress, Drupal, Joomla!, or other frameworks. Theme files for blogs and other custom PHP files and directories can be included or excluded as sources for code-hints.
Subversion support enhancements
Dreamweaver CS5 expands support for Subversion (SVN) (a popular source management tool), allowing you to move, copy, and delete files locally, and then synchronize changes with your remote SVN repository. The new Revert command allows you to quickly correct tree conflicts or rollback to a previous version of a file. Additionally, a new extension allows you to specify which version of Subversion you would like to work with on a given project.
While this is a great addition, it came at a price. Visual Sourcesafe integration has been deprecated in CS5, which may upset some Microsoft users.
Deprecated features
We should also cover some of features that are no longer supported in this version of Dreamweaver, just in case you counted on some of them. The following features have been deprecated as of Dreamweaver CS5, are no longer supported, but typically, they have been replaced with newer functionality, or simple are no longer needed, or were hardly used. So far, none of these have caused me any grief, but if you use any of them, you may want to be sure there is a work around for you.
Rather than go into detail on each, you can find more info on the Adobe website if you truly need to know more on each:
- Accessibility validation report
- ASP/JavaScript server behaviors
- Check Browser JavaScript behavior
- Connect to FTP/RDS server without defining a site
- Control Shockwave or SWF JavaScript behavior
- Create Web Photo Album
- Hide Pop-up Menu JavaScript behavior
- InContext Editing Manage Available CSS Classes
- Insert FlashPaper
- Insert/Remove Mark of the Web
- Microsoft Visual Sourcesafe integration
- Navigation bars
- Play Sound JavaScript behavior
- Show Events menu (Behaviors panel)
- Show Pop-up Menu JavaScript behavior
- Timeline JavaScript behaviors
- Validate tags
- View Live Data
Problems and Issues
All was not perfect with my CS5 installation (partly my fault), and I should mention one big thorn in my side.
Adobe, unlike any other application I have ever installed since the very first Mac I owned in 1984, requires that you do not move any of the application folders or files to any other location than the ones where the installer puts them. So why would you care? Glad you asked!
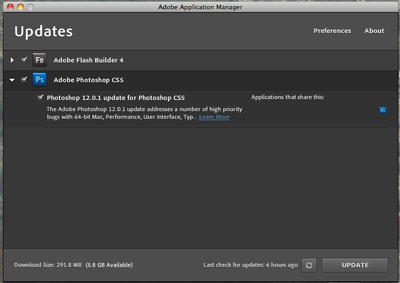
The installer for the full package of CS5 dumps over 20 items into your applications folder, all at the root of the application folder, all towards the very top of that folder (because they begin with “Adobe” of course), meaning your Application folder gets even longer and more cluttered. And if you move them, which you have always been able to do in the past with any app on the Mac, the updater that Adobe includes for CS5 program updates will fail.
This is strange, because if you have moved them, the app itself will warn you that you moved it when you next launch it, update itself to run correctly, and does not care anymore. But it does not seem smart enough to update the updater itself, so that program fails to update any moved application.
One of the stronger points of the Mac OS over others is that the OS usually never cared where the application file(s) lived. You could rearrange your Application folder any way you like, and I often did. For example, I create an Adobe folder, a Communications folder, etc. So after everything was installed, I moved all 20 of the Adobe folders for all the apps into a single folder called Adobe CS5, so now my Apps folder is less cluttered.
As I said, each application, when launched, warned me that the file had been moved, but did a quick update, and worked fine after that. So I thought all was OK. But when the automatic updater tried to run sometime later, it indeed listed apps that needed updating, but upon pressing update, it eventually failed saying it could not find the apps. This was, of course, AFTER spending a long time downloading the updates. Even Microsoft’s Office updater just searches the disk to find the location of the files if moved, so this surprised me greatly especially given that the app itself had fixed the moving of the files.
In my case, in order to get the automatic updater to work again, I had to move everything back to where they were originally installed, and then launch each moved app that had been previously launched in the new place to once agin fix their locations. Then and only then did the updater work correctly. This is a serious flaw in my view, one I hope they fix soon. That said, if you leave everything alone, this will never bother you. And if this is the only major problem I have found so far, then Adobe has done quite well in my view.
Fix that updater, and please bring back the old Site Files viewer.
No Site Files Viewer?!?!
I live in that side by side view.
That killed this upgrade for me.
Rich
I am trying to find if there is a way to make it reappear, but all I see is that pop-up letting you select one or the other. It may be in there, I just have not found it yet. I will repost if it makes an appearance. That said, all the other features really do make this a worthwhile update.
The other features look good, but I use this application every day.
I use that side by side view almost exclusively.
I won’t upgrade if it is no longer available.
Please let me know if you find it.
Thanks
Rich
Is there a dot in the middle of the left hand vertical border of your files window? Hover on the dot with the mouse cursor until it changes to a double arrow symbol, then drag the curtain divider to the right. You must to set up a remote site and a local site to see anything useful.
Hi Grave,
Nope, there is no such dot. If you hover over either the left or right edge of the window, you get a symbol, but it simply resizes the window. I cannot find a way to show both local and remote at the same time.
I have sent a request to Adobe, but so far, no answer.
WAIT!!! I FOUND IT!
OK, it is there, but I had to look deep to find the way.
Rich, it can be done. In the very upper right of the window is a very small menu indicator. Clicking on it offered some choices, one of which was to “Expand” the window. Clicking on that returned it to the side by side view I was missing and really wanted.
Oddly, however, after expanding it, the small menu item disappeared! 🙂
Good work Owen!!!
Now I can consider the upgrade…..CS3 runs kinds crappy on my Mac Pro. I hope this upgrade improves the performance.
Thanks
Rich
Sorry to be so thick, but I am having a nightmare and, although a designer, I am not a tecchie and glaze over, so be kind! I needed to delete a page on the remote server. In my previous Dreamweaver versions, I simply right clicked and the edit menu came up and ‘delete’ was on there. Now, in CS4 and 5, I can’t find a delete button anywhere!!!!
Please can someone give me a really simple explanation and tell me what to do?
Thanks, so much.
Well, there is an easier way using what we discussed above.
* Open the file browser as described (Window->Files, or Command-Shift-F).
* If all you see is the “local view”, either use the pop-up to see the remote view, OR, as mentioned above, click the little icon that looks like a box inside a box on the right upper edge of the window. This should expand the window to show both remote and local files.
* Click the little button that connect to the remote server (looks like to cable ends together with a dot. It is the first icon on the left.) This should now fill in the remote file window so you can see all the files.
* Now, select the file you wish to delete (single click it to highlight it) and hit the Delete Key on your keyboard.
* A dialog should pop up and ask if you really want to delete the file, and you can say yes to get rid of it.
I was surprised that the Delete file menu item went away as well, but I guess most people are now used to just hitting the Delete key.
Hope this helps.
-Owen-
I recently bought DW cs5 for mac. I edit my web site remotely. But I cannot figure out how to get access to my remote site with this software. With cs4 for Windowns I just went to the manage sites dialogue box. How do I get there?
Hi Jim,
Read the comments above yours, because I could not find it either at first. If the previous comments do not do it for you, let me know.
-Owen-