
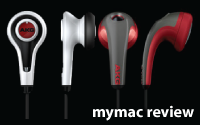
Because you must try before you buy, make sure that wherever you purchase or audition AKG’s earbuds you have sufficient time to determine if the fit is good.
Month: August 2009
Update to Snow Leopard
I had picked up my copy of Snow Leopard yesterday afternoon from the Apple Store closest to me. The store was really busy and
Read MoreMyMac Podcast 255 – Listener Invite – GazMaz

Download the show here and subscribe in iTunes
Guy, David, and Tim welcome Gary Malpas (GazMaz) to the show as this weeks Listener Invite. What happens when a Mac users buys a stolen Macintosh in the U.K., getting hooked on the Mac, Facebook, and a lot more is discussed in a fun and light show.
OWC USB to DVI/HDMI/VGA Display Adapter
Please review our show in iTunes!
Links from the show:
GazMaz.com
Fastpack 250 Backpack – Review
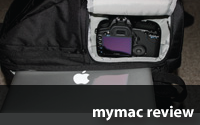
One thing is for sure, Geeks love computers and computer related technologies. Therefore, many if not most Geeks are in to digital cameras in general and DSLRs in particular. When it comes to carrying along these devices in one bag, there are very few choices. Lowepro is one of the big dogs in this space. Their Fastpack 250 was designed to carry along your trusty DSLR and your Mac notebook (well you could probably carry a PC in there too, but this is MyMac.com). Read on and find out if this backpack is Geek worthy.
MyMac Podcast 254 – Jason Hiner

Download the show here or via iTunes
This week we interview Jason Hiner, Editor in Chief of the TechRepublic. You may hear Jason on other podcasts talking about the weeks tech news and events, but we turn the table on this show and ask Jason questions about Jason!
Please send all feedback to feedback@mymac.com
Review our show on iTunes Please!
Sponsor – Other World Computing
Links from the show:
TechRepublic.com
Apple’s gigantic new data center foreshadows a cloudy future
Pagehand – Review

I have never been a Microsoft Word user. In fact, ever since I have owned a Mac I have used Appleworks/Clarisworks or Pages. However, I recently discovered a new kid on the block called “Pagehand.†In fact my last few articles here at MyMac (including this one) have been type in Pagehand.
inMotion MAX – Review
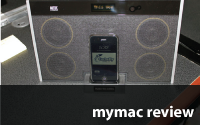
As indicated by its name, the Altec Lansing inMotion MAX is designed from the ground up to be inMotion. This svelte and sexy portable audio system was born to run. In the tradition of its older sibling (T612), the inMotion MAX adorns the "Made for iPod" and "Works with iPhone" designations. Read on and discover if the inMotion MAX measures up to the high standards set by the T612.Â
Macally ECOFAN Bamboo Cooling Stand for Laptop – Review
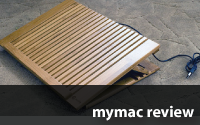
The first thing that attracted me to the new Macally ECOFAN Bamboo Cooling Stand was that it was made from bamboo. Bamboo is not a wood, but a grass. It has incredible strength, both tensile and hard strength that is, pound for pound, stronger than steel. It grows very fast almost anywhere that’s temperate in climate, and is completely biodegradable, Hence, the name ECOFAN.
iPWR SuperPack – Review

Are you spending lots of time charging up all of you handheld devices like I am? Running out of power on the road is a bummer. There are many portable battery add-ons for sale, which makes choosing the right one tough. Read on to find out why the iPWR may be a good choice for you.
MyMac Podcast 253 – Listener Invite – Justin to the Rescue

Download the show here, and via iTunes
Justin Bryce is our guest for the Listener Invite this week. We discuss the PalmPre and iTunes, Snow Leopard, and support for older (PowerPC) Macintosh computers. Host – Tim Robertson, Guy Serle, and David Cohen.
OWC eSATA ExpressCard/34 Adapter Price: $19.99
Review our show on iTunes Please!
Read MoreIT’s 1984, AGAIN!
In recent weeks, the digital world has been turned upon its collective ear amidst the outrage which has centered around the actions of Amazon regarding its e-book reader, the Kindle. Like a scene out of one of the many epics chronicling the despotic actions of the Third Reich, Amazon, both metaphorically and electronically, stormed into the homes of its citizens in the middle of the night and removed material it deemed unsuitable for its citizenry. Since that fateful night, a firestorm of controversy and debate has raged among those who see a, “Bad Moon Rising.” (Cue CCR)
MyMac Podcast 252 – Release The McCracken

Download the MP3 here, or subscribe via iTunes
This week, we interview Harry McCracken, creator of the Technologizer website. We also look at the FCC investigation of Apple and AT&T over the Google Voice app rejection, as well as the delay of StarCraft II. Hosts – Tim Robertson, David Cohen, and Guy Serle.
Drive Genius 2 + Data Rescue II
Special Bundle Price: $109.99
Review our show on iTunes Please!
Links:
Technologizer.com
Macspiration 115 – Verizon FIOS working with EyeTV Hybrid

I recently made the switch from Comcast to Verizon FIOS and I love it. However, one of the big issues I had after the switch was getting EyeTV and my EyeTV Hybrid working correctly. After searching the internet and the Elgato forums, I found a solution.
Trend Smart Surfing for Mac 1.0 – Review

Offering innovative, up-to-the-minute protection from social engineering threats as well as viruses and spyware, Trend Smart Surfing for Mac is a “set-it-and-forget-it†security suite that’s designed for Mac novices yet offers plenty of configuration options for experienced users.
N+ Wireless Router with USB Storage Port – Review
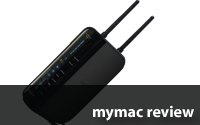
Strictly speaking, this Belkin unit is not a NAS router, but I’m not complaining, because it works.
Macally’s Bluetooth Keyboard and Mouse – Review

I have been looking for a Bluetooth mouse and keyboard for a while without success. The problem? Every Bluetooth mouse I find is notebook size and every keyboard is either not Mac compatible, has too many bells and whistles and is enormous, or it is missing the number pad (Apple). Macally has solved all of this with the BTMouse2 and the BTKey keyboard.