
Neat Receipts for Mac
Company: Neat
Price: $229.95, on sale $199.95
http://www.neatco.com/products/neatreceipts-for-mac
I like to keep track of my expenses and bills using Quicken. I put EVERYTHING into Quicken. But one of the major drawbacks of doing that is getting all my receipts into Quicken easily, so they tend to pile up. Currently, I must hand copy each and every one of these little pieces of papers into Quicken, and then I am left with a large box of little slips of paper, which take up room and are not easy to manage over time. There has to be a better way.
And now there just may be a better way of keeping track of your documents, business cards, and receipts. Save them on your computer. And this cool little product will make that job much easier. I was given a chance to review NeatReceipts for Mac by Neat, and I must say, this little gadget made the job of getting data into my computer and Quicken easier, and let me throw away all the little pieces of paper too.
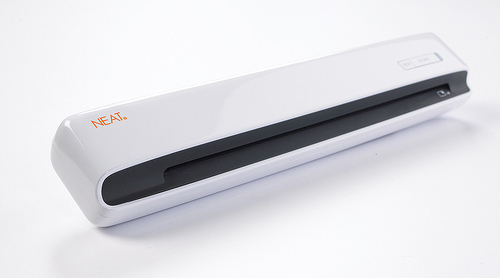
The NeatReceipts for Mac is a small, slim USB-powered scanner (10.8â€W x 1.6â€D x 1.3â€H) coupled with some clever software. The scanner can accept documents as wide as 8.5â€, and just about any length, and scans at a maximum of 600 dpi. It can scan 3 to 4 small receipts per minute, or an 8.5 x 11 sheet in around 15 seconds in B&W, and 35 seconds in color. Neat recommends a G4 or better processor running 10.4.11 or later, 512K of RAM, and at least 1.25 GB of available space for program and user data. And, of course, a DVD or CD drive to allow installation of the software from the included CD.
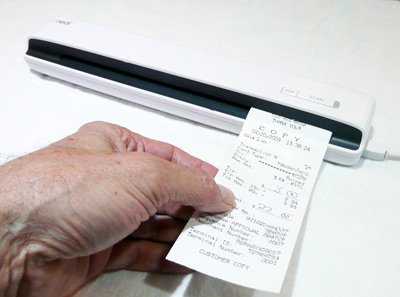
After a simple install of the software, and a quick calibration of the scanner, you are ready to start scanning your receipts and documents. Scanning is quite simple actually, just insert the receipt or document face down into the scanner and press the scan button on the top of the scanner. The receipt or document will be scanned into the software, where it is analyzed, and placed into one of three categories: documents, receipt, or contact. If the automatic category is wrong, the user can easily change it.
After being analyzed and categorized, if the program determines the document was a receipt or a business card, an OCR pass will be made on the data to attempt to extract the content to fill in a number of items in a set of fields for each scan type. Each of these fields can then be changed or edited by hand if needed. Sadly, in my tests, they needed editing way too often, as OCR errors were commonplace.
When the program is first installed, your contact database is imported into the program. Scanned business cards will automatically fill in OCR data into the proper text fields, and then this scanned card can then be dragged directly to your contacts database from within the program. Sadly again, almost all business card scans required some editing before saving. The OCR was not very good here either, even on simple cards.
And, of course, you can scan any number of larger documents into your computer as well. And while the program says it performs an OCR on these large scans, I could find no way to access the OCR results on my machine. There is also a PDF button on the top of the scanner. Pressing this will pop-up a SAVE dialog on the computer, prompting for a place to save the file, and then scan the document into a PDF file saved at that location. The process here too says it is doing an OCR scan, but again, that data is not available as far as I could tell.
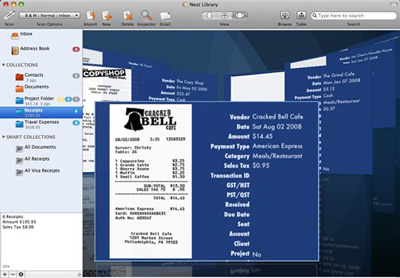
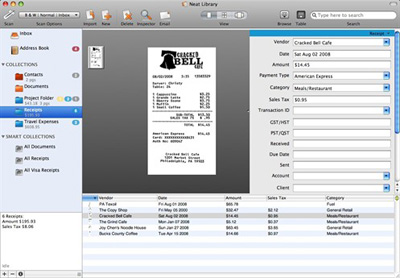
The program offers several view modes for reviewing scanned documents. The first shows an “Item Viewâ€, a three-part screen with a list of receipts, the OCR text data fields, and an image of the document. You can also choose to see an “Icon View†grid of thumbnails of document, and my favorite view, an “Image flow†display, showing the original scan and the text fields alongside in a cover-flow style display.
As for getting receipts into Quicken, my original goal, the process is simple, but not as straightforward as it could be. First, before scanning, you should create one or “collections†for scanned receipts. This will make keeping track of receipts easier, and allow you to separate receipts into functional groups, such as personal and business, for example, making separate exports to different Quicken files easier as well. As receipts are scanned, there are several text fields in the program for each receipt that you may need to fill in or edit by hand. The program will make a guess at these fields, and seems to learn with time, but may still need editing. One field, called “Category†must be filled in to match exactly the category used in Quicken (for example, “Business:mealsâ€) for each receipt. The program will remember these categories as you add them, making scanning of future receipts much easier. Once scanned and edited, simply drag each scanned receipt into the proper collection.
After scanning all your receipts, you now need to export them to Quicken. When ready, you can export each collection all at once, or selected receipts only. If you pick a collection, the program remembers which receipts have been previously exported in that collection, and gives the user the option of exporting only new ones. When you select EXPORT, you will be presented with an Export Dialog. Choices for export are PDF, Quicken, or CSV files. The first and last are fairly obvious, but here, we need to select Quicken.
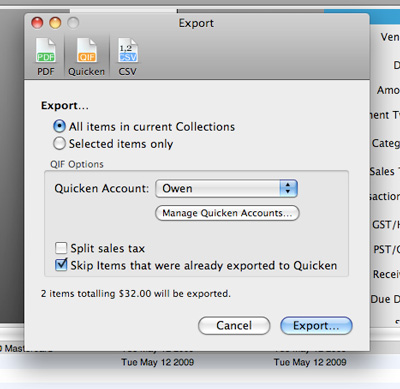
In this dialog, you must add one or more Quicken “accounts†to the export dialog to specify which account registers in Quicken the exported receipts will be imported to. Again, this name must match exactly the name in Quicken. These are also remembered for later use and can simply be selected next time. Press export, and the program will create a Quicken QIF file. This file can now be imported into Quicken using Quicken’s import function. Note that if the “account†field created in Neat does not exactly match any in Quicken, a new account register will be created in Quicken when you do the import.
While this all sounds confusing, it actually gets easier as you use the program more, and exporting receipts goes fairly quickly after a few sessions as more and more data is remembered by Neat.
So, how did this all work in reality? I had a stack of about 100 receipts waiting on my desk, ready to import to Quicken. So, I created a few collections, and starting scanning receipts 15 at a time. The scans went fast enough, but unfortunately, the OCR was not very good, and a lot of data needed to be corrected or added by hand. Once I set up the accounts and collections the first time, successive groups of 15 did indeed go faster than the previous group. The most annoying part was having to pause the scanning to switch to Quicken look up the exact category spelling I needed for the current receipt. However, over time, this too became less of a problem as more and more categories were added to the Neat program. However, I am not convinced this was actually any faster than if I had hand entered the data directly into Quicken by hand. But at least I now had scans of all my receipts, and no longer needed to keep the slips of paper.
All in all, this is a cool little device that will make handling various pieces of paper easier, and help remove the clutter. The more you use it the more it learns, and use becomes easier over time. Its small size means leaving it on your desk should not be a problem, so scanning receipts every day should be a fairly easy way to manage receipts, rather than collecting many for batch input. That said, there is room for improvement here. Sadly, the OCR needs improvement, and makes way too many errors, even on simple cards and receipts, meaning way too much hand editing. I would also like to see the program actually import categories from Quicken by reading my Quicken file, rather than having to add them one at a time as I need them, thus saving time and eliminating one large source of data error. Also, the program tends to crash quite a lot, and while I did not see any data loss, it is annoying. Lastly, it would be great if the buttons on the top of the scanner would launch the application when pressed. Currently, they do nothing if the program is not running, meaning I have to find the app and launch it each time. Lastly, this is a bit expensive for just a scanner in my opinion. Granted that it has some cool software, but for this same price you can buy an HP All-In-One printer that has a scanner, but also prints, copies, and faxes too and also comes with some cool software.
Pros: Small size, fairly fast scanning, no power brick needed, and direct export to Quicken.
Cons: Too expensive, poor OCR causing too much hand editing, crashes too often, and no Quicken category import.
email – MyMac Magazine – Twitter – Advertise – Reviews Archive – Podcast
![]()
Leave a Reply
You must be logged in to post a comment.