
Drive Genius 2.1
Company: Prosoft Engineering
Price: $99.00 ($59 Upgrade from Drive Genius 1.x)
Requirements: G4, G5 or Intel Mac; 1 GHz processor or better
http://www.prosofteng.com/
Hard drive utilities are used to maintain, repair and configure hard drives. Since OS X already comes with a basic hard drive utility called Disk Utility, you might wonder what’s the point of buying a third-party program like Drive Genius.
The short answer is that third-party disk utilities offer more power and versatility. They provide more ways to optimize disk performance than Disk Utility, fix problems that Disk Utility can’t, and are more flexible than Disk Utility in the range of options available when formatting new hard drives.
There is a flip side to a program that offers power and versatility though. The more options there are, the more danger there is of the user choosing the wrong tool or using it in the wrong way. With hard drive utilities this risk is particularly dangerous: with the press of a few mouse buttons, a careless user can lose data, potentially irreversibly!
So for a disk utility to be safe as well as useful, it needs an interface that steps the user through the tools, making it clear what each one does, and preferably warns them before doing anything stupid.
Installation
The installation process couldn’t be simpler: all you need to do is drag the application from the CD to the Applications folder. It doesn’t seem to matter whether you choose the main Applications folder or the one in your Home folder. The first time you launch Drive Genius you will then be prompted for a serial number. Once that’s successfully entered, you’re presented with the main Drive Genius window, of which more will be said shortly.
But before looking at the interface, it should be stated clearly that several tools in the Drive Genius toolbox cannot be used on the hard drive with the currently active operating system. Normally this is the disk inside your computer, and the the copy of Drive Genius installed on your computer can only be used to examine this disk, not fix it. On the other hand, you can use your installed copy of Drive Genius to repair or format any other Mac-formatted hard drives connected to your computer via USB, FireWire, ATA or SCSI.
However, unlike Disk Utility, you cannot use Drive Genius to produce FAT-32 formatted disks or partitions usable by Microsoft Windows. Whether this matters to you will depend on how much you use Boot Camp or virtualization software such as Parallels Desktop. Perhaps more surprisingly, Drive Genius doesn’t support iPods, even iPods with hard drives as opposed to flash memory inside them. You can certainly use some of the tools to examine and perhaps even optimize your iPod; the disk fragmentation tool for example works without any problems at all. But you can’t use Drive Genius to repair or format an iPod.
The main Drive Genius window is an animated Tool Arena from where you can launch whichever tool you need.
User interface
Prosoft Engineering products tend to sport distinctly non-standard interfaces, and Drive Genius is no exception. In this case, while some aspects might be mere eye candy, on the whole the interface does in fact make some kind of sense.
When the user launches the application, the main Drive Genius window contains a gently curved, three-dimensional arrangement of six tool icons followed by a green arrow. Clicking on the green arrow ‘spins’ the view, so that six additional tool icons revolve into view. A curved yellow arrow spins you back. When the mouse pointer moves over a particular icon, an animation moves that icon into the centre of the window and the name of that tool appears above it.
It’s hard to see how Drive Genius could be any more explicit about the risks involved when using certain tools!
This arrangement of tools in what Prosoft calls the Tool Arena is a bit weird, but it works. The first six tools are probably the ones the majority of users will use most often. These tools are all to do with repairing and analyzing disks. The second six tools are mostly concerned with editing, erasing and duplicating disks. These tools are likely to be used a lot less frequently than the others, so placing them out of view does help to keep the interface uncluttered. This second set of tools also includes those likely to cause the most damage if used improperly.
Once a tool is launched, the window changes to suit whichever tool is in use. A column along the left of the window lists the available hard drives, while most of the rest of the window is given over to various options, status displays, and of course the buttons used for starting or canceling operations.
While the tools are running an animation plays, but before that happens, a splash screen will appear if the chosen tool has the potential to cause data loss. This prevents the user from going further without explicitly choosing to do so.
Further reducing the risk of misuse, a few lines of text at the bottom of the Drive Genius window explain the purpose of each tool, both within the Tool Arena window and once that particular tool has been launched. If that still isn’t enough information, a link under the Help menu opens a PDF version of the user manual.
Personally, I much prefer PDF versions of user manuals to HTML files or standalone applications; PDF files are easy to read, easy to search, and easy to print. So while the lack of a printed manual is always regrettable, in this instance, it’s no big deal.
The tools
The six tools that appear in the first set of six are a disk information tool, a defragmentation tool, a disk space recovery tool, a disk repair tool, a benchmark testing tool, and a byte-by-byte scanning tool that can reveal certain types of hardware problem.
The second set of tools contains a tool for checking disk integrity, a tool for initializing disks, a tool for partitioning disks, a tool for duplicating disks, a tool for securely erasing data, and a sector editing tool.
All of the tools provided will be useful to certain people, though some will have much wider usefulness than others. At one extreme, the sector-editing tool Sector Edit is a very specialized tool that the vast majority of Mac users will have no use for at all. But several tools will be useful to almost all Mac users, and those are the ones worth looking at in more depth.
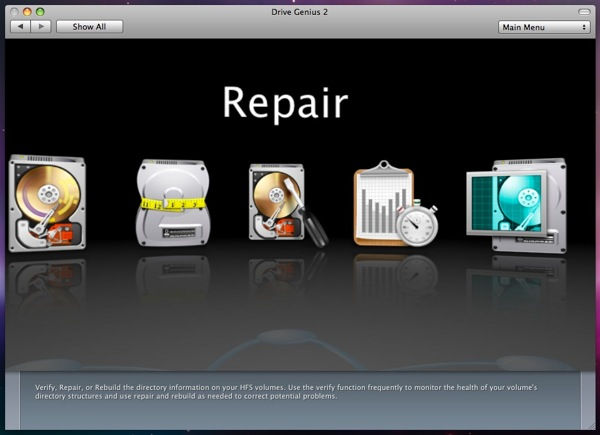
Obviously the disk repair tool, Repair, is of premier importance. Superficially at least it is similar to Disk Utility, running in a two-step process that involves a verification stage to begin with, and then the actual repair stage afterwards. It’s difficult to know what the differences are between Repair and Disk Utility, since most of the words that come up in the status windows of both applications are the same.
The disk defragmentation tool Defrag works well, but Macs and their hard drives are so fast nowadays that most users won’t find any appreciable difference in speed. It used to be that waiting for your Macintosh to find space on a fragmented hard drive was significant bottleneck in terms of speed, but this doesn’t seem to be the case anymore. The process of defragmentation does take some time: expect to set aside a few hours for Defrag to perform its magic. Whether or not you’ll ever make up that time through having a much faster Mac is debatable!
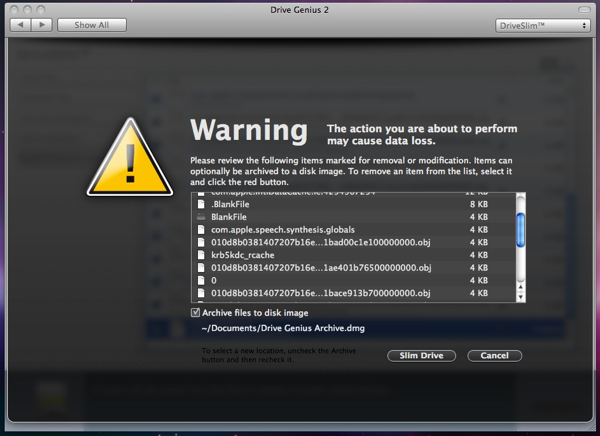
DriveSlim is intended to recover disk space by removing duplicate and unnecessary files. For obvious reasons it’s wise to back up your data before using this tool, but beyond that, it seems to work well.
By default, DriveSlim flags five types of file as being possibly worth deleting: large files that haven’t been used for more than 30 days; duplicate files; unused localization files such as language files; the redundant parts of Universal Binary applications; and temporary (cache) files. You can choose whether or not to include each of these categories in your search, and at least some categories have configurable settings, such as minimum file sizes or the time since the file was last accessed.
Although not available by default, advanced users can switch on a ‘hidden’ setting in the Expert Preferences panel that makes it possible to choose a sixth type of file as well, orphaned files.
Once DriveSlim has complied its list of possibly wasteful files, it arranges them into the five (or six) categories allowing you to sort through them and choose which ones, if any, you’d like to delete.
The partitioning tool, Repartition, is another useful tool. Unlike Disk Utility, you can use Repartition to resize your hard drive without formatting it first. This is obviously very handy if you need to partition the built-in hard drive in your Macintosh and don’t want to go through the performance of formatting it, reinstalling the system software, and then reinstalling all your applications and files.
The last tool worth mentioning is Shred, a tool that securely deletes unwanted file. OS X 10.5 does of course come with a built-in Secure Delete option, but it’s a one-size-fits-all approach, and Apple are (for some reason) a bit cagey about precisely how secure Secure Delete actually is. Be that as it may, Shred provides Mac users with a quick way to delete files, folders or volumes at a variety of security levels including US Department of Defense standards.
Bugs, performance and stability
On the whole Drive Genius worked flawlessly. The only real problem was a peculiar one: on my 1.83 GHz MacBook Pro, the copy of the application on the hard drive refused to get past the initialization screen when I was logged into the administrator account. It ran just fine from the DVD as well as from any other accounts, including guest accounts. Clearly there was a conflict between the application and something in the administrator’s home folder, and while working with the Prosoft engineers, our suspicions were directed at the Safari 4 Beta. In this case, it isn’t the browser itself that causes problems, but with the Java core Safari 4 installs. After reinstalling the operating system and sticking with the currently shipping version of Safari, Drive Genius launched and worked perfectly.
Performance will vary depending on the tool and the hardware, but even in the worst case situations things weren’t too bad. In the case of a 1 GHz PowerBook G4, defragmenting a moderately fragmented 60 GB drive took a bit over two hours; while that sounds a long time, it’s actually about the going rate for what is a complex and laborious task.
One last thing: if you buy a copy of Drive Genius 2 that’s been sitting on the shelf for a while, it might not boot the latest Apple hardware. If that’s the case, contact Prosoft within 30 days of purchase and they’ll send you out a free replacement DVD. Otherwise, you can download the DVD Boot Image, though at a charge of $5.
Summary
It’s hard not to like Drive Genius. It does precisely what it should do, delivering a wide range of useful tools in a safe, simple to use environment. Couple that with a very good reputation for after-sales service, and Drive Genius looks a lot like the disk utility of choice for a great many Mac users. Highly recommended.
email – MyMac Magazine – Twitter – Advertise – Reviews Archive – Podcast
![]()
Leave a Reply
You must be logged in to post a comment.