
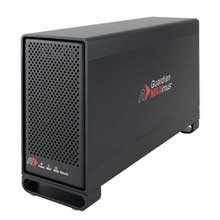
Guardian MAXimus 500 GB Model
Company: NewerTech
http://www.newertech.com
Price: $429.99
The very first article I wrote for MYMAC.COM was about the main internal hard drive (HD), in my G5 Mac, failing and what I had to do to replace it. I was backing up, but due to a variety of reasons, I had not backed up that drive for several weeks. While I got back about 98% of my “stuff,†I still lost some pictures and other items I wish I had not lost.
Nowadays, I religiously back up my internal HD every week. I live by the following mantra, “It’s not IF the HD will fail, it’s WHEN.†All things mechanical will fail at some point. However, I wish I could back up more often, and the process I use does take a little time. I clone my drive to two separate external HDs, which is why I am always on the look out for a better process.
NewerTech recently introduced the Guardian MAXimus RAID series of drives for backup and performance storage.
What’s a RAID?
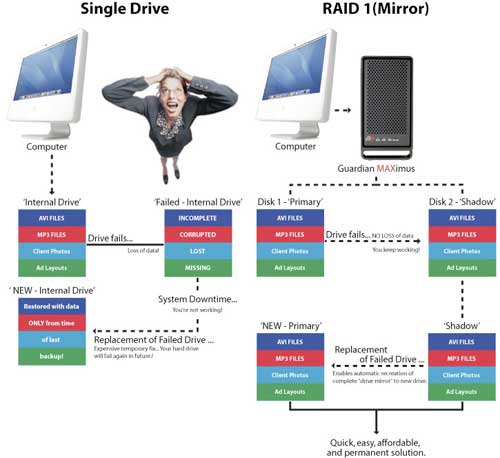
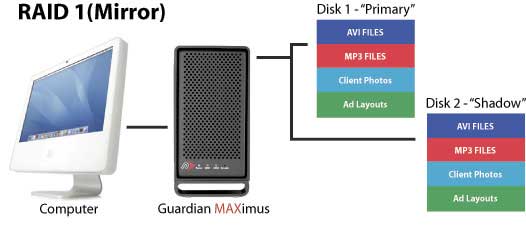
No, it’s not a bug spray. The acronym “RAID†stands for “Redundant Array of Independent Disks.†This refers to multiple hard drives contained in a single enclosure for the purpose of sharing or replicating data among the drives. Great. What does THAT mean? In plain English the data is simultaneously copied to two hard drives so that there is an exact copy should one drive fail. So? Well, if you are a back-up nut like I am (and you SHOULD be) that means all you have to do is tell your back-up program to back up your HD once and, with the Guardian MAXimus, you’ll have two copies.
Why are two copies of my HD needed?
Well, you can make as few, or as many back-ups as you’d like, but considering what is on my HD, I feel better having two copies because HDs will fail. Have you ever seen someone on the road with two flat tires? It’s not often, but it does happen.
What’s in the box and unit description:
The Guardian MAXimus comes with everything you need to get up and running very quickly. The back of the Guardian MAXimus has two Firewire (FW) 800 ports, one FW 400 port and one USB 2 port. There is a power switch on the back, and a jack for the plug that comes with one of those power supply boxes connected to the wire. The body of the Guardian MAXimus is black anodized aluminum with the “Guardian MAXimus†logo etched into each side. It has a silicone type pad on each foot, and it’s a handsome enclosure.
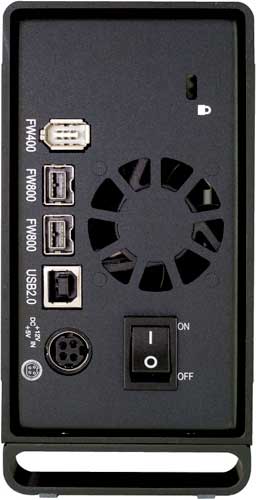
You also get all of the power plugs and cables, a short FW 400 cable, and a FW 800 cable, plus a USB 2 cable. This drive uses the Oxford 924 chipset, so it’s fast.
Across the front are four LEDs labeled as “Power†(we know what that one is for) “HDD1,†“HDD2†and “Rebuildâ€. We’ll discuss these three other LEDs a bit later. This drive also comes with the following software for the Mac; Prosoft Databack Up 3 ($59 value) and Intech SpeedTools ($89.95 value).
Set-up and operation:
It could not be easier to get the drive up and running. Plug in the power, connect via one of the three types of connections, and turn it on. An icon pops up on your desktop immediately. Even though there are two drives in the Guardian MAXimus, you only see one drive icon. This is the beauty of a RAID. Copy to that one drive, and the RAID simultaneously copies to the second internal drive giving you two copies.
I used the included Prosoft program to clone my HD to the RAID. The initial copy process took several hours to copy the 112 GBs of data on my drive via FW 800. After that, subsequent “incremental†back-ups took minutes. I prefer a CLONE back-up and this is why: A clone of your HD will enable you to boot up from the RAID if you suffer internal drive failure within your Mac. I could go into a long discussion of back-up strategies, but that is outside the scope of this review. Once booted up from your clone, you can go right back to work and replace your failed internal HD later. Then it’s simply a matter of cloning that Guardian MAXimus HD to the new internal drive you just installed in your Mac. I will admit that the Prosoft software is very versatile and allows all kinds of back-up configurations, clone, versioned clones, folders, files, whatever.
So I set up the Prosoft program to back up my HD every three hours—and it did! Imagine, an internal HD failure and all you risk losing is the last three hours of your work—and it made the back-up while I was working. Very cool.
The three LEDs:
The first two LEDs labeled HDD1 and HDD2 blink green when the drives are writing data. If a drive fails, the corresponding LED turns red. There are four screws on the bottom of the enclosure, which once unscrewed, allow the body to slide off revealing the two HDs inside. Replacement is that easy. Once you replace the failed drive, the RAID goes to work and the “Rebuild†LED lights up as the remaining good drive rebuilds the new drive to make an exact duplicate.
Brian from OWC tech support describes the process this way:
“If a drive fails, the LED for that drive will turn red. All that has to be done is remove the old drive and replace it with the same exact size, brand and model hard drive. Since the mirror does a block for block copy (safest method), there is no need to format it. The first time you turn on the enclosure with the new drive installed it will automatically start the rebuild process. During this process the replaced drive LED will be flashing from red to orange and the rebuilding light will be green. If the rebuild fails, the rebuilt LED will turn red. Because it is a block to block copy it can take several hours to overnight depending on the size of the hard drives inside.â€
I asked, “Does it really have to be the exact same drive.†Brian replied, “Yes, it has to be the exact same model, you always want that when you are using a mirror.†He also included a link to the OWC product page, which tells you what drive mechanism you have in your enclosure. Mine was a Seagate. http://eshop.macsales.com/search/guardian
Conclusion:
This is a sweet set-up for a virtually problem free back-up strategy. One that will take little time after the initial copies are made.
I marked the rating down a little for a couple of reasons. The included instruction sheet leaves you with more questions than answers. I was able to contact OWCs excellent tech support, Brian, to get some answers to what I thought were basic questions that I think should have been included in that instruction set. The included FW 400 cable is another one of those “shorty†cables. This drive series has won the American Photo 2007 Editor’s Choice/Digital Storage and Display award. It comes in configurations from zero GBs (install your own HDs) to 1 Terabyte.
Imagine for a moment that your internal HD has failed. Think of all of your photos in iPhoto, all of your movies in iMovie, the songs you created in Garageband, the emails you’ve saved from loved ones, all of the stuff you’ve created, gone in a flash. Sure, there are some utilities you could buy to recover some or even all of the stuff on that dead HD. However, sometimes when the drive dies, it’s dead. You can’t recover anything, and companies like Drive Savers cost a small fortune and you’d lose the ability to access your stuff for weeks, maybe longer. Do you really want to take that chance? It doesn’t matter what back up strategy you use, just that you have one and stick to it.
I almost lost my stuff, I’ll never take that chance again.
MYMAC.Com Rating: 4.5 out of 5
Leave a Reply
You must be logged in to post a comment.