
I’ve received several positive comments on my use of a written email signature. Nemo suggested I share the technique; to which I responded . . .
Not being flippant or anything. It really is that simple. But then I considered that there were several additional steps after all. Steps that might not be obvious to the regular Mac User.
So . . . let’s break it down to “Mac Simple.”
Step #1 — Write your Signature
Obvious? Sure! But this is where the first potential problem arises.
Don’t write it really big with a ball-point pen. When it’s reduced to the final size, that fine line will all but disappear. Instead, write your FIRST NAME ONLY about four inches wide, with a thick black felt-tip, on a blank sheet of paper.
Why?
a) you don’t want people to have your full, real signature.
b) Four inches is a good size for your signature to be smooth and detailed instead of shaky and blotto.
c) you don’t need to erase a bunch of superfluous stuff.
Step #2 — Scan It In
A little education. Monitors (for which this is designed) are assumed to be 72 pixels (dots) per inch. Print shops want at least 300 d.p.i.
So . . . set your scanner for Grayscale, 33% size, at 72 d.p.i. and scan in your signature. Save it as “Signature” where you can find it. (Preferably your Documents Folder)
Why?
a) You can do it in color if you want to, but this way the file size will be smaller. Remember, you’ll be sending this graphic every time you email.
b) At 33%, Your signature will be the right size for your email signature.
c) Don’t save it on your desktop. You want your desktop to be neat and clean. (That will be Mac Simple #2 wherein we’ll show you how to have a messy desktop without having a messy desktop . . . and why a messy desktop is a bad thing.)
Step #3 — Trim it
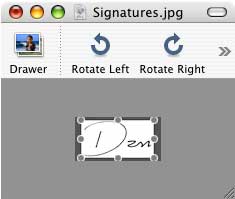
Open “Signature” in Preview. Crop the image by using the cross-hair cursor to select only the part of the image you want; then pull down ‘Tools’ to Crop.
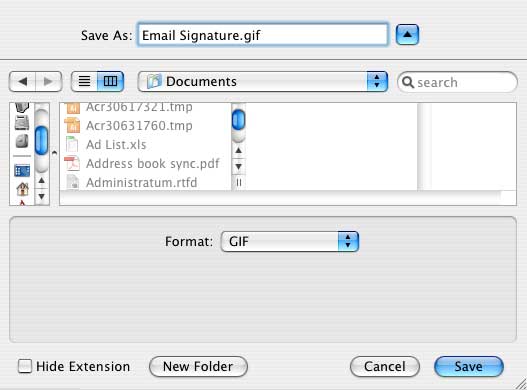
Step #4 — Save It
Pull down ‘File’ to Save As. Title the file “Email Signature” and don’t forget to set the format as ‘GIF’ . . . in your Documents Folder, of course.
Why?
a) If your Documents Folder is list view and sorted by Date Modified, everything we’ve done is at the top of the list and, by definition . . . not lost.
b) Gif files of this type are incredibly small. In the above sample, 564 bytes!
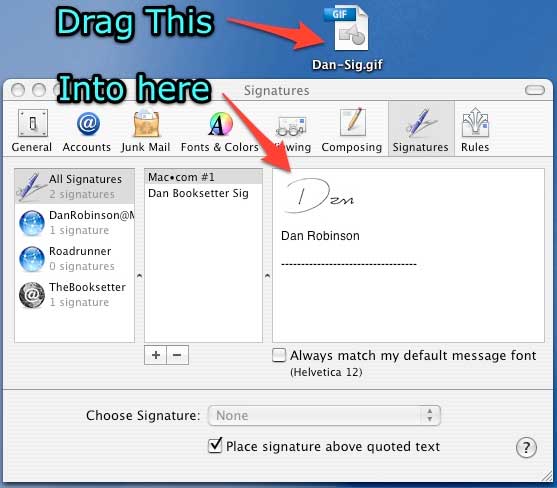
Step #5 — Create Your Signature
NOW we get to actually make your signature.
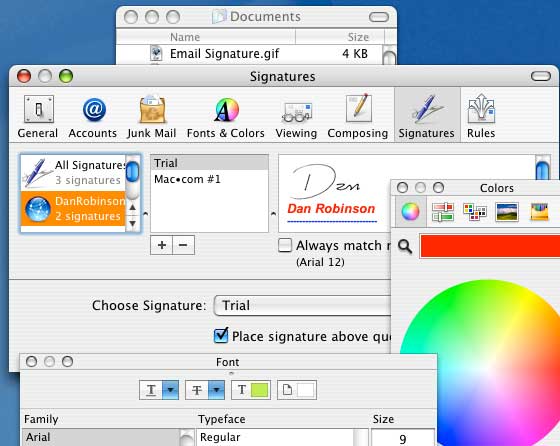
In “Mail” pull down ‘Mail’ to Preferences and choose Signatures
Drag “Email Signature.gif” from the Documents Folder to the right hand pane and type whatever else you may want. Notice you can choose fonts, sizes, and colors for the type. Make sure you use Arial or Times New Roman for your signature fonts.
Why?
a) Yes, other fonts will look classier. But in this case you want everyone to see your signature the way you formatted it. And everyone has Arial and Times New Roman on their computers. Also, many people have ‘Display Images’ turned off on their email. This way, even though your signature image may not show, at least some of your formatting does — unless they have HTML turned off also. In which case you may want to associate with a better class of people — like Mac Users, who are not so paranoid.
b) Special formatting and styles are like Karaoke and HipHop. Just because you can, doesn’t mean you should! I’ll stick with basic black, thank you.
———————————-
That’s it. You now have a signature that graces your emails.
Enjoy,
Leave a Reply
You must be logged in to post a comment.