

My daughter is 6 years old. Many days when she comes home from school, she drops her backpack on the floor and leaves a trail of hat, mittens, & coat to the living room, opens the PowerBook and inserts a CD-ROM or tells the AirPort to dial up the internet. By the time my wife & I are done talking to my sister in law, who brings her home most days, and notice the trail, Katie is well into her game or on whatever web site suits her fancy.
She first started messing around with the Mac with one of those keyboard banger programs when she was 9 months old. As she grew older and showed more interest, she showed more of a desire for using the computer herself. When she was 3, I set her up with her own user account on our iMac and taught her how to use it. It only took a couple run through before she was off and running. It was fun listening to her talking herself through the steps, waiting for me to correct her if needed. “First click on the purple one (Internet Connect), then click the blue button. I see the numbers, daddy! Now I can click on the blue one (Safari).”
Setting this up is very easy, and you should do it if you have young children to keep your stuff secure and to make it easier for your children to use the Mac. These steps assume you have a younger child, your Mac is running Mac OS X 10.4, and that there is only one user account. Older, more experienced kids can be less restricted. Some of these steps may also work with 10.3 but the example screens will look different since Parental Controls was introduced with 10.4. Fast User Switching was introduced with 10.3 and most or all of these steps won’t apply for 10.2 or lower.
First, open the Accounts system preference. Click the padlock and enter your password so you can make changes. Click the plus sign on the lower left above the padlock to make a new account. Enter your child’s name and set up the short name and password. I left the password blank, but if you have more than one child you may wish to give them passwords so they can’t accidentally cause issues with a sibling’s account. Obviously, you will not want to check the “Allow user to administer this computer” checkbox. When done, click the “Create Account” button. If Automatic Login is on and this is the first time you have created an additional account an alert will pop up that states, “Automatic login is turned on. Do you want to turn it off?” Read the explanation & click the appropriate button.
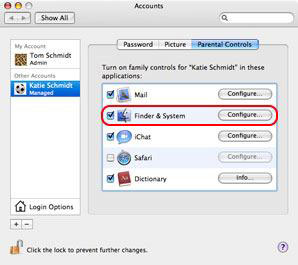
By default the new account is a Standard account with no administrative rights. We’re going to change it into a Managed account. Click the “Parental Controls” tab. Click the “Mail” & “iChat” checkboxes without configuring them to disable Mail & iChat or configure if your children need to use them. Click the “Dictionary” checkbox if you want to prevent your children from accessing age inappropriate content in your Mac’s Dictionary.
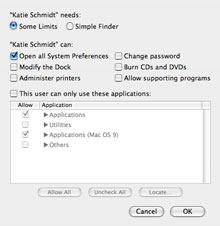
Click the “Finder & System” checkbox, then click the “Configure…” button. You will see that “Some Limits” is already selected. I believe “Simple Finder” dumbs down Mac OS X far too much. All you really need is to set up the Dock for your child.
Set up the “‘My Child’ can:” options as appropriate. I turned on “Open all System Preferences” in case I need to make some adjustment to fix something when my daughter was logged in. Your child won’t be able to make any major changes as those will still require an administrator name and password. I left everything else off, but you’ll want to turn on “Modify the Dock” at least temporarily to set up your child’s dock with the applications used. I turned it back off after setting up her Dock to prevent her from accidentally removing icons from the Dock. “Change Password” is something I simply would not advise turning on. As a parent, if you give your child a password you need to know it just in case. Internet predators are a scary thing, and you can’t check it out if you can’t get in. I wouldn’t bother with “This user can only use these applications” unless you really need to severely limit things for some reason. In most cases it’s just not necessary for the same reasons as not restricting the System Preferences. If you turn on “This user can only use these applications”, then you need to leave “Allow supporting programs” unchecked to keep that back door shut.
I think the best way to set up the Dock is this: If it’s a program your child will use, even if only seldom, put it in the Dock. If not, don’t. You can see there are a lot of icons in my daughter’s Dock. Older children can change their own Dock, but for younger children the Dock is the perfect launcher.


There’s one more thing you’ll want to do in the Accounts system preference. Go to the “Login Options” and turn on Fast User Switching. This allows you and your children to easily switch accounts by using the Accounts menu which will appear on the right side of the menu bar. “Login Options” is also where you will find the previously mentioned Automatic Login setting.
——————————
No More Spaces
Hey Tom,
A coworker has an iBook G4 and the spacebar stopped working. She called AppleCare and they walked her through the standard steps. It does work if she logs in as another user.
I reinstalled the 10.4.8 combo update, repaired permissions, etc., and it made no difference.
Any ideas? Thanks!
Don in Baltimore, MD, USA
Don,
It’s probably a corrupted user preference file, since it works with a different user account. Here’s how to fix it:
1. Quit ALL running programs. It is very important that only the Finder is running. Double check the Dock to make sure only the Finder (and Dashboard if you have 10.4 or higher) has the little triangle that indicates it is running beside it. Do not open any programs until after completing all these steps or you may inadvertently cause additional issues.
2. Move the /Users/(your user name)/Library/Preferences folder to the desktop, rename the folder to UserPreferences, and immediately restart.
3. Try the spacebar again. Go to step 4 if it works. If it doesn’t work, something in Mac OS X is probably damaged. Try reinstalling Mac OS X with the Archive & Install and Preserve Users & Network Settings options, repeat step 3, then move on to step 4.
4. Select everything inside the UserPreferences folder on the desktop and move them back to /Users/(your user name)/Library/Preferences. You will get an alert that says, “An item named [one of the item names] already exists in this location. Do you want to replace it with the one you are moving?” Select the “Apply to all” checkbox and click the “Don’t Replace” button.
5. Restart and try the spacebar again. It should still be working. You can now put the UserPreferences folder that’s on the desktop in the Trash, and you’re done!
——————————
Plug In The Jack, Mac
Dear Tom,
You helped me out with an AppleWorks questions last summer and I thought I’d try to seek out you wisdom once again.
I am interested in using my Mac to record selections from books that I read. Right now I’m in the early stages of this project, but I will eventually want to add voiceovers using sound effects, creating a multi-track recording.
I was using iMovie’s audio, but I couldn’t navigate it, and it kept quitting on me. I wasn’t sure if this was really the right thing to be using, as I’m not creating video for this project.
So the first real question is: what is the best application on my Mac (10.4) for recording a single track solo voice audio? A friend of mine suggested a product, but it cost too much and seemed far beyond what I actually needed. I was hoping there would be something already on my Mac that would do this. Maybe an upgrade of iMovie would be the answer?
Also, I have recordings on cassette which I would like to be able to burn on CD. Can you recommend a machine for doing this with my Power Mac G4?
I await your answer. Thank you.
Rex in Andover, MN, USA
Rex,
Do you have GarageBand? If not, there is an open source (i.e. free) audio editor called Audacity. Either GarageBand or Audacity and a USB microphone and you’re all set.
Since your Mac has a line in port, all you need to connect your cassette deck is an RCA to 1/8″ mini plug cable. Macs without a line in port can use a Griffin iMic to adapt line in to USB.
——————————
Tom has been a service technician with First Tech Computer in Minneapolis, Minnesota, one of the most highly regarded Apple Specialist dealers in the US, since 1994. Previous to that, Tom was the systems manager & a graphic designer for a small marketing firm from 1990 to 1992, then worked in technical & product support with Mirror Technologies & Envisio for 2 years.
Send your questions to tom@mymac.com. He will personally reply to each message when received and select letters will be included in the MyMac.com Help Desk column.
Leave a Reply
You must be logged in to post a comment.