
Vanishing Point!
When combining images to create a scene, you might find a need to add texture or a pattern along what is supposed to be a three-dimensional object. You might, for example, add a product box to a photo of a kitchen and need to add a logo to the front of the box. Or maybe you will create a room, perhaps in a castle high on a hill, and you’ll need to add a realistic stone texture to the walls. Use the new Photoshop CS2 Vanishing Point feature to “map†a pattern to angled surfaces, such as walls, floors, buildings, and boxes.
Vanishing Point, using information that you provide, automatically determines the correct angle, scale, and perspective. (Vanishing Point is rather complex, so for simple jobs, you might want to stick with the Paste and Edit–>Transform commands.)
To use Vanishing Point, you follow a specific sequence of steps:
1. Copy your pattern.
Open whatever pattern file (or texture or color or logo or whatever) you’re going to add to the walls or sides in your image, make a selection, and then choose Edit–>Copy. You can now close the pattern file.
2. Make a selection in your working image.
Identify where you want the pattern to be applied. If you’re working with walls, for example, make a selection that includes the walls but doesn’t include windows and doors.
3. Open Vanishing Point (Filter–>Vanishing Point).
The Vanishing Point window opens, displaying your image.
4. Create planes on your image in the Vanishing Point window.
a. Select the Create Plane tool (the second tool from the top on the left edge of the window).
b. Click on your image where you want to place the three corners of your plane, and then move the cursor to the fourth corner.
You see the plane extending along the last two sides.
c. When the cursor is in position, click to create the plane.
If the plane is yellow or red rather than blue, it’s not aligned properly. Drag the corners of the plane to realign them, using the Edit Plane tool (the top tool on the left). Drag the side anchor points outward to expand the plane’s mesh to cover the whole wall or side.
d. Create perpendicular planes by holding down the Ctrl key and dragging the side anchor point at the point where the two planes should meet.
If the second plane’s angle is off a little, drag one of the corner anchor points to adjust it. In Figure 10-10, you see two perpendicular planes.
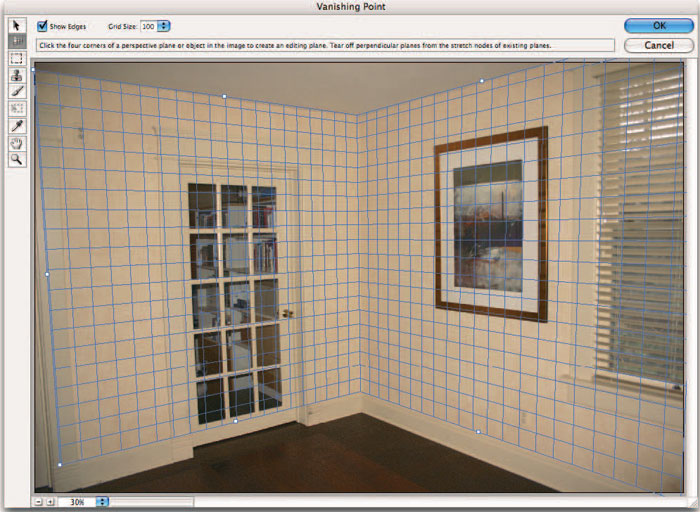
Figure 10-10: Use the Create Planes tool to identify surfaces.
5. Paste your pattern.
a. Press Comand+V/Ctrl+V to paste your pattern into Vanishing Point.
Your pattern is pasted into the upper-left corner of the Vanishing Point window.
b. Select the Marquee tool (third from the top) and drag the pattern into your plane.
The pattern automatically adopts the orientation of the plane. If necessary, press T on your keyboard, and then rotate and scale the pattern.
6. Replicate the pattern.
Unless your pattern is an exact fit, you need to replicate it to fill the plane. With the Marquee tool selected, hold down the Option/Alt key. Then click and drag in your pattern to replicate it. Repeat as necessary to fill the plane. As you see in Figure 10-11, you can replicate a relatively small pattern to fill a large area.
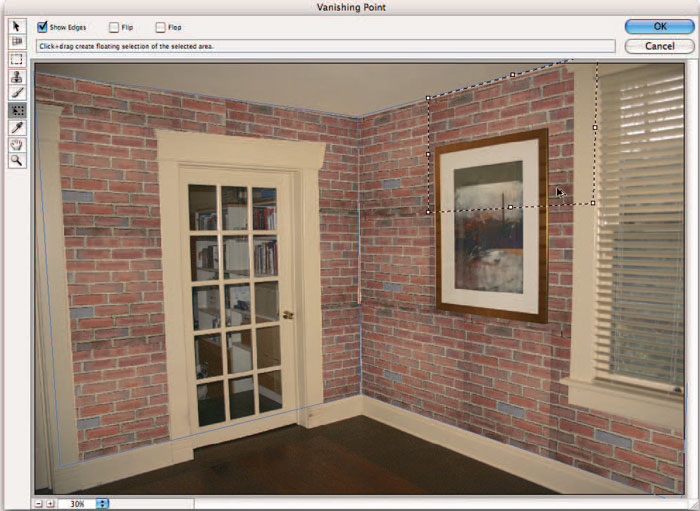
Figure 10-11: Option/Alt-drag with the Marquee tool to copy your pasted selection.
If the lighting in your original image varies, set the Healing pop-up menu (at the top of the window, only with the Marquee tool active) to Luminance. That helps maintain the original lighting on the new pattern or texture.
7. Click OK to exit Vanishing Point and apply the pattern or texture to your image.
After exiting Vanishing Point, you might need to do some touch-up work on your image with the Clone Stamp tool (depending on how precise you were when dragging). You might also, depending on the original image, need to add a layer and paint some shadows or highlights to reproduce the original lighting in the scene.
Here are some tips for working with Vanishing Point:
Create accurate planes; then drag. Click in four corners of any identifiable area of your plane — perhaps a window — and drag the side anchor points outward (or inward) to identify the whole plane.
Use the X key to zoom. Pressing and holding the X key on your keyboard makes the preview area zoom to show the area where you’re working. Release the X key to zoom back out.
Press T to transform. After pasting your pattern, you can press T on your keyboard and then scale and rotate your pasted pattern.
Use the Shift key to drag in alignment. Hold down the Shift key while Option/Alt-dragging to replicate your pattern. That keeps the new part aligned to the old.
Duplicate elements in the image. Make a selection with the Marquee tool and Command +Option-drag/Ctrl+Alt-drag to the area where you want to place the copy.
Paste over objects in Vanishing Point. Create your plane. Use the Marquee tool to select an area that you want to replace, and then hold down the Command /Ctrl key and drag to an area that you want to paste into the marquee selection.
Clone in Vanishing Point. Define your plane, select the Stamp tool, and Option/Alt-click at the source point. Release the Option/Alt key and move the cursor to the point where you want to start cloning. When the preview is properly aligned, click and drag to clone.
Paint in perspective. With a plane identified, the Brush tool in Vanishing Point shrinks or grows in accordance with your perspective plane.
Work on an empty layer. You can add an empty layer in the Layers palette before entering Vanishing Point. Your result is added to the new layer, which lets you work with blending modes and opacity to merge your pattern into the original.
Like it so far? Check out the entire book at the link below!
| About the author PETE BAUER (South Bend, IN) is a Photoshop World Dream Team Instructor, the author of five books on Adobe Photoshop and Adobe Illustrator, and a contributing author to a number of other books. An Adobe Certified Expert (ACE), he is a regular contributor to Photoshop User and Mac Design magazines and writes a weekly column for the computer graphics portal PlanetPhotoshop.com. As the Help Desk Director for the National Association of Photoshop Professionals (NAPP), Pete personally answers more than 25,000 E-mail questions regarding Photoshop and computer graphics. As Help Desk Director, he has contributed to and assisted on such projects as feature film special effects, major book and magazine publications, award-winning Web sites, and fine-art exhibitions. He has taught computer graphics at the university level and serves as a computer graphics efficiency consultant for a select corporate clientele. |
Leave a Reply
You must be logged in to post a comment.